
You are using an out of date browser. It may not display this or other websites correctly.
You should upgrade or use an alternative browser.
You should upgrade or use an alternative browser.
How to bring this antique console table back to its best?
- Thread starter wannadie
- Start date

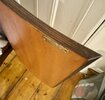
It looks like a veneer finish.
Finely sand it until all varnish is opaque and revarnish with oil based gloss.
Well, that's what I would do anyway.
Finely sand it until all varnish is opaque and revarnish with oil based gloss.
Well, that's what I would do anyway.
I like the mirror
Place some dynamite in it. Place in the garden and light!!
Place some dynamite in it. Place in the garden and light!!

Then with the bits of wood leftover, build another piece of furniture...
I like simple, time saving and practical solutions...
Place some dynamite in it. Place in the garden and light!!
Bruh....
Would it just be the front that is a veneer?It looks like a veneer finish.
Finely sand it until all varnish is opaque and revarnish with oil based gloss.
Well, that's what I would do anyway.
If we sanded it, would it go a lighter colour and could we then oil or wax it?
Attachments
Don't encourage him!!
Then with the bits of wood leftover, build another piece of furniture...
I like simple, time saving and practical solutions...
Definitely veneer then.Would it just be the front that is a veneer?
If we sanded it, would it go a lighter colour and could we then oil or wax it?
Don't hard sand it.
Use 180 or even 240 grit to make the top layer opaque and then recoat.
D
Deleted member 174758
Possibly the top as well. Be extremely careful of sanding veneered surfaces - modern (i.e. post 1920s) veneers are often only 0.4 to 0.6mm thick snd are frighteningly easy to sand through, especially when using power sandersWould it just be the front that is a veneer?
If we sanded it, would it go a lighter colour and could we then oil or wax it?
TBH I'd try to ascertain the date (any makers brands, labels or plates anywhere) and the exact type of finish before doing anything. Modern (i.e. post-WWII), factory made furniture will most likely be pre-catalysed lacquer or 2-pack lacquer, neither of which can be easily repaired - instead you need to strip and refinish. You also need to ascertain the type of finish, but I reckon that modern factory finishes are best scraped off using a cabinet scraper with a decent burr edge before a light hand sanding with P320 sand paper and a wipe over with a clean, lint free cotton cloth dampened with white spirits (to pick up any dust). Watch out for the manufacturer having spray stained different components (e.g.the legs) to get a uniform colour, too, as this may require that you restain the affected part or parts. Parts such as legs with small, lighter coloured chips are probably best dealt with by using an appropriate coloured timber touch-in pen by someone like Konig rather than refinishing
My own preference would be to seal the prepped surfaces after stripping with a light coat of dewaxed blond French polish, followed by a couple of coats of an appropriate sheen clear acrylic lacquer.
BTW, looks reminiscent of the Stag furniture produced in the 1970s and 1980s, but I may well be wrong
Last edited by a moderator:
DIYnot Local
Staff member
If you need to find a tradesperson to get your job done, please try our local search below, or if you are doing it yourself you can find suppliers local to you.
Select the supplier or trade you require, enter your location to begin your search.
Please select a service and enter a location to continue...
Are you a trade or supplier? You can create your listing free at DIYnot Local
Similar threads
- Replies
- 1
- Views
- 968
- Replies
- 6
- Views
- 964
D
- Replies
- 0
- Views
- 879