How to Cut Small Access Door in 300mm Cavity Wall

Joined
13 Mar 2022
Messages
24
Reaction score
0
Country
United Kingdom
Please can i get some advice how to cut a small access door in this wall.

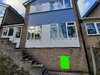
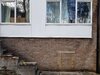
The photo shows the back of my house which has a crawl space below the airbricks. I want to cut an access hole approx 50cm X 70cm to the crawl space, the proposed hole is marked with green colour.

The wall is two skins of 100mm brick and in-between the brick is approx 50 or 100mm concrete which I believe is the footing to the building. Total thickness of this wall is between 250 and 300mm. I know this because my next door neighbours house is exactly the same build and he has the hole already cut. The interior layer of brick does not support anything, it simply stops at the air brick level with nothing resting on top.

I am looking into cutting the hole myself as I am fairly competent by DIY standardards.

I have contacted building control and a structural engineer already just waiting for them to get back to me.

Can you advise how to best cut the wall? The thickness is 300mm and the cut off saws I see for rental generally cut "only" 120mm deep.

All advice appreciated. Thanks.

To add. I have already cut an access hatch in the floor indoors so I can access this wall from the inside. Are there any tools I could use from inside to cut the hole in the inner skin of brick wall? This would simplify the job when hiring the cut off saw to cut the external brick wall and concrete footing. However access from the inside is not vented so making lots of dust is unfortunately not an option.
 

Attachments

  • green hatch.jpg
    green hatch.jpg
    378.9 KB · Views: 164
Last edited:
Sponsored Links
A lot of Stitch drilling with a hammer drill and chisel what's left out would be my first thought.
 
Unless you have money to waste you shouldn't bother with building control or an engineer. Don't try cutting a hole with a cutter, just drill/chisel the bricks out (chain drilling the joints usually helps), fill in the sides with halves cut with a small angle grinder to create a neat reveal. A steel single leaf lintel (they do them at 750mm for gas meter boxes) outside and concrete inside . I don't understand what's going on inside with the "footings", I presume you mean they just filled the cavity with concrete, normally a weak mix so should come out easily?
 
Unless you have money to waste you shouldn't bother with building control or an engineer.

Can you please clarify what you mean? I thought I needed building control to get the certificate. This way when it comes time to sell the house there is no problems. Note I have no intention to sell this house for a long time,

Can you explain why a structural engineer is a waste? My neighbour also said a structural engineer is not needed as the window has a bar at the bottom and is screwed to the sides. This absorbs the weight of everything above. However I do worry about the 8 layers of bricks above my lintel, will they not collapse inwards?

just drill/chisel the bricks out (chain drilling the joints usually helps), fill in the sides with halves cut with a small angle grinder to create a neat reveal.

To use this method and get through the whole 300mm wall would I need to stitch drill 300mm deep in the mortar joints pattern shown in this picture?

This method you mention would have a very good finish. However time is not on my side. To speed up the job I am considering to stitch drill the rectangle shape then tidying up the sides using an angle grinder. If the sides turn out rougher than expected I will concrete and maybe even wooden frame the hatch. I think it would be quicker do you agree? Is there any large negative to doing this method?
 

Attachments

  • half brick method.jpg
    half brick method.jpg
    478.6 KB · Views: 119
Sponsored Links
Technically you would need building regs approval, but for an opening of that size in that position many wouldn't bother - the risk and consequences are quite small - but up to you.

An SE would tell you to lintel the opening, proprietary lintels would be accepted by building control (or building control dodgers) without any calculations.

However I do worry about the 8 layers of bricks above my lintel, will they not collapse inwards?

Sorry, I don't understand this, unless you mean will they drop before you get the lintel in - they won't, they will self support over that span.

Regarding cutting the opening you would deal with each skin and the cavity fill separately (in essence you're cutting an opening in 3 separate walls, as I said before, the concrete in the cavity will be a weak mix ( we used to use 10:1) and should break out easily with a hammer and chisel.

You could cut the opening with a grinder or stitch drill - personally I think the making good is hard work compared to closing with half bricks, especially as you'll have mortar on hand to do the lintels.
 
I sent some photos and explained the three skin structure of the wall to a local one man band structural engineer. He explained over the phone that there is no need for him to come out and charge me, cutting a hole this size will not make the wall collapse and a lintel is needed.

I have bought a Titan TTB653SDS SDS drill. A few SDS Plus drill bits and an angle grinder with a 22cm masonry cutting disc. 900mm X 65mm X 100mm concrete steel reinforced lintel. Also a bag of mortar.

I attach a photo showing the size of the proposed door, super imposed over the actual wall I will be cutting.

Also I attach a photo of my plan of how to cut this hole. I will do this in the following stages.

Stage 1. stitch drill the outline of the lintel to a depth of 110mm using a 6mm drill bit. Then choose 1 brick and drill a few 12mm holes in it. Then use the SDS chisel function to smash the first brick out. Repeat for the 900mm wide lintel hole. use SDS chisel to remove mortar from top and bottom of lintel hole. Then use hammer and chisel to relatively smooth the sides. Then install lintel with mortar.

Stage 2. wait a few days for the mortar surrounding the lintel to dry.

Stage 3. working from top down. The hole will be 2 and half bricks wide which means for each layer of bricks I remove one side will be mortar which I will stitch drill and make good with a hammer and chisel. The other side will be brick which needs to be cut in half when in situ because the concrete in the cavity is holding it in place. I will cut the brick side with the angle grinder where I want the tidy edge, then stitch drill on the inside of the hole. I hope this method will allow me to break out the bit I need and leave a little bit which i can easily tidy up with a hammer and chisel. Picture shown.

Stage 4. Once the sides are cut for 2 rows of outer layer bricks then i will deal with the remaining 2 skins which are the concrete cavity 80mm and inner brick skin 100mm. I will need to stitch drill the sides and put some 12mm drill holes in the middle and then the sds chisel to smash through.

Stage 5 Repeat stage 3 and 4 for the 10 layers of brick to be removed for the hole.

Pics attached, I will try to take pics as I go to update the progress here in case it helps anyone in the future.

I will use the method above and hopefully it will give me a reasonably smooth finish to the sides at least good enough I can fill with concrete. If it doesnt then I will need to stitch drill out any bricks and replace with half bricks as per the method mentioned by cdbe.
hole in wall.JPG
hole method.JPG
 
Doubt very much the cavity is filled with concrete/mortar.

Once you have the first brick out in the lintel area, you’ll see the cavity thickness and what it’s full of or not.

you could also use the grinder to cut the mortar line, where the lintel is going... less work with the drill, stitching.

keep us all posted. (y)
 
Pics from today.

that sds drill goes through brick and mortar like a hot knife through butter.
First brick cut was the hardest to get out. Had to spot drill with a 6mm sds bit all around then swiss cheese the brick with a 12mm drill bit. Then used sds chisel to break it out bit by bit. After first brick removed i saw the concrete layer behind.

I spot drilled around the lintel line as planned with a 6mm sds drill bit. Then used the sds chisel which after the first brick removed did a really good job.

The second row of bricks came out very quickly because there is a lot of space above so the sds chisel was very fast and could take out big chunks at a time.

Installed the lintel and mortared all around. Total time spent today was about 3 and half hours total but I'm not racing and it's my first time tackling this sort of job.
 

Attachments

  • 20220324_141441.jpg
    20220324_141441.jpg
    683.2 KB · Views: 103
Last edited:
More pics
 

Attachments

  • Screenshot_20220324-183227_Gallery.jpg
    Screenshot_20220324-183227_Gallery.jpg
    286 KB · Views: 123
  • Screenshot_20220324-183229_Gallery.jpg
    Screenshot_20220324-183229_Gallery.jpg
    303.7 KB · Views: 117
  • Screenshot_20220324-183236_Gallery.jpg
    Screenshot_20220324-183236_Gallery.jpg
    283.3 KB · Views: 107
  • Screenshot_20220324-183336_Gallery.jpg
    Screenshot_20220324-183336_Gallery.jpg
    174.8 KB · Views: 121
A question if anyone knows.

Would it be OK for me to continue cutting the hole tomorrow? Or am I best to leave the lintel mortar for a few days to harden.

If I start drilling tomorrow that fresh mortar around the lintel has only had 12hours to set so I wonder if drilling will upset it.
 
A question if anyone knows.

Would it be OK for me to continue cutting the hole tomorrow? Or am I best to leave the lintel mortar for a few days to harden.

If I start drilling tomorrow that fresh mortar around the lintel has only had 12hours to set so I wonder if drilling will upset it.

If you can continue without disturbing the fresh mortar, then continue. The brickwork and lintel will not need much support short term.
 
Pics of the result from yesterday.

For the first skin of brick, I used the angle grinder along all of the edge. This gives the nice tidy edge. The 22cm mortar disc cuts very easily through this brick but the down side is that it doesn't go very deep. Then getting started was tough but using the sds drill and sds chisel works well.

Then onto the second skin of concrete. For this I used again the sds drill and sds chisel. In the pics you can see I've got the majority of that concrete out. I spent about 2 to 3 hours yesterday and quite happy with the progress. If doing this in the future I would use the angle grinder to cut a grid shape in the concrete then the sds chisel would smash through easier.

As per the picks I now need to angle grinder the edges to tidy them up. Then deal with the last skin of brick which should be easier than the first two.

I also need to design, build and paint the door. The door nees to fit well as I want it to be rain proof, mouse proof and a good lock maybe a mortice lock.

For the door my neighbour used floorboards with a z frame behind. Then battened the inner lining of the hole and attached the door to that.

If anyone has got tips on a good door material or how to build and fit the door I'd be happy to hear them.
 

Attachments

  • Screenshot_20220326-085130_Gallery.jpg
    Screenshot_20220326-085130_Gallery.jpg
    215.9 KB · Views: 113
  • Screenshot_20220326-085133_Gallery.jpg
    Screenshot_20220326-085133_Gallery.jpg
    283.9 KB · Views: 128
Some photos from when the hole was knocked through.

Dealing with the last skin was the quickest. Working from the bottom up. Deal with one row at a time. Stitch drill the sides then sds chisel to the top mortar of each layer of brick. The weight of each layer helps it break and fall down.
 

Attachments

  • Screenshot_20220403-175548_Gallery.jpg
    Screenshot_20220403-175548_Gallery.jpg
    170.6 KB · Views: 110
  • Screenshot_20220403-175550_Gallery.jpg
    Screenshot_20220403-175550_Gallery.jpg
    236.1 KB · Views: 104
  • Screenshot_20220403-175553_Gallery.jpg
    Screenshot_20220403-175553_Gallery.jpg
    195 KB · Views: 99
  • Screenshot_20220403-175557_Gallery.jpg
    Screenshot_20220403-175557_Gallery.jpg
    123.4 KB · Views: 99
Here's a photo of the space under the house. It's 2.5 meters wide.

This is actually only half of the space. I need to cut a hole in the left wall which will allow access to the other half of the space.

It tapers upwards as it goes deeper in.
 

Attachments

  • Screenshot_20220403-175600_Gallery.jpg
    Screenshot_20220403-175600_Gallery.jpg
    111.9 KB · Views: 86
  • Screenshot_20220403-175605_Gallery.jpg
    Screenshot_20220403-175605_Gallery.jpg
    170.9 KB · Views: 76
Then I used an angle grinder to flatten the sides and bottom of the outer skin in preparation for the frame. 100mm x 20mm treated timber.

Then I built the door from shiplap treated cladding 20mm thick.

Some small bits left to do like need a hasp, silicone or mortar the gap between the frame and wall. Install inner frame so the door has something to butt up against.

But the vast majority is dome. It was my first time doing anything like this. Took about 10 hours to get here excluding planning time.
 

Attachments

  • Screenshot_20220403-175609_Gallery.jpg
    Screenshot_20220403-175609_Gallery.jpg
    219.5 KB · Views: 101
  • Screenshot_20220403-175611_Gallery.jpg
    Screenshot_20220403-175611_Gallery.jpg
    229 KB · Views: 99

DIYnot Local

Staff member

If you need to find a tradesperson to get your job done, please try our local search below, or if you are doing it yourself you can find suppliers local to you.

Select the supplier or trade you require, enter your location to begin your search.


Are you a trade or supplier? You can create your listing free at DIYnot Local

 
Sponsored Links
Back
Top