How to fit concealed shower head to wall plate elbow

Joined
31 Aug 2014
Messages
75
Reaction score
0
Location
Aberdeenshire
Country
United Kingdom
Hi all.

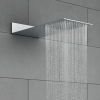
Ok, so I'm just about to refit our bathroom and I'm pretty much ok with most of it, but looking at the shower head (pic below) there are no instructions on how to fit. I am presuming it screws straight into the wall plate elbow but it's the detail of this I'm not sure about. Again, I presume you locate the elbow so it's pretty much flush with the surface of the tiles when they're installed? Then you simply wrap the thread of the shower head with ptfe and screw onto the elbow? My concern is how do you know at what point the head will be tight enough? If the head is tight before the end of the thread then it won't be flush. And also, once installed it's impossible to check for leaks behind.

So just some general advice would be appreciated.

Thanks.
 

Attachments

  • shower head.png
    shower head.png
    186.8 KB · Views: 839
Sponsored Links
have you given due consideration to your plumbing system pressures ? no idea how that particular shower head is connected to pipework and fixed to the wall ,that should be within the makers installation instructions . before you cover the hidden pipework ( plasterboard /tiles etc ) you must flush and pressure test the pipework ..
 
Trial and error will get it looking in the correct angle,be prepared to try a few times.

Hand tight and at least 1.5 turns extra turns,again be prepared to try a few times.

have you got any info for that fancy outlet ? technical fitting instructions ?
:rolleyes:
 
No bloody instructions whatsoever! There are some downloadable instructions, but they tell you all about aftercare and little else: https://images.victorianplumbing.co.uk/images/pdf/CSSH01instruction.pdf

But am I basically right in assuming the head screws into a flush with tile elbow plate?

The pressure here is 3 bar and the head runs between .5 and 5 bar.

Below is a pic of the head and you can see the fitting I have to work with.
 

Attachments

  • IMAG1405.jpg
    IMAG1405.jpg
    82.9 KB · Views: 1,136
Last edited:
Sponsored Links
can u post pics of the components that you have. you may get another contributor on here that has personal knowledge of the one that you have, but pics tell all
 
That brass nut looks like a back nut, and it looks as if the threaded shank is designed to go through a hole in the wall, rubber washer between shower head and wall, then back nut screwed up tight to secure. Connection to pipework likely to be a 15mm compression fitting, or possibly a tap connector, onto the end of the threaded shank. If I'm correct, you'll need access to the other side of the wall.

If the threaded end will fit into a tap connector, you might get away without using the back nut. Fix the tap connector firmly in the wall, making sure there's going to be adequate support against wall / tiles for the shower head. Then rough the threads on the shank up (very gently) with a file, and use Loctite 55 wound over the threads (not in them). The Loctite 55 allows you to undo the fitting by about 1/4 turn while still sealing. I'd start with about 10 wraps, and work up from there until its right. If you have to try more than once, remove all the old Loctite 55 before each attempt.

EDIT - for tap connector above please read wall plate elbow.
 
Just a quick additional thought....I guess looking at the fixings a little more on the head - in particular the large nut, I'm now thinking they expect you to fit the head through a hole in the tiles and backer, lock it into place with the locking nut and finally plumb it in. All assuming I have a stud wall which I can hack into on the other side. Oh joy. Surely I'm wrong?
 
thanks ,I can see the brass backnut but what is the black bit next to the chrome shower head ? is it detachable ? it looks like you need a half inch bsp female fitting ,which must be fixed rigidly, and squarely, as it has to support the weight of the shower head. that then just screws into it ,PTFE tape sealing the threads.
 
Lol, that will teach me to post before I check for replies oldbuffer....you beat me to it! Given the choices I think I may go with the option to fit from the other side. Heck, it's only more work and old lath and plaster mess isn't it?

Thankyou for the additional alternative info, I now have a choice!
 
thanks ,I can see the brass backnut but what is the black bit next to the chrome shower head ?

Thanks Terry. The black part are two rubber washers. So I think oldbuffer is right and it's expected to be fitted through a hole and accessed on the other side to lock it. I have the studs all exposed bathroom side so I'll fit in some ply, then tile backer and tiles over it. Drill a hole, insert the head and go through on the other side of the studwall to lock into place and plumb. That way it will be solid, safe, and I can check for leaks etc.

Does that make sense guys?

Thanks for all your help here.
 
the idea of having the joint inside the stud wall would worry me ,as if it leaks you wouldn't know until you see the damage ,usually below on a ceiling !! and it would be wise if you left a permanent access on the reverse wall. I would want the joint in the shower and sealed to tiles,so of it leaks it runs down the tiles into tray. what else comes with the shower head , valve and connecting pipe I presume ?
 
Not ideal I know. "Oh I like the idea of a concealed shower head" says the missus. Mind you to be fair so did I. The good news (ish) is that it's a downstairs bathroom with suspended floor. Yeah, there's a thermostatic shower valve to fit as well which also leaves a lot down to interpretation as far as instructions go. So, there will be plenty of concealed joints going off!
 
From the new picture showing the clamping nut/washers,this head needs to be clamped to a tiled plasterboard wall/tilebacker type board and then the water connection made with something like this below.
Trying to screw the head into a fixed female thread could result distortion or damage an experienced installer would be able to get away with it thou :idea:


18748.jpg
 

DIYnot Local

Staff member

If you need to find a tradesperson to get your job done, please try our local search below, or if you are doing it yourself you can find suppliers local to you.

Select the supplier or trade you require, enter your location to begin your search.


Are you a trade or supplier? You can create your listing free at DIYnot Local

 
Sponsored Links
Back
Top