

So I've got a three piece wall mounted tap that I'd like to fit in a solid wall in my bathroom (Hudson Reed Topaz - https://www.hudsonreed.co.uk/products/traditional/taps/topaz-hexagonal/BC309HX).
It's back to briclk at the moment ten I'll be adding battens, insulation, aquapanel and tiles so probably won't need to chop out much brickwork. The taps look straightforward enough as they can be attached to the wall first then there's a tight fitting shroud that can be fitted after tiling to cover any gap.
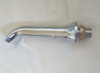
I'm struggling to see how the spout is going to work though. As you see from the picture it's a single piece with a thread on the end and a backnut, as though it's designed to be screwed on from beind. Obviously that won't work for me (or indeed anyone wall mounting!).
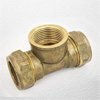
The only suggestion I've seen seems to involve using a threaded tee (like the one attached) mounted at precisely the right depth and sufficiently rigidly to support the spout, with the spout screwed in after tiling.
My concern with this is how to get it to be the right depth without knowing things like the thickness of the tiles and adhesive. It seems quite risky because if it ends up too far back there's not a lot that can be done after it's all tiled in and if it's too far forward it will look terrible. Also how to be sure it's not leaking when you can't see behind it after screwing it in. Finally, if it's only attached to the tee piece like that it feels like it could be a bit wobbly!
Has anyone got any experience of fitting something like this? Is it really just a case of stick some ptfe round the thread, screw it in and hope for the best? Or is there some way fo getting a bit of extra tolerance on the depth? Or am I missing something and it's all way more straightforward than I imagine?
It's back to briclk at the moment ten I'll be adding battens, insulation, aquapanel and tiles so probably won't need to chop out much brickwork. The taps look straightforward enough as they can be attached to the wall first then there's a tight fitting shroud that can be fitted after tiling to cover any gap.
I'm struggling to see how the spout is going to work though. As you see from the picture it's a single piece with a thread on the end and a backnut, as though it's designed to be screwed on from beind. Obviously that won't work for me (or indeed anyone wall mounting!).
The only suggestion I've seen seems to involve using a threaded tee (like the one attached) mounted at precisely the right depth and sufficiently rigidly to support the spout, with the spout screwed in after tiling.
My concern with this is how to get it to be the right depth without knowing things like the thickness of the tiles and adhesive. It seems quite risky because if it ends up too far back there's not a lot that can be done after it's all tiled in and if it's too far forward it will look terrible. Also how to be sure it's not leaking when you can't see behind it after screwing it in. Finally, if it's only attached to the tee piece like that it feels like it could be a bit wobbly!
Has anyone got any experience of fitting something like this? Is it really just a case of stick some ptfe round the thread, screw it in and hope for the best? Or is there some way fo getting a bit of extra tolerance on the depth? Or am I missing something and it's all way more straightforward than I imagine?

")