I have replaced all the light switches and sockets etc on the ground floor of our house.
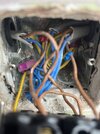
So (presumably) photos #3, #4 and #5 show the existing switches which you have installed/replaced.
Although the "wiring side" has not been shown in #4 and #5, these appear to be "ordinary" On/Off Toggle switches, controlling individual lights (or groups of lights).
(Please advise.)
I’m stumped on how to fit this dimmer module though.
Can anyone please talk me through how to install this.
According to
https://enkin.com/products/ss-en-00-idm250-enkin-in-line-dimmer
"The IDM250 In-Line Dimmer has been designed to allow for multi-point dimming of your lights, which works by converting a
retractive switch or toggle into a dimming module with a neutral position.
By holding the
retractive switch down you can control the brightness of your lights,
and
with a simple click
you can turn your lights on and off, allowing you dimming control from multiple switches."
(In my opinion, the above is not well worded !)
lists the "SGP316 20A 1 Way
Retractive Switch", of which you say that you have
two.
If the above is correct, that which needs to be done is as follows,
(after disconnecting the "Supply")
Disconnect the Incoming and Outgoing Line wires - and the Interconnecting Line wire - from the existing switches
(Probably connected to the Common terminals!)
Tie these wires together and note for future reference.
Remove the Outgoing Switched Line wires to
each of the Lights and
note these for future reference
Remove the two existing "toggle" switches
and
install the two SGP316 20A 1 Way
Retractive Switches.
Position the two IDM250 In-Line Dimmers.
(I do hope that there is enough space in the Back-Box, otherwise a "spacer" may be required !)
Connect
(by "Daisy Chaining") the Incoming, Interconnecting and Outgoing Line wires to the "C" terminals of the two "Dimmers".
Connect
each of the Outgoing Switched Lines (to the Lights) to the "L" terminal of
one of the "Dimmers" - as appropriable.
Connect terminals "C" and "1" of
each Retractive Switch to terminals "1" and "2" of
one of the "Dimmers" - as appropriate.
(Which way around does not matter.)
Good Luck.