How to remove a floorboard under a doorframe

Joined
30 Aug 2010
Messages
705
Reaction score
4
Location
London
Country
United Kingdom
I'd appreciate your advice. How should I go about removing a floorboards from underneath the upright of a doorframe? I tried to knock it sideways but it's not budging. I'm guessing it's nailed in to the upright but I don't know if that's the case. If I can get the floorboard out I can stick a smaller piece under the upright as I slide the old board our so that the doorframe doesn't drop. I'd appreciate your advice

IMG_20211212_105507634.jpg


Here's a pic of what above the door
IMG_20211212_110416625.jpg
 
Last edited:
Sponsored Links
It's probably nailed to the joist the same way the rest of them were, but then the door casing and architrave were fitted and covered over the nail head. I'd be tempted to use a broad screwdriver or scraper of some sort to open up a gap between joist and floor board, then use a hack saw (or multitool) to cut the nail. Are you trying to do it without cutting up the floor board?

Nozzle
 
Last edited:
It's probably nailed to the joist the same way the rest of them were, but then the door casing and architrave were fitted and covered over the nail head. I'd be tempted to use a broad screwdriver or scrap of some sort to open up a gap between joist and floor board, then use a hack saw (or multitool) to cut the nail. Are you trying to do it without cutting up the floor board?

Nozzle
Thanks for taking the time to reply. I don't mind cutting up the floorboard. If it's nailed to the joist then doing as you suggested should pretty straightforward. I've got the Bosch multitool so will get a blade and give it a go. Is this the best blade for the job?
 
Last edited:
If a multi tool doesn’t do it then maybe a reciprocating saw and metal blade would do it
 
Sponsored Links
I don't have a reciprocating saw but I do have the Bosh multitool. Anyone here done this sort of job with a multi tool and can tell me which blade will cut floorboards nails?
 
If they are modern steel nails you'll struggle - even with older wrought iron cut nails it won't cut that well. In any case the blades are probably not long enough because it'll probably be the stud leg behind the door casing which is nailed to the floor, not the casing. Without a recip saw I think your best bet would be to cut out the board either side and trim back because your stud legs appear to have been skew nailed through the floorboards into the joists below without any sort of sole plate being installed - so if you cut through the nail (actually, probably two - one either side) which fixes the stud to the joist, the bottom of the wall will start moving as it won't be secured
 
Last edited by a moderator:
If they are modern steel nails you'll struggle - even with older wrought iron cut nails it won't cut that well. In any case the blades are probably not long enough because it'll probably be the stud leg behind the door casing which is nailed to the floor,not the casing. Without a recip saw I think your best bet would be to cut out the board either side and trim back because your stud legs appear to have been skew nailed through the floorboards into the joists below without any sort of sole plate being installed - so if you cut through the nail (actually, probably two - one either side) which fixes the stud to the joist, the bottom of the wall will start moving as it won't be secured
What is a stud led? What's a sole plate?
 
Stud "leg" = vertical stud. Basically the conventional way to build a stud wall both in Victorian times and now was/is to build a frame with a sole plate on the floor, a header at the ceiling and have studs nailed to the header and sole plate in between. The header is fixed into the ceiling joists whilst the sole plate is fixed into the floor joists. This isn't writ in stone, there are variations, but it is by far the most common arrangement

Stud Wall Sketch.jpg


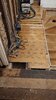
Note the orientation of the studs.

Your wall is very thin and in order to make it so thin they have turned the studs through 90 degrees to gain maybe an extra inch of space in the room on one side (I think). It is lacking a sole plate, presumably because whoever built it didn't have any 2 x 2 timber to make one and it was too much effort or time to rip some 4 x 2 down to make one up (hand ripping timber is quite hard work and you wouldn't get long enough nails easily to fix through a 4 x 2 edge on - I assume your studs are approx. 4 x 2in).

Stud Wall No Sole Plate Sketch.jpg


What they have done instead is to skew nail each stud through the floor boards and into the joists to fix it all in place (two nails, as in my grotty sketch below).

This means that if you cut the nails under that last stud (the one next to the door casing) you'll end up with that stud flapping about in the breeze because it will no longer be anchored to the building at the bottom. Do not assume that the door casing is fixed to the floor - that is very rarely done, either now or back then - it will be fixed to the stud. This is why I suggested cutting round that piece of floor plank and just leaving it in situ. Hope the sketches make it a bit clearer

A fine example of Victorian jerry building if I may say! Don't you just love working on old buildings (y)

Edit: Just looked at your door casings again - the header is joined straight into the existing stud and the jamb (the upright bit) looks like a reworked piece of matchboard fixed directly onto the stud as well. Now that is corner cutting!

P.S. Don't get me wrong, I also live in a Victorian terraced house and some of the short cuts used by the builders would have caused an apopleptic fit in one of my mentors - but 140 years on and it's all still standing, so...
 
Last edited by a moderator:
Thanks, I learned a lot from your explanation.

If I understand you correctly, every stud would have 2 skew nails. So in theory, if drive a skewed screw where the red arrow is before I cut the nail where the black arrow is, would the stud be attached to the building with one new screw and one original nail?

Stud Wall No Sole Plate Sketch.jpg
 
Well, think about it - the stud is also sitting on top of the floorboard, so if you take the floorboard out you'll need to repack beneath the stud before you refix it (the floor board is in effect a packer). You'll also need to make sure that the door still closes correctly. If the stud has moved at all you'll need to correct it. TBH that's why I recommended just cutting round it - it's a lot less work with less to go wrong
 
Whack it hard with a sledgehammer back and forth. Something has to give. When it's out you can get a hacksaw under the frame to trim off the nails.

43F7F31B-640F-48B4-B98D-F1C012E29225.jpeg

Why do you need to remove it?
 
Thank you all for your help so far. I got the said floorboard out but the nails pinning the stud to the joist is as was. I am about to change the floorboards on the landing and could use your expertise with how to finish the stairwell edge of the landing.

IMG_20211227_171147677.jpg
 

Attachments

  • IMG_20211227_171147677.jpg
    IMG_20211227_171147677.jpg
    302.4 KB · Views: 63

DIYnot Local

Staff member

If you need to find a tradesperson to get your job done, please try our local search below, or if you are doing it yourself you can find suppliers local to you.

Select the supplier or trade you require, enter your location to begin your search.


Are you a trade or supplier? You can create your listing free at DIYnot Local

 
Sponsored Links
Back
Top