• Looking for a smarter way to manage your heating this winter? We’ve been testing the new Aqara Radiator Thermostat W600 to see how quiet, accurate and easy it is to use around the home. Click here read our review.

Installing Class 2 Pendant into existing Loop circuit

Joined
28 Nov 2024
Messages
5
Reaction score
1
Country
United Kingdom
Hello

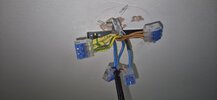
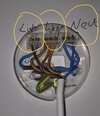
I've unscrewed the standard pendant light fitting in q bedroom to find the below combination of wires all hooked into various positions, 2 wires into Live, 3 brown into Loop and 3 blue into Neutral as labelled.

My new pendant is a Class 2 and only has 2 positions for the Live and Neutral.

See pictures.

How do I go about wiring up the new pendant? Where do all the other wires need to go?

I know for class 2 I'd terminate the earth and then wrap it up in electrical insulation tape. But no idea how to deal with the other 6 wires.
 

Attachments

  • 20241124_171824.jpg
    20241124_171824.jpg
    306.1 KB · Views: 170
  • 20241128_093814.jpg
    20241128_093814.jpg
    247.7 KB · Views: 104
The blue with brown sleeve (live) to new lamp live (brown). The two blues (neut) to new lamp Neutral (blue). The three browns need to be connected together in a third terminal you'll need to provide. The earth's need to be connected together in a fourth terminal you'll need to provide.
 
Last edited:
Sometimes (if the new cover is large enough), it's possible to slip the fixing bracket under the existing ceiling rose, keeping the existing wiring neatly in place.

However, I'm afraid that although the light fitting has a double insulated symbol(and CE markings etc.), with the short length of cable and terminal block for attaching it to the supply; it can't be double insulated.
With those connections, the metal cover should have an earth connection.
If the cable was longer, it could have a small junction box like..
1732789204904.jpeg

to maintain the double insulation.
Or the cover cap could have been plastic.

As it is, the relative risk is small, just keep the wires away from the metal work where it could be trapped, and ensure the wiring is neat and tidy, with minimal copper showing and no loose strands.
 
Use wago's and wago box if you cannot fit the wago's in the fitting itself. Lots of DIY/ electricians are tempted to just replicate the the wiring on the rose using choc connectors and some insulation tape. and shove the connectors back up in the ceiling void, you should avoid that.

You will need :

a three way for the Live

a three way for the neutral

a two way for the switched live.

a 3 way for the earths /CPC... you need to use three core to the light fitting as its metal currently the earth loop is joined at the rose as it is not used in an all plastic pendant, I am assuming that the mounting bar for the fitting has an earth connector on it.

and a box - https://www.screwfix.com/p/wago-41a-junction-box-39-x-108-x-44mm-grey/7355f

Of course you will need a short length of 3 core 1.5mm for the light itself.
 
If you use wagos and it’s contained by the ceiling and the new light fitting an enclosure for the wagos isn’t required
 
The blue with brown sleeve (live) to new lamp live (brown). The TWO blues (neut) to new lamp Neutral (blue). The three browns need to be connected together in a third terminal you'll need to provide. The earth's need to be connected together in a fourth terminal you'll need to provide.
 
Sometimes (if the new cover is large enough), it's possible to slip the fixing bracket under the existing ceiling rose, keeping the existing wiring neatly in place.

However, I'm afraid that although the light fitting has a double insulated symbol(and CE markings etc.), with the short length of cable and terminal block for attaching it to the supply; it can't be double insulated.
With those connections, the metal cover should have an earth connection.
If the cable was longer, it could have a small junction box like..
View attachment 364400
to maintain the double insulation.
Or the cover cap could have been plastic.

As it is, the relative risk is small, just keep the wires away from the metal work where it could be trapped, and ensure the wiring is neat and tidy, with minimal copper showing and no loose strands.
I missed including this small plastic box in my photo, think this should do the trick.
 

Attachments

  • 17328717612841626224766638324848.jpg
    17328717612841626224766638324848.jpg
    405.1 KB · Views: 69
I missed including this small plastic box in my photo, think this should do the trick.
Yes, that would theoretically mean the fitting was double insulated.
So ignore the rant! :)
It still doesn't make it easy to connect to a traditional UK lighting circuit and maintain the double insulation, but they can say that's not their problem!
 
Do the 3 brown need to be in any specific order when they go in their separate terminal.

I've got it working, all the rest of the lights upstairs work too, as does the landing light. However upstairs bathroom light/extractor/vanity light dont work!

Thought I'd followed all above to the letter.
 
Last edited:
Show us a picture of your connections. Check the copper conductors are clamped not the outer insulation.
 
Show us a picture of your connections. Check the copper conductors are clamped not the outer insulation.

All working now, I unclamped and reclamped everything.

This is where I'm at, does this look correct? I think it must have been a bad clamp connection

But just been re-reading one of the above comments, is this safe to go back into the pendant housing now as is? I've not used the supplied insulation box that came with the pendant as its too difficult to get 2 neutrals into it.
 

Attachments

  • 20241130_142317.jpg
    20241130_142317.jpg
    130.2 KB · Views: 68
Your fitting is class 2 ( double insulated) ,putting all those wires as they are and terminated in connectors is not the way it should be done ,and negates it's class 2 rating.
If you can access above the ceiling terminate all the wires within a maintenance free junction box ,and add a two core cable ( neutral and switch live) between the junction box and the light fittings double insulated terminal block.
 

If you need to find a tradesperson to get your job done, please try our local search below, or if you are doing it yourself you can find suppliers local to you.

Select the supplier or trade you require, enter your location to begin your search.


Are you a trade or supplier? You can create your listing free at DIYnot Local

 
Back
Top