Hello,
I'm converting some old stables/sheds into holiday cottages and have a wall insulation question..
The solid brick walls are very uneven being lime mortar and in quite poor condition being soft clay bricks. I considered fitting batterns to the walls and gain a plumb to work from but like I said the walls are quite poor in a number of places so opted instead to pour a new 4" thick concrete base (slightly thicker Upto 6" around the edge for the studwork to sit on) with DPM then build a 3"X2" stud wall onto the new concrete base using gypliner brackets just above the wall tanking membrane to provide greater support for the stud frame. In some places along the bottom the cavity is only an 2" but higher up where the wall meets the vaulted ceiling the gap is up to 4-6".. I now have a very solid studwork that I know will last well past my lifetime..
I planned to PIR 100mm rigid insulation between each 75mm stud thus 25mm would project out the rear but therefore out of sight. I would initially leave say 400mm PIR insulation from the top of each stud. Then I want to pour vermiculite insulation down the back letting gravity do the work filling all the remaining cavity void between the PIR and uneven brickwork. Finally, then putting the remaining insulation PIR into the top and plasterboard to finish.
Do you think this would be a good idea?? Would there be any risk of dew forming on the brickwork when I am completed. I guess not as I'm eliminating any void by using the vermiculite but just wanted to put it out there and gain some advice..
Thanks
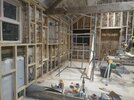