(Now added photos on my third post).So my next question is the best way to "deal with" a piece of timber infill above a window, immediately below the joists
The window is flush (casement?),so currently no sill/reveals.
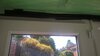
There was a UPVC window/door unit in situ when we bought the house and when we started pulling the 70's wood panelling of the ceiling it became clear that the fitters had just covered the gap (presumably where there was once a course of bricks ) with interior/exterior PVC trim, with nothing but fresh air between the 2.
Our joists run parallel to the window and there certainly wasn't room for a soldier course, just the continuation of the brick course at either end.
We've recently had the window and door replaced and the installer filled the gap with rockwool and timber on the interior and PVC trim on the outside.
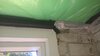
With the PIR boards between the joists above the window/door the timber is vertically proud of the front of the frame and interior brickwork at either end by about 25 mm
It's also horizontally proud by about 42 mm.
We'll be putting up insulated PB 62.5mm across the joists, but what's the best way to deal with this bit of timber?
Thought was that we could notch out the insulated PB so it fits around the bit of timber. This way the vertical face will have insulation across it, but the horizontal face will be left uninsulated and about 20 mm up behind the ins' PB and will be impossible to do anything with surely?
I know that when we put the wall insulation on(50mm between 75 battens,then 50mm insulated PB over the battens) we're going to create side reveals and a sill which we'll then put insulated PB on, but cannot work out how to deal with this bit of proud timber immediately above the window.
The window is flush (casement?),so currently no sill/reveals.
There was a UPVC window/door unit in situ when we bought the house and when we started pulling the 70's wood panelling of the ceiling it became clear that the fitters had just covered the gap (presumably where there was once a course of bricks ) with interior/exterior PVC trim, with nothing but fresh air between the 2.
Our joists run parallel to the window and there certainly wasn't room for a soldier course, just the continuation of the brick course at either end.
We've recently had the window and door replaced and the installer filled the gap with rockwool and timber on the interior and PVC trim on the outside.
With the PIR boards between the joists above the window/door the timber is vertically proud of the front of the frame and interior brickwork at either end by about 25 mm
It's also horizontally proud by about 42 mm.
We'll be putting up insulated PB 62.5mm across the joists, but what's the best way to deal with this bit of timber?
Thought was that we could notch out the insulated PB so it fits around the bit of timber. This way the vertical face will have insulation across it, but the horizontal face will be left uninsulated and about 20 mm up behind the ins' PB and will be impossible to do anything with surely?
I know that when we put the wall insulation on(50mm between 75 battens,then 50mm insulated PB over the battens) we're going to create side reveals and a sill which we'll then put insulated PB on, but cannot work out how to deal with this bit of proud timber immediately above the window.
Last edited: