Joining all 3 water pipes together (2 waste and 1 rain)

Joined
28 Aug 2015
Messages
58
Reaction score
0
Location
South Wales
Country
United Kingdom
Please see https://www.diynot.com/diy/threads/share-your-diy-projects-with-us-no-queries-please.74081/
As already suggested in this forum and it would be much easier to join all pipes (2 waste pipes and 1 rain water pipe) together so that there is just one pipe going to the gully drain.

Please see photos for clarification and exactly what parts do we need. We would like to get all parts and tools from ScrewFix or Wickes.
 

Attachments

  • 2 waste pipes joining the RWP.jpg
    2 waste pipes joining the RWP.jpg
    5.2 KB · Views: 332
  • 20151220_122122.jpg
    20151220_122122.jpg
    165 KB · Views: 335
  • 20151220_122139.jpg
    20151220_122139.jpg
    131 KB · Views: 306
  • 20151220_122254.jpg
    20151220_122254.jpg
    110.4 KB · Views: 316
  • 20151220_122319.jpg
    20151220_122319.jpg
    197.8 KB · Views: 332
Sponsored Links
You shouldn't really be doing this. The original rainwater pipe is the main indicator of what the drain is being used for- surface water, which is often separate to the foul drainage, can go out to rivers; adding in the waste water from the sinks is going to contaminate this. Wickes and screwfix aren't going to give you the connectors you need to to join waste and rainwater pipes together, so you may have to be content with just joining the two waste pipes together. You would normally use a hopper as a break in the rain water pipe, and then direct the waste pipe in to it, but you can only do that with the upper outlet pipe; the lower one is too low to to do this trick. A builders merchant might have something, but I doubt it.
 
I was thinking of joining the 2 white waste pipes together using a tee plastic section or something and then further down the pipe, thinking of fitting a reducer to join them to the black plastic Rain Water Pipe so that this is the only one that goes to the gully drain eventually.
 
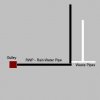
Okay, Use the bottom waste pipe as you're starting point. Measure the distance from where it comes out of the wall, to where it's going to join the rain pipe, and calculate a 1:40 fall. It looks to be about 1.4mtrs, so you'd have a drop of about 35mm (Sorry if I'm teaching you maths that you already know, but best to do this properly) and set up your waste pipe supports accordingly. Take the upper waste pipe down in to the lower pipe, and join it with an equal T (screwfix part no 99915), but be careful to join everything up dry, and then plastic cement (from a plumber merchant as screwfix don't sell it) it when you're certain of the angles. You can't actually go straight down with the upper pipe, because the lower pipe is slanting down at an angle. Joint the upper and lower pipes in to the T piece measure and join the section from the T piece to the rain pipe. Mark where the last section will cut into the rain pipe, and drill a 40mm hole into it and slide the rain pipe on to it. You don't want to extend very far into the rain pipe, or it can catch leaves etc on it. Put some silicone sealant round the joint, and the job should be done. You shouldn't need (or want) to reduce the 40mm pipe, or you'll risk a build up of waste in the reduced section. All completely illegal of course, but best of luck
 
Sponsored Links
I gather I also need FloPlast SC250 Solvent Cement (ScrewFix Product Code 14295), is that correct to join them together?
The bottom waste pipe is actually metal; not plastic at all, but the top waste pipe is plastic and so is the black RWP.

I have an oscillating multi tool to cut plastic or pvc but not the blade to cut metals. ScrewFix seems to be doing one for the metal (part no 39314)
 
Last edited:
My local Screwfix doesn't stock the solvent cement (no idea why), so you're lucky there. Solvent weld is rock solid if done properly; put the solvent glue on both surfaces, push together, and then give a quarter twist to make sure it's spread evenly. Push fit is quick and easy, but best suited to inside use; and some will argue the same with compression joints as well.

If the lower pipe is metal, then you may find the width isn't standard, in which case 73315 compression T might work better, but at least you can take back what you don't use. Having looked at the blade, it may not have the depth to get right though the pipe, and you may need a straightforward hacksaw which is much cheaper. If you've got a jigsaw, then you just need a metal blade. And what about just replacing the metal pipe as far back as is practical.
 
What waste pipes and fittings would you use for this type of work? Sometimes, leaves and other debris may be trapped inside the pipes so maybe it is not a good idea to use solvent weld fittings, as in the future, I might decide to dismantle one section and loosen the debris and leaves. My next door neighbour's tree is massive and leaves do get caught annually.

Lower metal pipe can be totally replaced with a plastic (item no 65426) so that I don't have to spend money on metal blades. Uncertain whether the 90° Bend pipe (protruding from the interior) is of standard fittings.
 
The solvent weld fittings are only for the waste pipes, not the rain water pipe. Where you fit the waste pipe into the rainwater pipe, you want to seal this joint to stop rainwater coming down the pipe and out of the joint. If you think you'll need to do maintenance, then just do a minimum amount of sealant that can be cut out when necessary. Put a leaf guard at the top of the rain water pipe, and that should handle most problems. You've shown a pretty good grasp of what you're trying to achieve, so just have the courage to start the job, and then come back with any pics if you get stuck. I prefer to use solvent weld pipe as it solid, and minimalist, but if you're uncertain of your abilities, then choose push fit or preferably compression.
 
I prefer to use solvent weld pipe as it solid, and minimalist

What do you mean by 'minimalist'? I know the push fit system will get 'push out' of place during freezing condition as any water collected will turn to ice and expand. Both compression and solvent weld seem to be very solid and never get 'pushed out' by trapped frozen water.
 
Solvent weld is the neatest finish. Compression fittings are the bulkiest, and push fit sits in the middle. Trapped frozen water isn't the issue; if it's outside, rubber will wear over a period of time due to getting cold in the winter, and then hot in the summer. It will eventually fail, Solvent weld won't,
 
I have no idea, where's your tape measure. Come on, just get on with the job, then check back
 
After careful observation, the bottom pipe is actually plastic but looks and feels like metal and the size is 40mm.

The above waste pipe is roughly of size 33 - 35mm.
 
Last edited:

DIYnot Local

Staff member

If you need to find a tradesperson to get your job done, please try our local search below, or if you are doing it yourself you can find suppliers local to you.

Select the supplier or trade you require, enter your location to begin your search.


Are you a trade or supplier? You can create your listing free at DIYnot Local

 
Sponsored Links
Back
Top