Leaking uPVC Window Frame

Joined
20 Jan 2021
Messages
54
Reaction score
3
Country
United Kingdom
Evening, gents.

Got an issue with a recurring leaking window frame on a bay window that I have yet to solve, but think I'm on the right track now. This has probably been happening for years, but I only noticed when I ripped off the PVC window board during a redecoration in order to replace it with an MDF one.

There, I noticed on the left edge of the window frame, was water ingress that was soaking into the wood. This would occur after rain, usually when it was fairly heavy rain. At first, I thought the seals on the outside of the window were the culprit, as they were coming undone at the bottom of the frame, but that didn't seem to fix it either.

Then I learned about drainage channels, and today (after more rain and noticing it leaking again), discovered that my drainage channels appear to be blocked off by mastic that I just replaced (!). I have yet to remove it again and test to see if the holes are now unblocked, but wanted to get you guys input on this. I did pour water into the drainage hole of this particular window after pulling the window out of the frame, and did indeed have water trickle out of the open edge of the frame that I have pictured, where the water was ingressing, so it feels like the culprit to me.

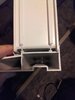
I have uploaded pictures showing:

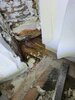
1) The area where the water is ingressing, you can see the wood that has become wet there.

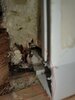
2) The actual location the water is coming in from. It appears to be coming in from those channels at the edge of the frame... are those holes supposed to be sealed off at the sides? I had to hack away at foam to get here, but as foam isn't waterproof, that wouldn't exactly count as sealing. Circled area I'm talking about in red.

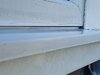
3) The outside of the window frame, before I (incorrectly) sealed it back up. I have concerns about that black line above the 'lip' at the back of the sill. Is that supposed to be there, or has the frame been fitted incorrectly? If it has, what do I do? Would sealing in the gap (but leaving the drainage holes exposed) work? Again, circled in red.
 

Attachments

  • WATER INGRESS LOCATION (2).jpg
    WATER INGRESS LOCATION (2).jpg
    392.9 KB · Views: 213
  • WATER INGRESS LOCATION.jpg
    WATER INGRESS LOCATION.jpg
    235.4 KB · Views: 212
  • FRAME WITH EXTERIOR SEALANT REMOVED.jpg
    FRAME WITH EXTERIOR SEALANT REMOVED.jpg
    161.1 KB · Views: 206
Last edited:
Sponsored Links
Well, I did more searching and found a picture of how the window would roughly be constructed, and it makes more sense now.

So that gap pictured on the outside indeed shouldn't be there, and the windows weren't installed correctly all those years ago. The question is, how do I go about correcting it? It'd be a bit of a bodge, but would just gunning in a bunch of mastic do the job (while leaving the drainage hole exposed)? I realise that long term, the only solution would be complete replacement, but if I just keep an eye on the mastic every year or so to ensure the seal is good, it should do for now.

I also presume that gunning some mastic on the exposed end to stop water dripping off would be in order too. I did think about gunning some foam in there as well, but that's probably a bad idea with uPVC due to warping if I remember correctly.

I did notice that over the years this particular window would always feel colder and condensate much more than the other two next to it, and I'm guessing this is probably why.
 

Attachments

  • 32207699640_ca18088449_o.jpg
    32207699640_ca18088449_o.jpg
    212.6 KB · Views: 144
  • 32584300455_a688e05b2f_o.jpg
    32584300455_a688e05b2f_o.jpg
    159.3 KB · Views: 177
Update: I'm still having issues with this window.

I thought I'd solved the above, but apparently not. I'd gotten around to opening up the weep hole on the left window frame, and carefully sealing all around it, which stops any outside water ingress but allows the weep hole to drain. Job done.

I moved on to removing the sealant that was blocking the weep holes from the middle frame, then poured water in to test drainage. It appeared to drain fine.

Then I noticed the area that I mentioned on the first post that was leaking heavily had water all over the place! It seems that I may be buggered here, if water is somehow leaking out of the drainage channels, down into the framing channels and ending up in a cavity? How is that possible -is the middle frame defective?

The water is following the direction of the purple arrow on the attached picture. The frame is slightly non-level to this side, which is probably why the water ends up there.


20220803_171905.jpg


WATER INGRESS LOCATION.jpg


The water is draining out of the large open channel on the lower half of the red circle in the above image.


As I'm unable to have the frame replaced, I'm not sure how to fix this. My father suggested that, if something is busted inside the frame in the drainage channel that is allowing water to burst out underneath the frame, then we skip the drainage channel entirely and drill holes straight out, gluing tubing to allow water to drain straight outside. Seems like it would work, but look a bit naff.

The other thought I had is, maybe the weep holes were drilled incorrectly to begin with?

20220803_182308.jpg


In the above pic, I notice a weird plastic 'lip' on the inside of that hole at the bottom - is that supposed to be there? Or is water draining down into it and ending up in a part of the frame it shouldn't be, and that is why it is leaking? Really hoping that it is as simple as this, as then at least I could just seal the holes up with Stixall or something and drill new ones.
 
Last edited:
Note, I'm just a diy'er so don't consider my input professional!

At the bottom of the frames, are there any screws going through into the cill? If yes, have these been sealed with silicon where the screw head goes into the frame? Perhaps some water is getting through there?

Looking at the pic where you've circled the end of the cill in red, is it possible for you to put your smartphone camera there and record into the cill void? If yes you could try doing this, pour water onto the bottom of the frame and see if the camera picks up where the water is tracking down and along?

The end of the cill (area circled in red) can be sealed to prevent water getting out there, however the water could then start building up / sitting in the cill void.
 
Sponsored Links
Note, I'm just a diy'er so don't consider my input professional!

At the bottom of the frames, are there any screws going through into the cill? If yes, have these been sealed with silicon where the screw head goes into the frame? Perhaps some water is getting through there?

Looking at the pic where you've circled the end of the cill in red, is it possible for you to put your smartphone camera there and record into the cill void? If yes you could try doing this, pour water onto the bottom of the frame and see if the camera picks up where the water is tracking down and along?

The end of the cill (area circled in red) can be sealed to prevent water getting out there, however the water could then start building up / sitting in the cill void.

Hi,

I took one of the screws out (it holds the locking mechanism for that tilt and turn window) to see if they were maybe too long and had pierced something - they had not, and it did look like silicone was used as it was present in the threads. The bottom of the screws also looked brown with corrosion. Maybe years of water buildup in there eventually resulted in it bursting through something in the frame, causing the leakage? I just have no idea since I don't know how these uPVC windows are internally constructed.

I could try with the cill void, but the view is definitely obstructed by the screws that go through the cill and attach it to the woodwork.

I did consider that the area in red could be sealed, but it is a pretty big hole, and it doesn't seem like a long term fix.

I may also test just using a straw to dump water into the weep hole and making sure I avoid the 'lip' I mentioned, to see if water is unintentionally going into a channel it is not supposed to. That would be by far the easiest fix, versus drilling through the frame and installing custom drainage channels with piping.
 
re screws in the frame, I wasn't referring as much to those holding the espags (metal keeps) in place, was referring to any screws that might have been drilled in the middle of the frame to secure it to the cill.

Good plan to test water going straight into weep hole.

If you Google upvc cill end caps you might find a close enough fit to insert in the end, along with silicon to create a water tight seal.

If you Google upvc window cross section you'll see how these windows are constructed. Normally they're modular in design and the drainage holes allow water to drain down the front cells and out. Like this:

window cross section.jpg
 
re screws in the frame, I wasn't referring as much to those holding the espags (metal keeps) in place, was referring to any screws that might have been drilled in the middle of the frame to secure it to the cill.

Good plan to test water going straight into weep hole.

If you Google upvc cill end caps you might find a close enough fit to insert in the end, along with silicon to create a water tight seal.

If you Google upvc window cross section you'll see how these windows are constructed. Normally they're modular in design and the drainage holes allow water to drain down the front cells and out. Like this:

View attachment 276001

There are no screws in the bottom of the frames other than espags ones, fixing screws are on the top and sides instead, which holds them together (you can observe this on the picture I scribbled the purple arrow on). So there wouldn't be any punctures there.

As for the weep hole exits, in these windows it would go as follows:

window cross section.jpg


The pre-drilled holes exit right out the bottom, so they are not visible from the front.

However, see that thin bit of plastic acting as a wall to the left of the weep channel? If you look at the last picture I posted again, that seems to be what that 'lip' is, so water would be getting into where I'd scribbled in blue... maybe it's also breaching into the rest of the window frame as a result?
 
If you have a syringe or something similar, try injecting water into the drain hole ensuring you do it over that lip, then check to see if water getting out at open end of cill. Make sure you do it a few times to ensure enough water goes in. If no sign of water, do it again but intentionally inject the water this side of the lip i.e. so the water goes down that part. Then check again for water at the open cill end. This will help prove if your theory is correct?

Tbh it's the kind of thing that's difficult to fully comment on without seeing it first hand.

If push comes to shove, even without a cill end cap, you can still block that end with a copious amount of sealant. Yes bit of a bodge but might do the trick if all your investigations lead nowhere? Watch this video from 11 min 50 secs. You can do this to your cill but you might not have the end cap.

 
Last edited:
If you have a syringe or something similar, try injecting water into the drain hole ensuring you do it over that lip, then check to see if water getting out at open end of cill. Make sure you do it a few times to ensure enough water goes in. If no sign of water, do it again but intentionally inject the water this side of the lip i.e. so the water goes down that part. Then check again for water at the open cill end. This will help prove if your theory is correct?

Tbh it's the kind of thing that's difficult to fully comment on without seeing it first hand.

If push comes to shove, even without a cill end cap, you can still block that end with a copious amount of sealant. Yes bit of a bodge but might do the trick if all your investigations lead nowhere? Watch this video from 11 min 50 secs. You can do this to your cill but you might not have the end cap.


So, I finally got time to get around and testing this. I injected a few glasses full of water into the drain hole, avoiding the lip. I made sure to do it in both, seeing tons of water pour out of the weep holes at the bottom of the window.

What happened? No leaks whatsoever. I stopped there for the day and kept an eye on some tissue I had stuffed into the edge of the channel, but it never got wet. We may have found the answer. This would also explain why the screws for the lock catch mechanism (visible above the red cup in the first picture) had corroded threads when I unscrewed one - water sitting in the main chamber of the frame and rusting the hell out of everything. I hope the frame stiffener wasn't made out of steel...

Tomorrow I'm going to inject directly into that lip and see if a) no water weeps out the frame, and b) if the water ends up spilling out as before.

If that happens, then we know what the problem is. The only thing I will be wondering then is how to fix it:

a) seal the entire hole with a hybrid mastic like stixall/EB20, then drill new holes
b) seal the hole partially, only filling the exposed lip
c) seal the hole partially and also drill new hole for insurance

I am wondering how the hell I am supposed to seal these holes, given how there isn't exactly much for the mastic to stick to, it's just a big void down there. There's no patching plastic stuff I can glue over it instead and drill holes around for water to get out, is there?
 
tbh you've lost me a bit in what you're trying to achieve sealant wise. The open end of the cill can be sealed with copious amounts of sealant, or you could put a piece of plastic in first (cut to roughly same shape) to give the sealant something to butt against as you pump it in (oh err missus!) then just smooth over the outer edge to ensure it's fully sealed.

If you're referring to sealing parts of the frame, drilling new holes etc, it's difficult (for me anyway) to further comment without seeing the window in the flesh so-to-speak.

Others might be able to advise based on the pics and your updates. All the best with it.

Hi, let me try to explain with one of the pictures, easier that way.

20220803_182308 (1).jpg


I have confirmed that the inner (orange) channel is not connected to the outer drainage channel (blue), and that the inner channel is responsible for the leaking (I tested it after my last post by injecting lots of water into it, no water came out the weep holes and it eventually started spilling out of the side of the cill as expected). I am guessing there is a hole or something in there and it is draining into the interior of the frame, probably corroded the hell out of the stiffening bar if it is a steel one!

So my idea was to put some foam into that inner channel, mostly to give the sealant something to stick to, then smooth over it with sealant. I figured it would be easier to leave the hole partially open (the blue part) so that water could still drain easily, as it looks like sealing this whole hole will be fairly difficult to do properly?

And if I end up needing to seal it all entirely, then drill the purple holes instead.
 
Last edited:
Ah right, I've got you now.

Does the plastic flap that separates the outer and inner sections move? i.e. can it be pulled towards the inner section of the frame (where your orange text is)? If yes I'd do this (disclaimer: don't blame me if the house floods!):

1. Inject sealant where the orange line is, also going to the left and right beyond the ends of the drainage hole. If need be buy something like this to get in there:


2. Pull the plastic flap towards you, closing off the gap and enabling the sealant to grab properly. If need be i.e. if the flap just wants to ping back to its original place, keep it in place by temporarily putting something in the hole (e.g. crunched up bit of tape or something) to stop it pinging back to its original place. Hopefully that makes sense?!?

3. Next day it should be secure. Finish if required by putting sealant over the newly sealed edge, just to make it smoother for water to traverse. Might not be required though if the first lot of sealant adequately fills the void and has a smooth top surface.

4. If the plastic flap doesn't really move, still do the above, the only bit you'd leave out is trying to pull the flap towards you. If it doesn't want to move, just seal up the void as per rest of my instructions.

That should be job done. Let me know how you get on.

p.s. remember to test it once sealant fully dry to make sure it's actually worked :)
 

DIYnot Local

Staff member

If you need to find a tradesperson to get your job done, please try our local search below, or if you are doing it yourself you can find suppliers local to you.

Select the supplier or trade you require, enter your location to begin your search.


Are you a trade or supplier? You can create your listing free at DIYnot Local

 
Sponsored Links
Back
Top