Making a record/vinyl storage unit

Joined
3 Sep 2015
Messages
315
Reaction score
5
Country
United Kingdom
Guys, I'm quite keen to make my own vinyl storage unit, something along the lines of the Ikea Kallax idea, so essentially three 'cubes' wide by two height.

Essentially build a rectangular frame being about 700mm in height, 900/1000mm wide, split in half horizontally, then vertically a few times.

What I'm struggling with:

1. How to join bits of wood which are less than say 35cm wide for the frame.
...Dowels seems like something I'd perhaps mess up - I have a decent amount of space to work, but all hand held tools, and I believe accuracy would be paramount for dowels (perhaps I'm wrong!)
...support battens in each corner being say 20mm wide - a lot easier, but way uglier

2. The best way to do the divisions for maximum strength - for those who don't know vinyl is bloody heavy - with the Kallax you'd be looking to put around 18kg in each cube - so this unit I'm building would need to support about 50kg on each level

I think critical to all of this is the sort of wood I use really - using solid wood that's over 30cm wide seems tricky to find - most places seem to go by thinner bits you'd need to join - I was looking at say pine or spruce.

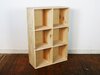
Attached is the end result I'd want - not precious about it looking exactly like that pic, just to give you an idea (oh and that;s about £400!)

Any thoughts/advice on this much appreciated! - I'm working with a fairly tight space in which I need to get quite a lot - the Kallax with its chunky frame, especially with a 2x1 and a 2x2 butted together takes up precious mms needed for a desk/speakers/sub etc!

Cheers guys
 

Attachments

  • il_1588xN.2777366222_jt7c.jpg
    il_1588xN.2777366222_jt7c.jpg
    172.5 KB · Views: 72
Sponsored Links
To make successful dowel joints your marking has to be accurate, especially if using manufactured boards such as contiplas(?), the white stuff a lot of modern furniture is made from.
To help line the dowels up accurately I use these kind of things;

Center Points Pin Set Dowel Pins Center Point Set 6 mm 8 mm 10 mm 12 mm Dowel Pin Center Dowel Centre Point Woodworking Alignment Tools Points Marker Drill Center for Woodwork Drill Tools 16 Piece Set : AmazonSmile: DIY & Tools

Basically you drill the dowel holes in the end of one side. I usually drill them to a depth of 3/4 the length of the dowel. Insert the dowel point and then line the board edge up to where you want it to fit. Push/tap down so it leaves tell-tale pin holes in the corresponding piece of wood. Drill to a depth equal to half the dowel length. Try a dry fit to make sure you are happy with the fit. If all is ok then squirt a little glue into each hole, tap the dowels into the holes which are only half length deep. Then tap corresponding side on to the projecting dowels. The reason for the 3/4 deep hole in these ends is to allow any excess glue to squeeze down.

Practise on some scrap wood first until you get the hang of them.

You can also buy dowel jigs;

Amazon.co.uk : dowel jig kit

but I've not used one yet so can't comment.
 
Sponsored Links
I've used dowel jigs and found them excellent for alignment and quicker than the points. My first was an Eclipse but I now have Wolf kit which is much better.


Edit
Looks like the "wolfcraft" one on your Amazon link but I probably used ebay

Ideal for making or altering kitchen units and similar made of laminated chipboard
You can use more dowels and they will be stronger than factory made.
 
Last edited:
To make successful dowel joints your marking has to be accurate, especially if using manufactured boards such as contiplas(?), the white stuff a lot of modern furniture is made from.
To help line the dowels up accurately I use these kind of things;

Center Points Pin Set Dowel Pins Center Point Set 6 mm 8 mm 10 mm 12 mm Dowel Pin Center Dowel Centre Point Woodworking Alignment Tools Points Marker Drill Center for Woodwork Drill Tools 16 Piece Set : AmazonSmile: DIY & Tools

Basically you drill the dowel holes in the end of one side. I usually drill them to a depth of 3/4 the length of the dowel. Insert the dowel point and then line the board edge up to where you want it to fit. Push/tap down so it leaves tell-tale pin holes in the corresponding piece of wood. Drill to a depth equal to half the dowel length. Try a dry fit to make sure you are happy with the fit. If all is ok then squirt a little glue into each hole, tap the dowels into the holes which are only half length deep. Then tap corresponding side on to the projecting dowels. The reason for the 3/4 deep hole in these ends is to allow any excess glue to squeeze down.

Practise on some scrap wood first until you get the hang of them.

You can also buy dowel jigs;

Amazon.co.uk : dowel jig kit

but I've not used one yet so can't comment.

Cheers, I'd be using solid wood as opposed contiboard or similar, yeah, I guess I could practice a few times!

Thanks for the jig thoughts :)
 
I'd stick with the K-tel Record Selector or how are you going to get to the records at the back?
 
I would certainly spend a bit of time making a jig.
If you have access to a sheet of aluminium it would be great or use sheet wood.
This will give you repeatable accurate spacing.

the horizontal shelves could have holes drilled right through so the lower upright support is pinned from the top and the top one uses the same dowel.

use a back so that it acts as support pinned to vertical and horizontals
You can paint the inside of the back to match the wall behind to make the unit look less heavy.
 
Thanks for the comments. I had intended to put a back on it, probably decent ply. I could paint the back yeah, but I'm hoping it'd be full of records and made in such a way you'd not see the back!

I'm struggling to see how the jig side of things comes into it, and the dowels!

I was thinking the frame would be made with simple but joints, held square with sash clamps, screwed and glued (or I could use dowels). Critical to this is probably that only the front of the unit will be visible - the sides will either have speakers or a desk near them.

The internal would be comprised of one long 1m section, and two about 70cm... I had thought I'd make two cuts in the horizontal long section, and one each in the uprights so they would slot into each other - kind of like this: https://www.routerforums.com/attachments/half_lap_joint-gif.115194/

How I attach those into the frame I'm not too sure on - I guess I could screw or dowel from the back with some precise measuring - and the same on the sides. Not sure I'd be able to drill dowel holes all the way through 400mm material?

I've since learnt I can probably get pine timberboard from Wickes which is 40cm wide which will negate the need for joining two bits of timber all around to make the frame.
 
general comments

if you are using 18-22mm timber lay all the shelved top and bottom in line mark the positions off the partitions top and bottom off all shelves and one surface top and bottom on the face with a roofing square
mark the sides using an off cut at the top to give you the thickness off the top on this line place a divider draw a line then lay the offcut draw another line then move the divider
copy till you reach the bottom then tranfer to other side back to back
then make a box[outside frame ] with dowels or screws and recessed 5.5mm back
you then cut the timbers for the shelve and partitions 5.5mm less
make the shelves the full run and the spacers vertical so the joints are under compression off the load so cant pull out
now when i do this the partitions between the base and shelve one are screwed in with no8 or 10 x2" countersunk screws
i then make shelve 2 up with the dividers as legs with countersunk screws then dowels 5mm away from the screws to stop conflict dowel the shelve top to the divider underneath
now doing this way you will need screws in the side

make them about 8 or ten inches deep as an lp is awkward to get out iff you cant grab the cover top and bottom
will get back with further information iff you choose my way
 
I'll give you a very basic structure in MDF which can be painted. Construction is by screws alone, which are countersunk and filled before painting, or dowels or biscuits.

Basic structure is something like:

Sides 18mm MDF cut to size 900mm x 350mm 2 no
Shelf, top, bottom 18mm MDF cut to size 664mm x 350mm 3 no

Record Shelving 001a.jpg


The dividers then go in between the top and middle/bottom and middle shelves. If you have access to a router these could be pushed into stopped grooves:

Record Shelving 001b.jpg


In a 350mm deep carcass the grooves are 18mm wide x 5mm deep x 325mm long (measured from the back)

The shelves are then cut at 423mm x 335mm and the front 20mm notched top and bottom:

Record Shelving 002.jpg


and slotted in, being simply glued in place with PVA wood glue in the grooves

Record Shelving 001e.jpg
Record Shelving 001d.jpg
Record Shelving 001f.jpg


You can put in multiple dividers this way. An evensimpler way to install thge diviuders would be not to groove the unit, or notch the dividers, but simply to drill the divider points front and rear and install "Magic Wires" top and bottom with a matching sawn groove in the top and bottom edges of each of the
dividers.

The back can be a simple rectangle of 12mm thick MDF sawn 10mm narrower and 10mm lower than the top, the edges chamfered and the whole pinned onto the back and inset by 5mm all round. The back increases stiffness greatlyn

Record Shelving 001g.jpg
Record Shelving 001h.jpg


How you approach this depends on what you have by way of tools and what experience you have
 
Last edited by a moderator:
Funny, I used to have a fanatically-acquired collection of approx. 550 albums – mostly late 60s-early 70s prog rock etc. I kept mine in a slightly modified pine rack I bought out of a newspaper ad back then for £30, I think.

I’ll attach a pic if I can find one – since then, the collection has been sold on eBay (for about £5000 – there were quite a few first pressings etc ) the rack has been divided into 4 pieces, and used as separate units for other things.

Ah yes, got one, from back in 1984 I think

rack.jpg

It’s not a great pic, but you may be able to see lengths of dowel used to separate the records into manageable quantities, and stop them falling over. Those have since been removed – here’s what’s left. You can hopefully see the location holes (drilled half way into the wood) for the upright dowels:


20220201_120956.jpg


Of course, this design may not appeal to you at all – if it does, it would be a lot easier to make than your original suggestion – good luck
 

DIYnot Local

Staff member

If you need to find a tradesperson to get your job done, please try our local search below, or if you are doing it yourself you can find suppliers local to you.

Select the supplier or trade you require, enter your location to begin your search.


Are you a trade or supplier? You can create your listing free at DIYnot Local

 
Sponsored Links
Back
Top