Maple flooring part 2 or maybe its 3!

Joined
3 Jun 2005
Messages
169
Reaction score
1
Location
Aberdeen
Country
United Kingdom
Hello again diy peeps.

Finally got back onshore to a pleasant surprise, it turns out that the maple flooring i sourced is working out at a volume of 100Sqm instead of the 40Sqm i was told was there! Anyway got a few Sqm's home today and realised theres no way i am sanding this lot down so instead i am going for a thickness machine. Thats the one below, so for anyone interested, in about 2/3 months time i will have 50Sqm of excellent 3 1/4" x 3/4" various lengths of maple flooring for sale and it will have been through the thickness machine to give it a surface ready to lay and seal, the maple flooring is from the 1930's and it looks really nice! P.S Syptoms, thanks again for th advice on laying the flooring and sealing it.

http://cgi.ebay.co.uk/Perform-CC10T...oryZ3126QQssPageNameZWDVWQQrdZ1QQcmdZViewItem

P.P.S the thickness machine will be for sail in a few months as well, if you are like me and plan ahead this might be a thread to remember!
 
Links in this post may contain affiliate links for which DIYnot may be compensated.
Sponsored Links
Pants - excellent news! You may remember from an earlier post my use of a planer/thicknesser on my maple stuff, it'll do the job well. Word of warning ... get all the old cleats out before you run the stuff throught the machine as one missed nail will ruin the cutting knives. Cleats in reclaimed flooring sometimes break-off so they aren't obvious to a visual search, so get a 'nail finding wand' (a type of metal detector designed for wood machining) ... Axminster Tools do one - not very expensive.
 
Mr Symptoms i owe you a beer if you ever come to the NE of scotland! It was your previous post on the prep of your floor that sent me down the thicknesser route, i will buy a wand this morning. Foundations are starting today, thicknesser should arrive tommorow and off i'll go. Thanks again for your advice, much appreciated.
 
So far i have cleaned the edges and ran about 35sqm through the thicknesser(huge job)! This batch is now sitting in the house aclimatising for about 2 months before i start to lay it.
Symptoms on a previous post you said that using caberfloor is a false economy and i should use ply? I have since read conflicting reports online regarding secret nailing onto caberfloor as this is through the whole house and i now intend to use 75Sqm of the flooring to cover a lot more of the public areas downstairs. As i am back onto secret nailing the flooring instead of floating it can anyone give me advice on the best secret nails to use, should it be T or L, are their specific nails that take a better grip onto caberfloor? Any advice appreciated. The flooring will be laid in 4 rooms now all running through to give a complete seamless floor and there will be 3 turns through 90 degrees of the flooring as i lay it through the rooms. Thanks.
 
Sponsored Links
pantsmachine. how does the wood come out after the wood goes through the thicknesser? will it need a light sanding or is it ready to seal straight away?
as you know we are in similar situations and am looking at the thicknesser route to keep the mess outside rather than sanding in situ.
any chance of a couple of pics of the wood after its been through?
also how long does it take? i have around 25m sq to do. looking at taking about 2mm off the top.
thanks for your help

craig
 
It comes through really well. I will still be hiring a belt and corner sander once the floor is laid. The reason is that the flooring i am using has a few rough bits on it which have nicked the blades and a few nails as well. So i don't have the perfect finish. Don't get me wrong the transformation from reclaimed old tatty varnished floor to new look is phenomenal! Also the floor once laid will have to pass my bare foot test for flatness so the belt sander will be needed. The machine runs at 8 metres per minute. I was doing about 7 Sqm per day and that was starting a 09.00 and finishing at 16.00 so it is a lot of work. Sorry no photos as i am offshore again.
 
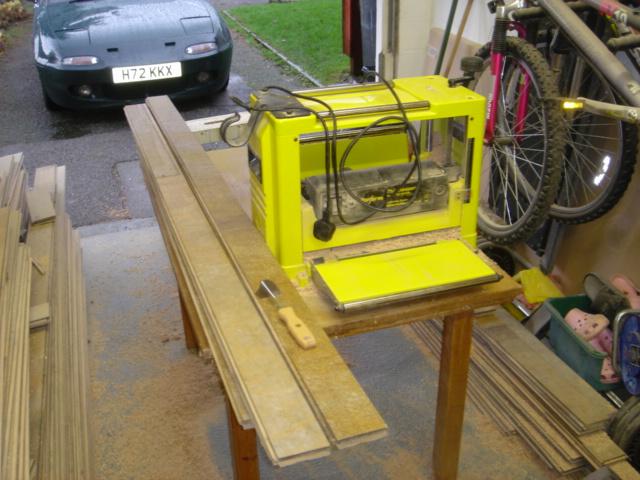
I have finally got to a stage where i can post agian on my floor. Last time i was home i laid 30+sqm in the new extension. I really hope my bletherings below will help someone out down the road. First of all, Axminster tools thicknesser machine(yellow one hobbyist level) is only good for about 60Sqm of flooring through it. The motor burnt out and i had to buy another one(next level up and about £140 i think). I was taking about 1-2mm off in total. It did vary as i was not going for a set finished height but instead removing the old surface to a clean finish and for whatever reason my batch of maple had 2 heights within it with a difference of approx 1mm between the 2 sizes.

After seeking advice on this site i was unsure how to proceed with laying as i was laying the maple onto caberfloor via the secret nailing method and this is largely judged to be a no no as the design of the secret nail is not really sharp and piercing, more wedge like and this can and will blow the back of the caberfloor out. After a bit of thinking i went down the route of marking the placement of
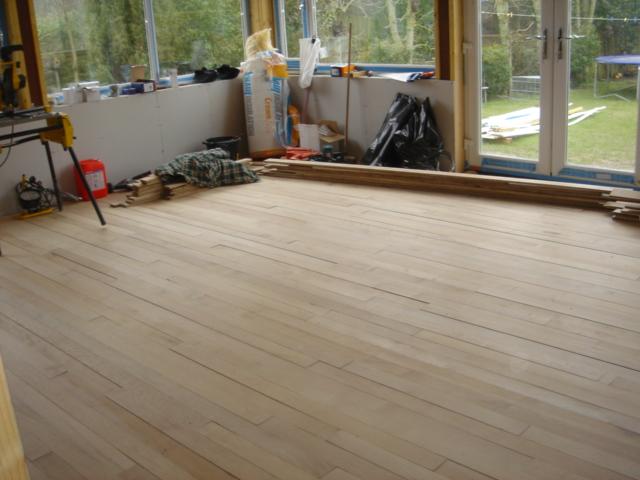
all my subfloor joists in black marker on the caberfloor. I then applied a coat of pva glue to the caberfloor and laid the maple floor secret nailing through to the joists and on occassion just through the caberfloor. The majority of the time the nail took but on a few hits i could feel the floor blow out, no big deal but i now agree with the people who gave me advice and would not rely on secret nails holding over the longterm onto chipboard flooring on their own.

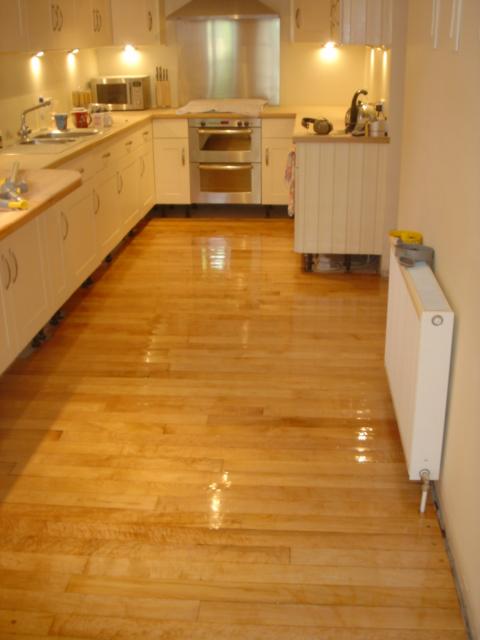
Once laid i then had the problem of the height difference of the flooring to contend with. This turned out to be no problem once i had spent a few hours running from 80 grit down to 120grit on a hired belt sander. I went even more anal than the bare foot test and ended up crawling around on my gel knee pads feeling for differences(yeah i know, i have a wrongness in my head). I then used an orbital edging sander on any bits i did not feel were perfect. To give you an idea of how good the belt sander was i hired it at 13.00hrs and had it back to the hire shop at 09.00 the next day and that was 30sqm of differing height flooring flattened to smooth and goodness me isn't the belt letting go on the sander when worn quite an event?

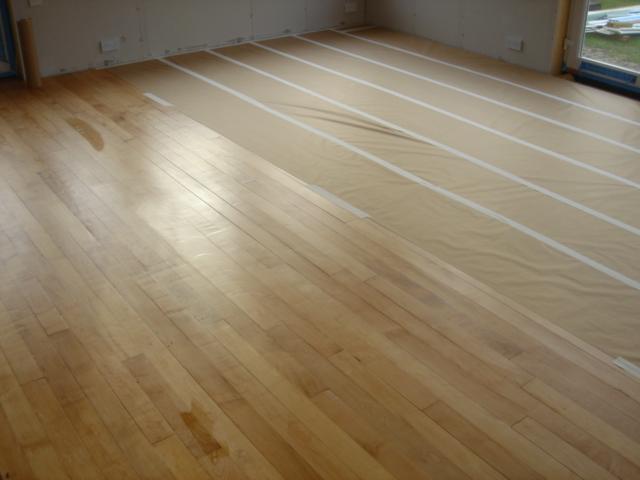
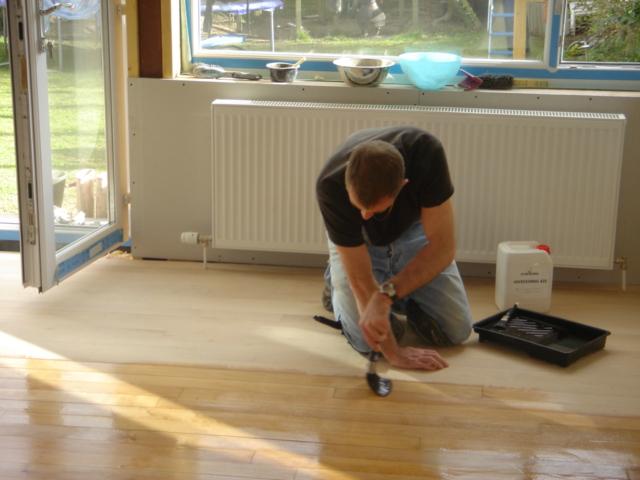
I ended up going for Junkers acid cataysed floor lacquer, there are 2 types, semi gloss and silk matt. I went for the silk matt and bought 2 of 5ltr tubs from decorating direct along with a couple of 4" harris brushes to apply. 1st coat went on stunning and i could see the potential. Sadly someone in the Junkers factory did not know the difference tween semigloss and silk matt when mine was labelled so the second batch was not silk matt but semi gloss although it was labelled silk matt. My goodness me how i freaked out at that!
In the end Junkers were cool&convinced and they sent me another FOC. So that's where i am now, next time i get onshore(15th May) i will lightly sand to key the flooring and then apply the final coat.

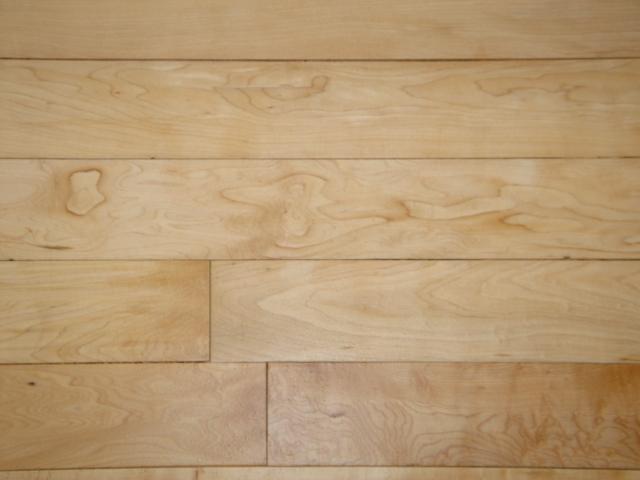
Now i have seen the difference tween semi gloss and silk matt(unintentionally though it may be) i can say that i would go for silk matt every time. It still has a mellow shine to it which compliments the infinite grain patterns of the maple(going off on one am i not). I thought the semi gloss was too 'bright' and concealed through reflection of light a lot of what is going on in the flooring.

I can honestly say that the work needed to turn this flooring from a pile of potential firelighters i bought off a mate to what it is now has been vastly more than i expected BUT i can also say i don't regret a minute of it and it is simply THE most stunning floor i have ever seen(i was not joking about the infinte grain patterns you know). Once i have finished the final coat i will take and post a few pics.

If anyone is thinking about doing the reclaimed maple route i wholehearedly encourage them. Its good for the enviroment(recycling), if its an old enough floor there is no way the grain quality can be matched by what is sold as new today. You WILL learn interesting new swear words and your wife WILL eventually apologise for doubting you the day you brought a load of scrap wood to the house and said 'look what i bought'.

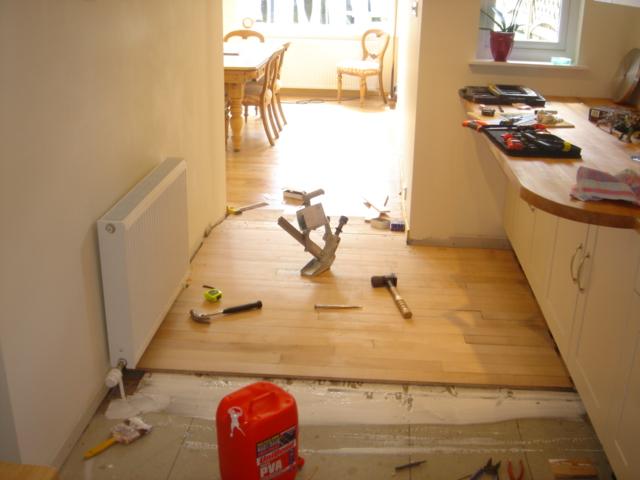
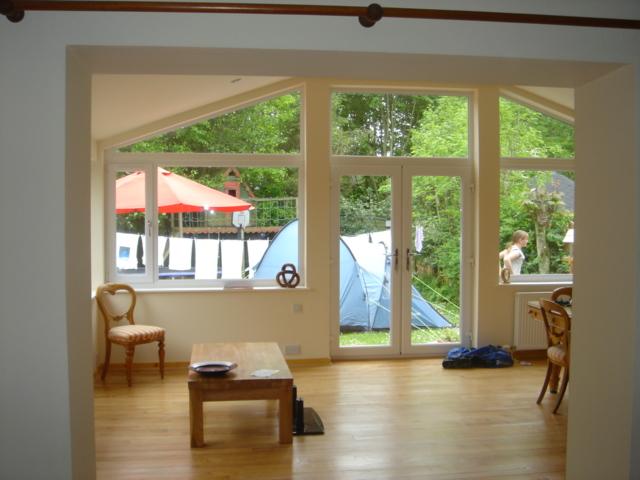
Only another 65sqm to lay in the family room,kitchen and hall now and i can't wait! Cheers. Joe :D
 
Hi Joe

Good on you! Valuable asset to any home, bit of labour of love, but the rewards are plenty.
When you finish you're whole project: pictures please! (And why not enter our DIY-Triumphs contest too?)
 
Well, its been a while but heres the photo's(hopefully).

The jobs not done yet. I floored the room off the extension last time i was at home and sometime soon i will use about 30sqm to do the hall. At the end of all this work(and more to come) i am so very very happy i took the time to do it correctly. The kitchen floor shots are with wet lacquer so thats not the finish. The close up grain pattern shot is more like it except spread over 65sqm seamlessly through 3 interconnected rooms. Well chuffed, thanks for advice given by all in this and other threads. I've got more shots if you want them or if it helps with your own project. Cheers
Joe
 
Thank you very much. How does it feel to know that you had a direct influence on the project? I don't like looking at the start date on this thread, too much of my obsessive side on display there! Thanks again symptoms. On another note i will have approx 20sqm(maybe) left over of rejected maple when i am finished which i am giving to a mate who is building an extension and he is going to lay it at his with the above technique so your influence will be in two houses!
 

DIYnot Local

Staff member

If you need to find a tradesperson to get your job done, please try our local search below, or if you are doing it yourself you can find suppliers local to you.

Select the supplier or trade you require, enter your location to begin your search.


Are you a trade or supplier? You can create your listing free at DIYnot Local

 
Sponsored Links
Back
Top