Miele Washing Machine heater element spade connector burnt off

Joined
27 Oct 2020
Messages
72
Reaction score
7
Country
United Kingdom
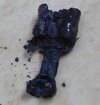
My Miele W3204 washing machine stopped heating the water, so I took it apart and found the spade connector on the bottom of the machine, burnt off, and the cable connecting it to the heater element also burnt off. Does anybody know why this might have happened? The heater element was about a year old, I replaced it myself. I have a new replacement element ready to install, a heater relay and a new temperature sensor (as I didn't know what was the cause of the fault before I dismantled the machine, so I thought I would get all the parts to save having a dismantled washing machine taking up space while I waited several days to get a replacement part.)

I don't want to put in a new heater element without first doing whatever is necessary to prevent this from happening again. Could it have been a faulty element that caused this? I bought it off Ebay, it was around £20 and wasn't a genuine Miele one.

The machine hasn't been heating water for about six months, so I've been using it with hot water from my gas boiler (it's always had the hot water pipe connected to it, as I have the cold water pipe plumbed into the dishwasher next to it- that's just the house was set up when I moved here, so I thought I would leave it the same), so if there was any water that caused a short circuit all those months ago, it's long gone now.


Spade connector.jpg

DSCN77081920.jpg
 

Attachments

  • Spade connector.jpg
    Spade connector.jpg
    457.7 KB · Views: 51
Sponsored Links
When connections burn like that, its usually because they are loose.
 
That has happened to me, caught it as I could smell the wire coating melting, In my case it looked as if it was becuase of corrosion and or being loose increasing resistance and making it overheat and burn.
Due to damage, I could not tell if it was on the wire to spade interface or the spade to heater interface.

I cut the wire well back to good clean unheated copper.
Crimped a new spade onto teh copper wire with a professional tool.
And is then soldered it.
I also make sure spade was slightly more squashed so it was tight onto heater terminal.
Sfk
 
Last edited:
Thank you both very much for your help. I have cut off the burnt wire, back to copper wire, and soldered on a new wire, put on a spade connector and put some solder on that too (I use flux to ensure the solder sticks well), and I'm about to put it all back together, I will let you know if it works! I will make sure both spade connectors are pushed as tight as I can before I put them onto the spades of the new heater element.
 
Sponsored Links
(I use flux to ensure the solder sticks well)

Hopefully, it has done a little more than 'stuck', to serve the purpose it would need the solder to flow easily, on all surfaces.

Yep, as above, the spade connector was loose, or otherwise not making adequate contact with the terminal. The small amount of resistance, caused the contact point to heat up, making the contact progressively worse.
 
Looks to me that the original spade connector had an insulating sleeve on it. Probably when the new elements connector was pushed on rather than the spade connecting firmly the blade on the element went between the back of spade connector and the inside of the sleeve cause a high resistance connection. Something easily done especially if you don't know how stiff it is to push a spade onto the blade. The high resistance connection when passing current and heating the element the spade connector would also get very hot due to the poor contact melting the insulting sleeve or even causing it to burn.
 
Hi Diver Fred, if you look at the second photo, the right hand spade connector is the same as the burnt one was - I don't think either had an insulating sleeve on them. I did put the spade connector on correctly the last time, but I can't guarantee it was as tight as it might have been, from memory - but now I'm a lot more careful about these things. I wonder if the electric cable itself was no longer securely held by the burnt spade connector, and that's what caused it to fail.
I gave the washing machine a test at the 95C setting, the door was too hot to touch after about ten minutes, so it's all working fine now.
Harry Bloomfield, I didn't phrase that very well, I know how flux works but didn't use the right terminology.
 
Last edited:
I did put the spade connector on correctly the last time, but I can't guarantee it was as tight as it might have been, from memory - but now I'm a lot more careful about these things.

I am always wary of spade connectors, for use with high currents - they are a very, very common point of failure, even on appliances which have never been repaired.
 
I recently had to fit a longer flex to my mum's Miele washing machine.

I decided to use the same female spade connectors that had been used previously. They are the uninsulated ones that need a special crimping tool that crimps both the cable and insulation at the same time.


I can't remember which size I purchased, I do recall that I purchased ones that were too small. Because of minimum purchase levels for free delivery, I found myself adding other stuff to the order (and the second order). In addition to the crimping tool (purchased elsewhere) I spent about £70 and now have loads of connectors.

I am now a convert. I love the fact that you can see that both the cable and insulation are properly gripped. I also purchased clear "rubber" boots that you can fit over the connections (if need be).

Edit- I notice that you say that you used the same type of connector. Did you use the correct tool? I purchased a decent German branded one at a really good price (eBay).

BTW solder should not be used, it wicks up the cable and makes it rigid. Washing machines vibrate, the cable needs to remain flexible.
 
Last edited:
I recently had to fit a longer flex to my mum's Miele washing machine.

I decided to use the same female spade connectors that had been used previously. They are the uninsulated ones that need a special crimping tool that crimps both the cable and insulation at the same time.


I can't remember which size I purchased, I do recall that I purchased ones that were too small. Because of minimum purchase levels for free delivery, I found myself adding other stuff to the order (and the second order). In addition to the crimping tool (purchased elsewhere) I spent about £70 and now have loads of connectors.

I am now a convert. I love the fact that you can see that both the cable and insulation are properly gripped. I also purchased clear "rubber" boots that you can fit over the connections (if need be).

Edit- I notice that you say that you used the same type of connector. Did you use the correct tool? I purchased a decent German branded one at a really good price (eBay).

BTW solder should not be used, it wicks up the cable and makes it rigid. Washing machines vibrate, the cable needs to remain flexible.

Nor should a flex be tinned with solder, before crimping or clamping under a screw - the solder is pushed out and eventually can result in a poor termination. I do sometimes add solder, after crimping. A proper ratchet crimping tool should always be used.

Spending my working life in the industry, I have boxes of all sorts of crimps and lugs, along with the proper crimping tools for them.
 

DIYnot Local

Staff member

If you need to find a tradesperson to get your job done, please try our local search below, or if you are doing it yourself you can find suppliers local to you.

Select the supplier or trade you require, enter your location to begin your search.


Are you a trade or supplier? You can create your listing free at DIYnot Local

 
Sponsored Links
Back
Top