Moving lintel above fireplace

Joined
23 Jul 2015
Messages
11
Reaction score
0
Country
Ireland
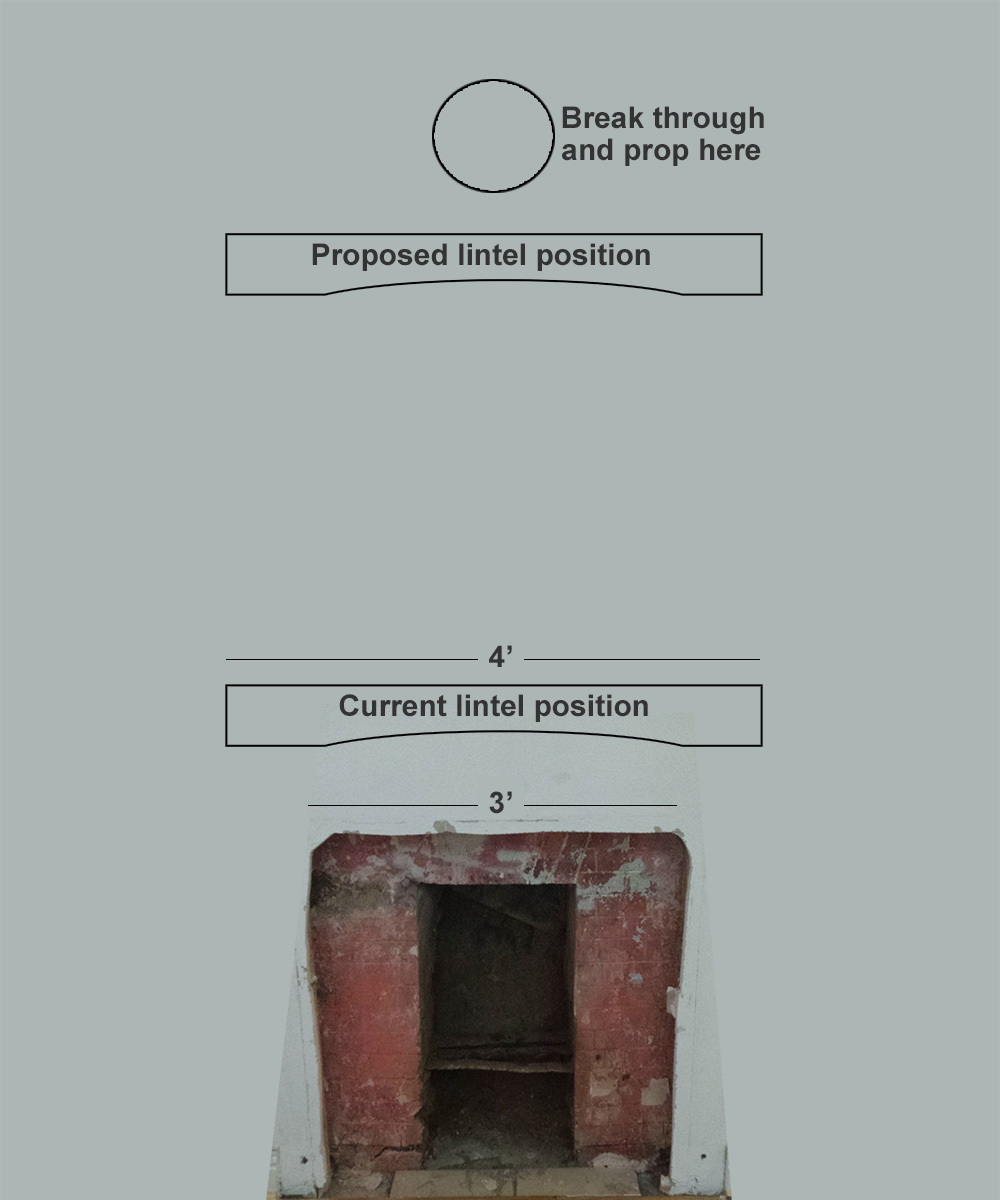
We want to put a doorway through a rubble/stone wall where there's currently an old fireplace. I'm planning to start by moving the chimney breast lintel up to the height of a doorway. I'm going to break through the chimney breast just above the final height of the lintel, prop the chimney breast by putting a needle (4" x 4" propped timber) through the hole, then dismantle the wall below, then move the lintel up to the new position and concrete it in place.


Is this the right way to go about the job? the lintel is about 4' wide, will a single needle be enough? I've read that every 2' is sufficient for propping. Anything else I should watch out for? And yes, I know it will be messy :)
 
Sponsored Links
So just to clarify, is the wall at the back a load bearing wall by any chance?

Just that you only mention one lintel? And not the second in the rear wall?
 
The external wall is behind the one with the lintel, at the back of the fireplace. I was planning to open up and secure the chimney breast first, then open up the external wall afterwards. I could try and put a needle through both and do them both at the same time, but this is one of the tricker things I've done so I was going to move one step at a time.

For the chimney breast I can simply move the existing lintel upwards - for the external wall I will probably have to buy a new lintel. I'm assuming they're both load bearing - the chimney breast will be supporting some joists from the floor above.
 
Pics of the full interior chimney breast would help, and a pic of the exterior wall position.
A possible difficulty before you do anything is the width of the chimney breast - will there be enough supporting brickwork left in the cheeks after you have opened it up? So whats the width of the c/b?

Does the chimney breast run full up to the roof stack - its not been lowered?
Have the flue(s) swept.

Open up and insert a lintel before doing anything else. Let the lintel set and bed in for 24 hrs.

I dont see any existing lintel - what you have is a flat cambered gauged brick"lintel".

Open up the doorway to the required dimensions on the c/breast interior only.

When ready you can open up the outside wall. Use a suitable lintel, as before, set it before opening up the lower brickwork.

Given the apparent width of the c/breast you might be well advised to use two strong boys for each lintel insertion but it depends on the above questions.. No needles necessary.

The upper floor joists will be trimmed around the c/breast. Typically they dont sit in the c/breast.
 
Sponsored Links
Thanks ree - that's great news about the joists and the needle - I feel more confident now, although I won't be taking any chances! Glad you agree about doing it in two sections.

We did a bit more exploring last night and cut out the door area from the plasterwork - that fireplace was inserted inside the old fireplace. There's a sort of arched lintel there already, so the original fireplace would have been about 3' wide, which is the width we need to open up for the door. I imagine if it can take a 3' fireplace it can take a 3' door. We might know more when we've cut away more to get the lintel in.


20150723_191019.jpg


If you look up inside the chimney you can see that it looks like it runs up to the stack - poor photo I know.

20150722_193509.jpg

There are very few clues from the outside - it looks like this. The top of the stack is contemporary red brick, everything below it is stone from about 1890 we think. This photo was taken halfway through painting the house! One interesting thing - the fireplace is not directly under the stack, it is a few feet to the left, looking from the inside.

20150409_174059.jpg
 
Thank you for the pics.

I now see that the c/breast is a rear projecting c/b. No need for any strong boys or propping in the room but what about the external width of the projecting c/b?

Flues often moved off centre to accomodate other flues in the c/breast and stack.
 
I presume by rear-projecting, you mean it projects into the room but not outside the house? I'll open up some more this evening and see if I can get an external width on the c/b.
 
Rear projection means the c/b projects out beyond the face of the outside wall - according to your pics, the c/b obviously doesn't project into the room.

You measure the outside width by going outside and measuring the width. Nothing needs opening up.

Why not pic the outside?
 
True, it doesn't project inside, but if you look at the exterior pic it doesn't project outside either! I have once seen into another section of the wall from the floor above and I saw the top of a block wall - so I'm suspecting something a bit like this is going on. We might need to get some more plaster off in order to know for sure.
internal_block_wall.jpg
 
OK, all becomes much clearer. Your c/b does indeed project into the room only for an inner wall to bring the whole wall flush.

You will need to expose the c/b width by hacking off the plaster,say at skirting level unitl you reach the full width of the c/b - if the c/b is narrow then the lintel could bear on a padstone on the blockwork but wait and see what the measurement reveals?

At a later stage a long bit can be drilled thro the stone and rubble outer wall to give a depth and a reference point. Or a small central hole can be opened up. First, a pic.
 
Great. Also - I was going to put in 4" x 4" timbers for lintels as a I have lot of it around - most of this house has timber lintels anyway. Any reason to use concrete?
 
Use concrete inside and metal outside - dont use timber. Thickness of outside wall must be considered.
 
Ok - I can pick up a concrete lintel easy enough. I'll ask about a steel - I assume that when you say metal you mean RSJ, there seem to be a lot of flimsy-looking metal lintels about.

So the plot thickens. I opened up a good 5' of plaster where the lintel would be as that will all have to come off anyway. It's all stone, and that same 1800's rough plaster goes out a lot further than that if you look in behind - no sign of any modern blockwork.

2015-07-24 20.07.14.jpg(front)

2015-07-24 20.13.40.jpg(looking sideways to the right behind the plasterboard)

If you look up inside the chimney, there's no joists visible (obviously - they would burn!). But if you look up from in front between the wall/chimney breast and the plasterboard you can see the joists resting on top. That seems to go all the along the wall. It seems like the first floor is resting on an internal wall and the external wall is simply holding up the roof. The blockwork I saw from upstairs may simply have been used to repair the top of the wall some time ago when the bathrooms went in.

2015-07-24 20.00.52.jpg (joists resting on the top of the internal wall)

2015-07-24 20.01.05.jpg (looking up inside the chimney)

So I'm guessing that I'm looking at two load-bearing rubble walls with a chimney flue built between them.
 
I think that you probably have a single stone and rubble wall - altho its not yet been established in any of the pics? It must be pretty thick to contain the fireplace and flue within the wall - but there is no chimney breast as such. A common practice in older cottages.

A plasterboard & stud framing has been built on the room side of this wall. Is this stud wall supporting any first floor joists?

You will only need to lintel the stone wall door way opening.

Your local building supplies company will advise on what lintel(s) is required - they will have had previous similar requests.
Give them the thickness of the wall and the dimensions of the door you propose. They will supply the rough opening dimensions and the exterior frame size.

FWIW: the metal bar across the flue was used to support the old cooking pot or kettle.
 
Nope - the stud wall is much newer than the joists which run over the top of it and rest on the wall. Thanks for all your advice - it's really helpful to get a more experienced pair of eyes on it. I'll chat to the builders merchants tomorrow about lintels - I think I'll put a concrete lintel over the fireplace anyway just so that I sleep well at night!

More updates to follow, I'm sure.

PS - That's great about the bar - we will repurpose
 

DIYnot Local

Staff member

If you need to find a tradesperson to get your job done, please try our local search below, or if you are doing it yourself you can find suppliers local to you.

Select the supplier or trade you require, enter your location to begin your search.


Are you a trade or supplier? You can create your listing free at DIYnot Local

 
Sponsored Links
Back
Top