Nest 3rd gen install

Joined
9 Jan 2021
Messages
9
Reaction score
0
Country
United Kingdom
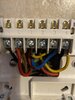
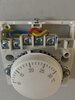
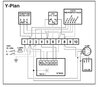
I currently have a Honeywell st9400A on my Y plan system with a Honeywell room stat. I’d like to know what wires go where from my existing controller to the nest heat link. Also what would I have to do to the existing room stat.

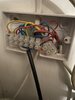
I was looking at installing the link next to the water tank so that I can use the existing thermostat wires to put the nest stat in the same position as my Honeywell one.

Thanks
 

Attachments

  • 81A73AB3-70F7-4979-AAE4-73BD932200A5.jpeg
    81A73AB3-70F7-4979-AAE4-73BD932200A5.jpeg
    242.1 KB · Views: 197
  • 728D8963-EF25-4D7C-8F94-C89CD4368621.jpeg
    728D8963-EF25-4D7C-8F94-C89CD4368621.jpeg
    215.6 KB · Views: 184
  • 651980E8-2D27-464B-95F0-26E9E6205E71.jpeg
    651980E8-2D27-464B-95F0-26E9E6205E71.jpeg
    250.1 KB · Views: 187
  • E7784869-FA90-4133-8967-F099354C5784.jpeg
    E7784869-FA90-4133-8967-F099354C5784.jpeg
    76.9 KB · Views: 171
  • EE78BE2B-C5DD-48D8-A939-5C5B8828EE63.jpeg
    EE78BE2B-C5DD-48D8-A939-5C5B8828EE63.jpeg
    207.6 KB · Views: 183
Sponsored Links
First of all Gillsboi24 welcome to the forum and congratulations on an excellent first post that actually contains helpful information. :)

Step 1. The Nest Heat link replaces the ST9400 programmer as it carries out the same electrical switching functions. If you wish to locate the Heat link in a different position to where the ST9400 is you will have to relocate the wires.

From the your diagram of the ST9400 below we can ascertain that the yellow wire currently in 1 is 'Hot Water Satisfied', blue in 3 is 'Hot Water Call for Heat', and yellow in 4 is 'Heating Call for Heat'.

ST9400.jpg


They are moved to the terminals at the Heat link that have exactly the same functions as follows:

1. The Hot Water Satisfied wire then goes to '4' at the Heat link
2. The Hot Water Call for Heat wire then goes to '6' at the Heat link
3. The Heating Call for Heat wire then goes to '3' at the Heat link
4. The 'N' and 'L' supply is self explanatory and is just moved from the ST9400 to the corresponding terminals at the Heat link
5. Heat link terminal 'L' also needs linking to the two common terminals '2' and '5' (these connections are made internally with the ST9400)

147712-5e96bc99f273496cb3b55c63f6ae727d.jpg


Step 2. Removing the Room Thermostat

Because the Nest carries out the functions of the room thermostat, the old wired thermostat needs to be decommissioned to prevent it overriding the Nest. It can't simply be disconnected as this would leave the heating wiring 'open circuit' and it will not operate. Trace the cable from the room thermostat back to its origin, when you find it, note where the red and yellow wires are connected. Now disconnect the cable and all of its wires that go to the thermostat. Once the old cable is removed, insert a link to join together the terminals that you have just removed the yellow and red wires from so that they are now electrically joined together.

Step 3. Power the Nest Thermostat

This can be done by wiring the Nest thermostat terminals T1 & T2 to the corresponding Heat link terminals T1 & T2, or by using a separate plug in power supply. If you use the T1 and T2 terminals to power the Nest thermostat, there must be an earth connection made to the terminal next to T1 & T2.

The quality of the existing terminations is poor, there is too much copper protruding from some of the terminals. Also the blue wire in ST9400 terminal 3 is being used as a live conductor, not a neutral, so should have a brown sleeve over it to show this.
 
Perfect thank you much for your reply, that has made things muscle clearer. I’ve been researching for days and couldn’t find out where the link goes in the wiring centre when I remove the stat. So you would advise to not use the current wires at the stat to power the nest.

I’ve also gone down the road of maybe doing away with the controller at the boiler and just putting the heat link in with the water tank where all the wiring is. Or would this be too awkward?
 
Once the old thermostat cable is disconnected from the mains wiring, you can use it to connect the Heat link T1 & T2 to the thermostat if you wish.

If by "controller at the boiler" you mean the ST9400. You can remove it and put the Heat link near the hot water cylinder, but as I said before, you will have to relocate the wiring accordingly. To do that you will need to understand what each wire at the wiring centre (shown in your last photo) does and is what each wire is connected to at its other end.

Unfortunately all of these installations are different, one installer may use a yellow wire to connect A to B, another may use a red wire to connect A to B. It's what a wire is connected to at each end that determines its function, not the colour of its insulation.
 
Sponsored Links
I think I’ll stick to putting the heat link where the ST9400 is sounds a lot easier. I’ll put the nest on a stand and leave the old in place but just disconnect it at the wire centre. Makes things a lot easier when I move home to put it back.
 
Probably makes sense. If I was going to do it and move the Heat link to a different location, I would start again from scratch rather than try and move things around. The wiring centre could do with some attention though.....

Capture.JPG


.....whilst the electrical terminations appear much better than at the thermostat and programmer, the cables should be securely fixed. The electrical connections themselves shouldn't be the sole means of supporting a cable. An accidental tug on one of the cables could pull live wires out of the terminals. I've seen a few that are located in airing cupboards and have been pulled out whilst someone is moving laundry, one even caught in a coat hanger hook. If that happens as well as being dangerous, finding out which terminal the wire has come out of can be tricky.

Proprietary wiring centres come with built in cable clamps to hold the outer cable sheath in place.

wc.JPG


If you don't want to replace the wiring centre the cables could be fixed by clipping them securely to the wall, or enclosing them in trunking.
 
Perfect thank you so much. I have now purchased nest and will be giving it a shot later this afternoon. given myself plenty of headaches making sure the wiring is spot on. But then you popped up and mad it sound 100x easier. I will keep you posted with the outcome. If I'm successful I will look a doing the wiring centre to make it easier to understand in the future because at the moment its spaghetti junction....
 
It’s all not installed but since I’ve installed it. The boiler comes on fires up for about 1 minuet 30 goes of for about a minuet and then comes back on. It just repeats that cycle. Any idea?
 
Sorry there is not enough information to go on there. I would need to know how all of the heating system parts were now interconnected to each other answer that. The boiler is obviously getting a switched live supply from somewhere. The question is where?

I'm not sure what you mean by "it's not all installed". The three port valve has wires that require connections to both the HW and CH systems via the the same controller to work properly. It won't work properly if it's only part installed.

From an electrical point of view, it's a simple exchange. All you are doing is taking out two switches, and replacing them with two identical switches.

ST9400.jpg


hl.JPG


Even the extra links you made between L, and the switches 'Common' terminals (2, & 5 at the Heat link) were already there, but made inside the ST9400.

ST9400 (1).jpg


So as you can see, from an electric circuit point of view, when it comes to the ST9400 and the Heat link wiring, you aren't actually changing anything from what you had before. Therefore, provided that you have the wires connected correctly, nothing will have changed.

The room thermostat wiring modification is generally the tricky part as it involves tracing the thermostat cable back to its origin. I don't know if you have done this part yet, but to start with, to test the programmer / Heat link exchange, you could leave it connected and just set it to its highest setting, This would allow you to test the Nest and make sure it is working before decommissioning the old room thermostat.
 
I’ve now connected it all back up using the rooms stat and the ST9400 and the problem is still happening. Maybe it’s been happening before and I just haven’t been listing for it. So maybe it indicates there’s a problem with the boiler?
 
The boiler should only fire up if there's a signal from the outside controls telling it to do so, an easy test if you have a multimeter and know how to use it is if when the boiler is running and it shouldn't be see if the switched live to to boiler from the external controls is present, if it is the external controls are at fault, if not, it's the boiler.

There are several things that could cause the boiler to run when it shouldn't, is there a frost thermostat fitted to the system?
 
It only happens when the heating is on and it’s trying to heat up or when it’s heating water. I’ll have a look later for the frost thermostat
 
The boiler comes on fires up for about 1 minuet 30 goes of for about a minuet and then comes back on. It just repeats that cycle. Any idea?

You might be describing a normal operating sequence for your boiler. Mine works like that. The boiler will produce more heat than the radiators can emit, so to stop the water actually boiling it will switch on / off as per the sequence you describe to maintain the water temperature that is set on the boiler's internal thermostat.

When the system starts from cold the on period will be longer then as the system warms up the on period will get shorter and the off period longer.

Newer boilers are self modulating and the flame adjusts up and down to maintain the temperature rather than going on and off.

I thought you meant that the boiler was coming on when it shouldn't do. ie when the heating and hot water were set to be off. What you describe could be completely normal.
 
Last edited:
I’m currently at work but been doing research. I have a dial on the front of the boiler behind the little cover. This is set really low. I wonder if this is to do with it keep cutting out. Maybe if I turn the dial it might help. I’ll post a picture of what I’m on about.
 

Attachments

  • 3DCE7065-AAE3-49B1-9EC2-24562E5ED997.jpeg
    3DCE7065-AAE3-49B1-9EC2-24562E5ED997.jpeg
    41.2 KB · Views: 150
OK, so you have a Baxi Solo 2 or 3. It's difficult to say what yours is set at, because the operating knob is missing from the spindle. That dial controls the temperature of the water that leaves the boiler. Anticlockwise is minimum, and then off [off is the position shown in the diagram] Fully clockwise is maximum. The burner will then cut in and out to maintain the selected temperature.

Capture.JPG


However I can now confirm that what you describe:
The boiler comes on fires up for about 1 minuet 30 goes of for about a minuet and then comes back on. It just repeats that cycle.

Is exactly how it is designed to work, it's regulating the temperature of the water heading for the radiators. It will do it regardless of the setting, the on and off periods will change slightly as you adjust it. Nothing wrong there. (y)
 

DIYnot Local

Staff member

If you need to find a tradesperson to get your job done, please try our local search below, or if you are doing it yourself you can find suppliers local to you.

Select the supplier or trade you require, enter your location to begin your search.


Are you a trade or supplier? You can create your listing free at DIYnot Local

 
Sponsored Links
Back
Top