New PVC windows, water leaking into reveals

Joined
8 Jan 2014
Messages
343
Reaction score
33
Location
Surrey
Country
United Kingdom
Hi. I'd really appreciate some advice on where to focus to fix the problem.

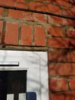
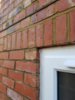
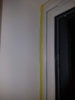
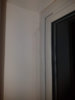
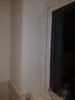
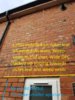
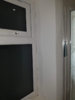
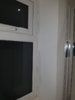
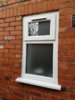
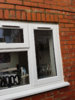
I think the photo's speak for themselves I have put some text in 2 photos to explain what work was done in altering apertures (before rennovation work, the smaller window aperture was wider and the larger narrower). Opposite of what they are now.

I don't want to put words in your mouth, as I have already repointed locally the brickwork down the sides of reveals affected (where is was poor or loose) and cut out and put new mastic down the kitchen window frame on the external RHS and it has made zero difference. I was surprised as there was some poor pointing towards the top of the aperture where some new engineering bricks have been inserted under the RHS lintel bearing. And the frame sealant didn't go properly into both top corners before. Alas that work has solved nothing....

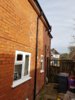
The windows have been in place for 14 months and have only just shown this problem now with recent wind and driving rain ( the elevation is south facing).
 

Attachments

  • KW External 2.jpg
    KW External 2.jpg
    228.7 KB · Views: 603
  • KW LHS 3.jpg
    KW LHS 3.jpg
    38.6 KB · Views: 613
  • KW LHS 2.jpg
    KW LHS 2.jpg
    31.8 KB · Views: 630
  • KW LHS 1.jpg
    KW LHS 1.jpg
    39.2 KB · Views: 611
  • BW External 2.jpg
    BW External 2.jpg
    255.7 KB · Views: 613
  • BW RHS Leak.jpg
    BW RHS Leak.jpg
    47.1 KB · Views: 596
  • BW RHS 2.jpg
    BW RHS 2.jpg
    38.1 KB · Views: 532
  • BW External 1.jpg
    BW External 1.jpg
    143.3 KB · Views: 671
  • KW External 1.jpg
    KW External 1.jpg
    127 KB · Views: 600
  • External side elev.jpg
    External side elev.jpg
    177.1 KB · Views: 585
Sponsored Links
I should of made it clear for reviewers that there are only 2 windows involved. But leaky reveals on one side of both. Any takers?
 
Someone, please put me out of my misery. I've already covered the water marks and stains once, repointed all looses mortar around reveals and cut out and re-applied external mastic down the side of the larger window reveal.

It seems to be coming from above, but the lintel and improvised cavity tray were already in place for what is the smaller BW (bathroom window) now.

Also the IG lintel above the larger aperture, has a sloping ski ramp to the outer skin and has 2 x weep vents.

Could the windows be faulty? Seems unlikely?
 
Poor face pointing and penetrating moisture assisted by the windows being set too far forward.

No drip from the head of the opening

Otherwise it is most likely related the the felt tray being incorrectly inserted, despite the damp being more recent.
 
Sponsored Links
Thanks both for looking.

Woody: I agree with you it is likely to be one of those things but which one as a priority to resolve.

1. All the windows in the house are set there based on where the old wooden framed windows were positioned in the 1930s. None of the other windows have this problem and neither did these apertures before modification and new windows.

2. I could buy or fashion a drip and insert it in between the front underside of lintel and top of window frames. But the lintels slightly protrude already and the silicon is really well sealed to the lintel and the frame on those top edges.

3. I guess that leaves regrinding out all the mortar immediately above and slightly to side of lintels and re-pointing.

Otherwise removing bricks or plaster for a lookin.

JohnD v2.0: Yes, maybe coincidentally, maybe not.

Both reveals now showing damp are the modified sides of the apertures.

. The 2 panel window (Kitchen Window) had brick work cut out with a saw and a cavity closer installed. It was a bit messy above though as the cut out was on the line of an 1980s small two story extension and there was a massive metal track used as a wall starter spanning both leafs from memory. Had to cut that and rip out where the window was and the lintel installation area. My builder was not known for his fine detail skills.


The single panel window had the aperture reduced by inserting bricks to both the inner and outer leafs, to the side that is leaking now. Again a cavity closer was installed.

Close up bicks externally on the corner and above of the reveals that leak attached.....

Thanks for replying.
 

Attachments

  • KW Close up.jpg
    KW Close up.jpg
    295.8 KB · Views: 397
  • BW Closeup.jpg
    BW Closeup.jpg
    380.4 KB · Views: 383
Windows are set too far forward.

Thanks for reply noseall. Can I ask what setting the windows where they are does to cause the water ingress? They are set so the inside of the frames are about flush with the inside of the outer leaf, which is where the previous ones were and all other windows in the house are.

Do you think that would likely solve the problem on its own?
 
Do you think that would likely solve the problem on its own?
Possibly.
The problem with having external brick showing internally AFTER the windows are fitted are the obvious transfer of moisture either by the brick or the joints wicking rain through or by the brick wicking cold, thus attracting condensation internally.

It can be mitigated with some clever use of cav closers and DPM along with some diligent dabbing techniques, so that the reveal plasterboard is not in contact with any of the outside masonry.

We have to do it often when lazy fitters stipulate ease of fixing over good practice.
 
Mmmm. ok. Well in our house it is just these two modified aperture, new windows that are the problem. Window fitters fitted them and I have a warranty but they did not mention the set back. And their mastic was poor anyway particularly at the bottom cill horns and it didn't seal the very top corners of either aperture. They also used no foam in any of the perimeter frame voids to seal. Their problem?.....

It sounds a bit like you would probably recommend stripping the reveals again and checking on the cavity closers and dressing the area between the back of the frame and the cav closer?

That would be preferable or more effective than my idea of grinding out all the pointing above or near the windows or removing some corner soldiers to see what is going on??

There was certainly poor pointing and a lack of mortar behind at the top corner of the double window between the eng bricks replaced in the corners as bearing for the lintel. But I rectified that and disappointingly it hasn't improved anything at all.

I feel certain it is rain penetration, not cold / condensation. It hasn't been a problem for the first 12 months plus and it is very very noticeable after severe driving rain with S / SW wind...... Which is the way the elevation faces.

Thanks for the response and advice.
 
Their problem?.....
Poor finish on the silicon - yes. Whether this is contributing is another matter. The importance of windows set-back, is often touted by architects - the further the better. In fact they'd like to see them over the cavity. Window fitters argue that they need to locate them where they are best fixed.
 
Last edited:
ha, yes. Thanks. Obviously over the cavity closer would mean some strapping arrangement for fixing (a bit of a faff for fitters) or just foaming in. Would look weird in our house with all the other windows only set an inch or so back...
 
Some of that pointing does not look suitable - joints look rough and do not have a weathering face to cast off water.

Knowing the potential routes and likely culprits, it should be relatively easy to inspect the area critically, all the way up to the eaves and determine what's causing it.

As a last resort, coat the wall with a suitable water repellent.
 
Have you had cavity insulation put in ? had similar problem in friends house i repointed gable installed cavity tray,cavity closure on reveals new silicone around frames and damp still appeared. went one day when raining heavily,whole gable drenched i removed some brick around cavity tray and found the blown insulation soaking wet and bridging across, so advised her to either remove insulation or try a waterproof coating as woody says.
 
Thanks woody and Charlie George.

Edit: No cavity wall insulation well. Actually from about the middle of the double window on, towards the non leaking reveal, there is mineral wool type Batts from the 1980s.

But the side of the reveal leaking and all the original elevations have none....and the single window has none.

Trying a repellent was one option I was considering to see if it improved or eliminated the problem. Possibly along with repointing that soldier course above the double window and the area around the lintel bearing on that side.

The pointing on the other single window, looks pretty good though doesn't it? That one has perplexed me a bit as the aperture has been reduced and didn't leak before. So using that logic it has to be the infill area. The bricks are hard as nails so has to be mortar? It took a few days of driving rain before that one showed. One day of driving rain on the other....

Being super critical, on the single window, there is an area at the top left, where the finish has been brushed and doesn't look the same as the rest of the pointing. I could revise that area.

The brick weep vents positioning and spacing seems a bit poor unless I am mis-interpreting. On the old double window, the aperture, now reduced and a single window, there are only 2 x weep vents 1, at each extreme end of the lintel probably 1.4M apart.

On the other, double window, there are two above the double window area, probably 800mm apart and none near the top corners / lintel bearing.

Plus they all appear to be set at the height of the bottom of the brick, rather than immediately on the lintel. Wouldn't that mean 10-12mm plus of water needs to build up before they release and the water would more likely spread accross the lintel width? The weep vent itself could let water in that is trapped by a 10mm lip?

Thanks again.
 
Last edited:

DIYnot Local

Staff member

If you need to find a tradesperson to get your job done, please try our local search below, or if you are doing it yourself you can find suppliers local to you.

Select the supplier or trade you require, enter your location to begin your search.


Are you a trade or supplier? You can create your listing free at DIYnot Local

 
Sponsored Links
Back
Top