Painting walls after wallpaper off.

Joined
25 Aug 2018
Messages
8
Reaction score
0
Country
United Kingdom
Hello,

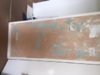
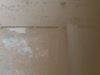
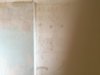
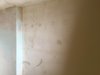
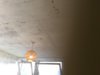
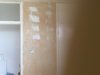
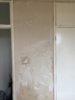
I put these photos out. i wish to start painting these wall but on taking wallpaper out i got this. Don't think i can just paint over it. Can someone help me how to go about painting these walls. I painted other walls in my flat but they were easy because there was no wallpaper just solid wall to paint.

any advice much appreciated. any good videos out there you know of that shows how to paint similar walls.

Thanks.
 

Attachments

  • IMG_5383.JPG
    IMG_5383.JPG
    9.9 KB · Views: 242
  • IMG_5384.JPG
    IMG_5384.JPG
    11.9 KB · Views: 221
  • IMG_5385.JPG
    IMG_5385.JPG
    11.1 KB · Views: 221
Sponsored Links
Is your house a hundred years old?

D**t*m**r
 
no its purpose build ex-council flat, i say build in 60s. there is some black areas on wall.
 
black areas are usually mildew caused by damp walls. Are these in a bathroom?

You need to scrape off the loose material. Probably a broad metal scraper will do it. Generally, if it adheres too tightly to scrape off, it is firm enough to paint over, but you will need a thin film of filler or the surface will look scabby.

Wet the wall first, then your scraper will also remove the residue of wallpaper paste, it will come off like sludge on your scraper. Wet it using a plant mister or garden sprayer. Add a tiny drop of washing-up liquid.

On a test sample, try wetting some of that old paint with boiling water. If it comes off with boiling water, but not with warm, it is distemper (which it looked like to me) which is a much more difficult surface. The age of the building is very relevant. It was not so often used by the 1960s but will be in older houses
 
Sponsored Links
Do i apply the filler all over the wall to make it even before i start with paint.
 
Try your own technique, but on a scabby wall, I sometimes apply filler very thin, pressing hard with a broad metal knife so it goes into the dips and scrapes off the high spots. You may need to lightly wipe with extrafine sandpaper if you haven't got the hang of it, but filler is very soft and you can easily rub it all away. you can also scrape it smooth with a broad metal scraper.

With practice you can get better results with fine finish plaster, mixed up to custard consistency, and wiped on with a plasterers trowel, which is very wide. Plaster is cheaper and more durable than filler, but it sets fast so you must work fast, and work with a small amount at a time. Once initial set, you can spray it with water and polish the surface. Don't sand it, as the trowelled finish will be smoother than a sanded surface.


I removed all wallpaper, have question as per photo how to seal these gaps between wall and ceiling wall
 

Attachments

  • 0829A596-266D-4B14-A294-5FF35D9D5B7F.jpeg
    0829A596-266D-4B14-A294-5FF35D9D5B7F.jpeg
    99.7 KB · Views: 198
Decorator's caulk, available in a large tube and applied by gun.

It is white and can be painted.

Silicone is more flexible and less prone to sink or crack, but won't hold paint. If the ceiling is white it may not show. Smooth it with your finger or a plastic tool, remove all excess.

Clean away all dirt and dust with a hoover then a small damp brush, caulk will not stick to it.
 
Now that I have removed wall paper I will take these steps, feel free to correct me and offer advice, much appreciated:

1. use quick dry filler (polycell)to fill any imperfections
2. Start using electric sandpaper on walls to smooth
3. Apply Dulux trade super Matt high opacity white paint
4. Follow that up a good normal white paint

The steps are in order, would appreciate for your feedback, have decided to do away with lining paper instead just paint after sanding it.
 
You didn't mention cleaning the wall, to remove dirt, loose paint and old paste. Do that first.

What was the cause of the black marks? Have you found and corrected it?

Remember to apply one or two mist coats, if you have any bare plaster or filler.

You only need Supermatt if the plaster is new and still drying out. If it is, you must not apply a normal vinyl paint until the plaster is fully dry.


This is how it looks at present, forgot to mention that I clean all walls n ceiling with anti fungus spray.

Don’t understand what you mean by mist coats, can u please shed some light on it

Dulux super Matt was recommended by diy man to apply before normal Paint.

Can someone tell me if new plastering is required, or I start sanding and apply paint. If you see some part of walls are blue and behind is cement wall. Is sanding over it and then Painting is fine
 

Attachments

  • BE2AB6D3-49CB-45C8-91BF-17B8F0BC97A9.jpeg
    BE2AB6D3-49CB-45C8-91BF-17B8F0BC97A9.jpeg
    99.5 KB · Views: 196
  • 10F7A73A-3D23-4A5E-B8D5-44F5F7B6FCDE.jpeg
    10F7A73A-3D23-4A5E-B8D5-44F5F7B6FCDE.jpeg
    107.7 KB · Views: 188
  • 01C11EB8-9458-48AE-9E1A-5113C4D5643D.jpeg
    01C11EB8-9458-48AE-9E1A-5113C4D5643D.jpeg
    129.4 KB · Views: 204
  • 598AF2C5-4A16-449D-9B4F-A921015C9293.jpeg
    598AF2C5-4A16-449D-9B4F-A921015C9293.jpeg
    109.4 KB · Views: 208
a chemical spray does not remove dirt or old paste.

One method is to wet the wall and scrape off the softened dirt and paste with a broad metal scraper.

What was the cause of the black marks?
 
a chemical spray does not remove dirt or old paste.

One method is to wet the wall and scrape off the softened dirt and paste with a broad metal scraper.

What was the cause of the black marks?
Few questions
Can I use electric sander over the blue paste you see and also should I sand the ceiling or just paint it (already clean it)

Also pls advice if I really need to plaster the walls, can I just use electric sander and filler to do job before painting

Black marks on ceiling is the scratching wall patron ceiling
 
the scratching wall patron ceiling

I don't know what that means.

If you have already cleaned and scraped the walls and taken off all the dirt and paste, you can apply thin filler to any low spots and sand any scabs. The filler should be so thin that you can practically see through it. Use your broad metal knife to press or scrape it smooth before it goes hard. When you paint it white, that will highlight to the eye any remaining defects, so fill or sand them smooth before applying your finish paint.

An electric sander will make a vast amount of dust. Filler can (if necessary) be lightly wiped with extrafine paper to smooth it, by hand.
 
I just applied a Two coat filler by hand as you can see, i will let it dry it overnight and apply sanding over it tomorrow then this part looks be ready to paint soon.

Can you suggest what to do with the plasterboard wall that is the big wall in previous photos. Do I need to apply something or sand it before paint, any suggestions
 

Attachments

  • 03BD9EDF-797F-4DFF-A241-3CD9FCE5424F.jpeg
    03BD9EDF-797F-4DFF-A241-3CD9FCE5424F.jpeg
    162 KB · Views: 182

DIYnot Local

Staff member

If you need to find a tradesperson to get your job done, please try our local search below, or if you are doing it yourself you can find suppliers local to you.

Select the supplier or trade you require, enter your location to begin your search.


Are you a trade or supplier? You can create your listing free at DIYnot Local

 
Sponsored Links
Back
Top