Hi all,
Firstly please allow me to apologise for the numerous questions. There is a lot going on at the moment and I need as much help as I can get!
Our first room is almost prepared for plastering. The majority of the wallpaper has been removed (all three layers of it), the skirting boards are up and the coving has been taken down.
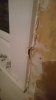
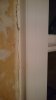
Getting the wallpaper off around the windows has been fiddly and as you can see some still remains. Whilst removing this it got me thinking about the window trim and the sealant that has been used when installing the windows.
In order to achieve the best possible finish is it better for me to remove this sealant and the trim it's attached to to give the plasterer the flattest surface to work with? Once he's done I can then source new window trim and seal as required. As you can see from one of the attached pictures some trim has been damaged (not our doing!).
If the preferred option is to remove the sealant what would be the best way of doing this? Do I simply just cut it away?
Thanks again for any help
David
Firstly please allow me to apologise for the numerous questions. There is a lot going on at the moment and I need as much help as I can get!
Our first room is almost prepared for plastering. The majority of the wallpaper has been removed (all three layers of it), the skirting boards are up and the coving has been taken down.
Getting the wallpaper off around the windows has been fiddly and as you can see some still remains. Whilst removing this it got me thinking about the window trim and the sealant that has been used when installing the windows.
In order to achieve the best possible finish is it better for me to remove this sealant and the trim it's attached to to give the plasterer the flattest surface to work with? Once he's done I can then source new window trim and seal as required. As you can see from one of the attached pictures some trim has been damaged (not our doing!).
If the preferred option is to remove the sealant what would be the best way of doing this? Do I simply just cut it away?
Thanks again for any help
David