Re skim over day old plaster?

Joined
27 Jan 2014
Messages
1,240
Reaction score
80
Location
Essex
Country
United Kingdom
Hello spreads
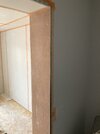
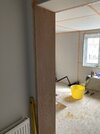
had my first proper go at plastering today (have done repairs and bits and pieces before)
it’s come out smooth and good enough but there are some low spots where the trowel has depressed in and out when troweling
My question is, can I just plaster straight on to it in the morning whilst it’s still drying out or will it need to fully dry and seal?
Thanks
 
Sponsored Links
OP,
Leave it to fully dry out, and then go at the spots with, say, two coats of 50:50 Pva.

But there are one or two buts:
1. how significant are the "low spots" - have you had a straight edge across each one?
2. are there lots of low spots?
3. Given that you are new to plastering you might find it difficult to skim the low spots flat with the wall surface and trowelled to nothing at the edges?
4. a 12" or 14" trowel is best for you doing skimming.
5. Well done for having a go! Keep practicing, plastering is mostly experience.

So I only started with the reveals on a walk way to get a feel for drying times etc. so it’s between to corner beads and the discrepancies might actually come where the beads are slightly flex here and there.
Probably better off leaving it I reckon and just easifilling after a mist coat.
If I could have gone straight over it then I would have…. And before anyone says anything about the tape under the bead I just personally thought this may prevent cracking and I’m aware it’s probably doing nothing
 

Attachments

  • image.jpg
    image.jpg
    185.3 KB · Views: 33
  • image.jpg
    image.jpg
    203.6 KB · Views: 33
Last edited:
OP,
No problemas, your work so far looks great.
Do you intend to go at the ceiling?
Now I've got to get working.
 
Sponsored Links
OP,
No problemas, your work so far looks great.
Do you intend to go at the ceiling?
Now I've got to get working.
I will do the entire room and I knew typically you would do a ceiling first but I’m going to do one wall so I know I can do a larger area
 
Fair enough.
Maybe do a whole room of walls before attempting a ceiling?

My method for the inside corner at the wall to ceiling abutment is to fold a length of paper tape and press it into the prepared corner - prep by running 50mm of skim each full length side of the abutment.

I dont use mesh tape at abutments - only paper tape as above..

I notice that you've got new gear - keep a wash bucket handy, and constantly clean everything - tools, hawk, boards & buckets - to keep it newish.
I got some done today but where I came unstuck was it setting so quick. I will use that stuff that slows the set time down for a while.
My trowels are old, I just brought a new plastic trowel and some speed skims to assist.
I tile so I’m no stranger to cleaning buckets and trowels sadly. I wish they cleaned themsleves
 
Why not buy a small amount of set Retarder & see how it goes?
Are you brushing on ample clean water for suction?
Today wasn't that hot - how long did you take to skim a first coat over one wall?

I use a 14" steel trowel for most everything.
 
20 minutes I reckon.
Retarder, that’s what I needed.
I was spraying water on in between trowels, after the second coat.
I reckon maybe it was just cos it was my first big wall
 
20 minutes I reckon.
Retarder, that’s what I needed.
I was spraying water on in between trowels, after the second coat.
I reckon maybe it was just cos it was my first big wall
 

Attachments

  • image.jpg
    image.jpg
    241.8 KB · Views: 15
Why not buy a small amount of set Retarder & see how it goes?
Are you brushing on ample clean water for suction?
Today wasn't that hot - how long did you take to skim a first coat over one wall?

I use a 14" steel trowel for most everything.
I attached a photo to one of my messages. It’s quite smooth, possibly a light sand but when I put a level vertically and horizontally it’s not dead flat (ie. Small gaps in the level, slight bumps) it’s the same on a wall I had a professional plasterer do so I guess there will be some discrepancies, but if I want it dead flat and level what methods can I use? Or is it just practice ?
 
Yes, your dead right, its experience, experience, experience, & practice, practice, practice. Your doing great for a first timer - forget about the bumps and dips - when your troweling improves you'll do flat and plumb without thinking about it.

You've done good doing it in 20 mins.
.
Dont start trying to hack or scrape off skim - unless its still wet.
Only do one wall at a time.

As I suggested - stay with your steel trowel, its too early for Speedskims or Darby's.
Be very spare with water, most water is used for suction - when skimming the coats simply brush wet your trowel, and a light spray on the finish if you reckon its needed.

I think you've used a bit too much water because, unless its the photo, the finish looks grainy but the point is that you got it on the wall and you got a finish - no small thing when starting.
Leave it alone now, let it dry. Check it out tomorrow.

I think that ceiling will be too big for you working alone - if a ceiling goes bad you might have to replace plaster boards.
Would you be working off a Hop-up or scaff boards? With a Hop-up, hope I'm wrong, but i dont think you'd have much chance.
 
My question is, can I just plaster straight on to it in the morning
No

When I was practicing I made a right mess and the following day painted on a coat of neat SBR, works a treat

if you leave a day before putting on another coat, the multifinish will be high suction so def seal it properly
 
Yes, your dead right, its experience, experience, experience, & practice, practice, practice. Your doing great for a first timer - forget about the bumps and dips - when your troweling improves you'll do flat and plumb without thinking about it.

You've done good doing it in 20 mins.
.
Dont start trying to hack or scrape off skim - unless its still wet.
Only do one wall at a time.

As I suggested - stay with your steel trowel, its too early for Speedskims or Darby's.
Be very spare with water, most water is used for suction - when skimming the coats simply brush wet your trowel, and a light spray on the finish if you reckon its needed.

I think you've used a bit too much water because, unless its the photo, the finish looks grainy but the point is that you got it on the wall and you got a finish - no small thing when starting.
Leave it alone now, let it dry. Check it out tomorrow.

I think that ceiling will be too big for you working alone - if a ceiling goes bad you might have to replace plaster boards.
Would you be working off a Hop-up or scaff boards? With a Hop-up, hope I'm wrong, but i dont think you'd have much chance.
The ceiling is low, I can reach it.
I didn’t get my timings right and is room for improvements but honestly I’ve had worse “professional” plasterers

I’m not totally new to it, I’m pretty much a multi trader. I knew I could get it on the wall. Few months practicing and hopefully I will improve considerably

I found the speed skim (actually got a refina x slim) saved me by flattening it in large sections when I was struggling on second coat
 

DIYnot Local

Staff member

If you need to find a tradesperson to get your job done, please try our local search below, or if you are doing it yourself you can find suppliers local to you.

Select the supplier or trade you require, enter your location to begin your search.


Are you a trade or supplier? You can create your listing free at DIYnot Local

 
Sponsored Links
Back
Top