Refurbishing 100 years old timber staircase

Joined
11 Nov 2013
Messages
49
Reaction score
2
Location
Surrey
Country
United Kingdom
Hi all!

I have ripped up carpet and some very old carpet grippers on my stairs, previous owners have just laid new carpet down over the years, I found carpet grippers from 1962 made in England!

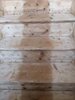
Using a orbital sander and mouse sander I started sanding the staircase as in photo attached.

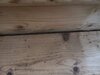
First of all I can't seem to get the old runner in the middle to disappear, been using 40 grit, looks like the old stain as seeped well deep into the wood. Also there are a ton of nail holes from grippers that look ugly, before I even consider to carry on, I have a few questions, seems this totally new to me:

- How do I fill all these nail holes would a gap wood filler do the job? (my friend recommend Bona Gap filler)
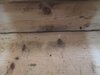
Also there are a couple of wide gaps 5-7mm between steps can I use Bona Gap filler for this.

-And can I use a dark wood dye to make this runner not visible to the eye?

My thoughts so far....... is this timber really worth it to restore and can i restore! I'm just not confident @moment I can restore to something looking really nice. But if I can get advice this might change, thanks!
 

Attachments

  • IMG_20200605_191001.jpg
    IMG_20200605_191001.jpg
    272.3 KB · Views: 239
Sponsored Links
There was a similar thread on here within the last 12months? I'll see if I can find it.
The guy "won" eventually but it took a lot of effort
If I remember it was partly that the stain was an old fashioned one that genuinely stained, rather than sat on the surface.

Once you get to an acceptable bare finish, collect the sanding dust and mix it with PVA to make a filler that matches
 
I don't think more sanding will make the wood colour even.
What i would do is find a stain matching the middle run, stain and blend the sides, then use a slightly darker stain to even up thecolour.
Unless you don't mind going very dark (walnut for example) and cover the lot.
As suggested pva and saw dust for the little holes or ronseal wood filler which comes in different shades, or cuprinol wood filler which takes any stain perfectly.
For the wider 7mm gaps you mentioned, i think it's best to have pictures of them.
If they're gaps in between the joints, you will need to access the staircase from underneath and see if you can close that gap.
Any filler will simply crack.
 
I've started downstairs today, 2 steps and it's the bottom 2 steps where the biggest gaps are, see attached 2 photos. Not finished sanding yet

TBH looking at the grain and knots with condition of the timber wood, I want a dark as colour as possible as a lighter or medium colour will not like nice IMO. So would this mean I wouldn't need to worry about the stain runner and a darker coat like Walnut would hide it? and also a matching dark wood filler to fix small nail holes and possibly cracked knot as below ?

Also there one step with slight split 6 inches so maybe a glue or filler?

Thanks
 

Attachments

  • IMG_20200606_152907.jpg
    IMG_20200606_152907.jpg
    164.9 KB · Views: 213
  • IMG_20200606_152915.jpg
    IMG_20200606_152915.jpg
    126.7 KB · Views: 212
Sponsored Links
I managed to reduce gaps of last few steps via underneath the stairs down to about 2-3mm with a few nails into riser/tread.
 
You need to use screws.
Nails on a staircase come off easily.
Get back underneath armed with reissers screws, a drill for pilots and an impact driver and all will be fine.
With the colour, probably walnut will cover it, but better test on a step first.
 
I removed all the nails I put in very gently and brought some Reisser screws from Toolstation, this worked wonders, after drilling in the gaps are closed even more, some are flush now. Thanks!:)

There is a bad creak on 1 step and underneath I can see a Riser wedge missing looks like 170mm, so I've ordered a replacement online. And a crack needs filling on the tread.

I ordered a sample heavy duty traffic varnish colour (walnut) and will test on top landing step, plan is to brush one coat on each bare looking sides and then 1 coat over all the step including runner. Lets see.

I have to prepare other areas, like walls and ceiling, want to prepare and paint walls/ceiling etc before starting the stairs. I'll update this thread at some stage with results.
 

DIYnot Local

Staff member

If you need to find a tradesperson to get your job done, please try our local search below, or if you are doing it yourself you can find suppliers local to you.

Select the supplier or trade you require, enter your location to begin your search.


Are you a trade or supplier? You can create your listing free at DIYnot Local

 
Sponsored Links
Back
Top