gaps in Victorian staircase

Joined
23 Mar 2021
Messages
47
Reaction score
1
Country
United Kingdom
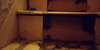
I'm stripping and painting my very old staircase , after removing the carpet I can see that some of the fronts of the steps have a large gap in them below the actual step , some are worse than others , the face and the step are solid , should I be concerned ? , Should I fill the gaps with strips of wood , steps do creak but they always do ... It's an old house , thanks .
 

Attachments

  • 20210323_153848.jpg
    20210323_153848.jpg
    166.9 KB · Views: 182
Sponsored Links
The issue is that the tread and riser are parting, from the looks of it it's because the tread which has warped. I have to say that yours look very thin by modern standards. Normally the riser fits into a groove on the underside of the tread (see photo below) This groove is just behind the nosing and is often only 4 to 9mm deep at most. TBH, with such major amount of warping, but without physical inspection, I'd be inclined to say that the stairs have probably had their day and that you should consider replacing them

Riser-Housing-555x405.jpg

Above: Showing the plywood riser housed (inserted into a groove) into the tread

Were this my property I'd probably see if I could remove the under drawings from the stairs (assuming that there are any, and that they are not lath and plaster). That would allow me to access the glue blocks (see photo below - the glue blocks are the triangular bits).

Glue-Blocks-555x405.jpg

Above: Showing the triangular glue blocks which are located at the joint between the riser and the tread (in the corner). Note that this view has the stairs inverted. The darker coloured material is a plywood riser the light coloured piece is the tread

These are quite possibly absent, but if they are there they need to be removed. Next a full length block needs to be glued and screwed in place where the underside of the tread meets the riser. Something like 3 x 2in (70 x44mm finished size) planed softwood should do, placed vertically. The block has glue spread on the top and front before inserting it and I'd strongly recommend a traditional gap filling adhesive such as Ellmer's Cold Hide Glue. The block is held in place by one person whilst a second person screws through the riser into the block first, then through the tread into the block to secure it in place. You'll need something like 5.0 x 40mm or 5.0 x 50mm screws, at 75mm centres, at least 25mm in from the edge of the new block. This exercise needs to be repeated for every damaged tread. Even then it is only really a temporary fix as there may be other issues such as missing wedges (see below) and broken/cracked treads which can cause squeaks but cannot be seen your picture

Wedges-555x405.jpg

Above: Showing the triangular glue blocks together with the wedges which are used to retain both treads and risers in place. The grooves (housings) which the treads and risers sit into are tapered to allow the wedges to work. Note that this view has the stairs inverted (again)
 
Last edited by a moderator:
Next a full length block needs to be glued and screwed in place where the underside of the tread meets the riser.

would you screw the tread down to tighten it against the riser? or would it sit on the block?
 
Sponsored Links
my thoughts
assuming the riser is firmly affixed to the back off the tread and not overlapping in a "dropped " position as the riser should be several mm into the nose off the tread i wonder iff the wedges fell out off the lower tread it has dropped and been filled in many many paints ago and over time with use the tread has sagged ??
what is the measurement between nosing and tread on the separated riser and the next one up or down ??
 
Last edited:
would you screw the tread down to tighten it against the riser? or would it sit on the block?
With treads that thin the risers are likely to be even thinner (risers are always thinner than treads in any case), hence the block suggestion. There is also the likelihood that screwing down into the edges of the riser will cause splìts and further damage the riser.
 

DIYnot Local

Staff member

If you need to find a tradesperson to get your job done, please try our local search below, or if you are doing it yourself you can find suppliers local to you.

Select the supplier or trade you require, enter your location to begin your search.


Are you a trade or supplier? You can create your listing free at DIYnot Local

 
Back
Top