Removing nut on old towel radiator

Joined
18 Apr 2025
Messages
84
Reaction score
3
Country
United Kingdom
Hi

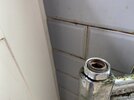
Replacing ancient towel rad as part of bathroom upgrade. Removed old rad and see the connector in the images. Do I just need to remove the nut with a hexagon key and use this with new rad?

Just asking, as not provided with new radiator.

Sorry for dopey question,

Take care.
 

Attachments

  • IMG_9452.jpeg
    IMG_9452.jpeg
    163 KB · Views: 54
  • IMG_9451.jpeg
    IMG_9451.jpeg
    182.2 KB · Views: 46
Hi again

Typical-biggest Allen key too small. Seems to be about 16mm width. (Just short of 3/4”) Is that what I need?

Regards
 
If stuck for a correct allen key, I used to insert part of my Footprint grips and tap home with a hammer then proceed to unscrew the union tail. When stuck miles from base, you have to improvise or end up with an irascible customer;)(y)
 
Hi again

Bought the above product from Screwfix. I’ve tried loosening the old ones, as needed the key anyway to tighten new tails purchased.

I’ve inserted the 13mm into slot, and it fits snugly. However, I can’t budge the inserts. If I put key into drill, it just spins around? (Am going anti clockwise)

Any wisdom from sages would be v welcome.

Thanks
 
As long as the allen shaped tail key fits nice and tight into the hex in the rad tail then just get levering, it should go eventually. Some can be really stubborn if the installer rammed them in too tight.
 
If a really stubbornly tight thread won't budge with brute force then try heat to the rad to expand the outer metal. A good well aimed flame usually does the trick as does a knock with a hammer on the key. Remember, a faint heart never won a fair maiden .. give it some welly (y)
 
Thank you (for both suggestions). I’ve since got some movement, but only by bashing the other part of the L with a mini sledgehammer. However, worried this will knackered the thread. Also curious about behaviour of key in drill, as alluded to in my previous post.

Moving on, the new TRV valves fit new rad nicely, but I only seem to be able to tighten using a spanner on the external nut. No room to get the new rad key that I can see. Is that right?

(Attached image of valves purchased from B&Q.

Sorry to be taking so much of your time.

Regards
 

Attachments

  • IMG_9461.jpeg
    IMG_9461.jpeg
    88.2 KB · Views: 44
They look like 1/2" tails - A bit strange though, not the normal tail you would use, you would use an adjustable on the flats and just nip them up. They use o-rings to seal to the rad tapping and to the valves so no need for PTFE tape or similar. Just make sure the tapping and the paint around it is nice and clean

These are what would usually be 'normal' 15mm rad tails, that use PTFE tape on the 1/2" threads to seal into the rad tapping and a 15mm compression end for the valve/TRV

1749074454324.png
 
Hi again

Sorry to revive this saga.

Fitted new tails to new rad and set about fitting and connecting latter.

First problem was bracket holes in wrong position on wall. Half expected that- old towel rad about 25 year’s old.

Drilled two new holes, connected brackets but then ran into another problem. Although the new rad lines up nicely width wise and height wise with the pipes, the new brackets push the rad too far out beyond them. You’ll appreciate you can extend width of bracket from wall but not shorten it.

Both the inlets have some vertical free play and one has a bit more back to front movement than the other. However, even that isn’t sufficient to line up with the rad.

The only thing I can think of is to try and cut the brackets back a few inches-plastic so will end in tears.

Conversely, get plumber to sort. Don’t mind doing that, but new LVT laid etc.

Is this a common problem?

Thanks again.
 

If you need to find a tradesperson to get your job done, please try our local search below, or if you are doing it yourself you can find suppliers local to you.

Select the supplier or trade you require, enter your location to begin your search.


Are you a trade or supplier? You can create your listing free at DIYnot Local

 
Back
Top