Replace BG Up2 + Wr1 with Nest 3rd Gen-How to remove WR1??

Joined
6 Dec 2023
Messages
4
Reaction score
0
Country
United Kingdom
Hi group,

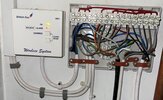
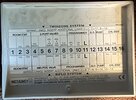
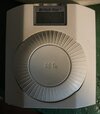
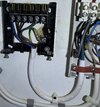
I am installing a Google Nest in a British Gas boiler 330+. It has a WR1 and a wireless thermostat. I managed to install the Google Nest Heat link, and it seems that it is working. However, I would like to remove the WR1. No, idea how to do it. Please I need your help. I think I have a Y Plan with water tank. Boiler for heating and Hot water. See pictures bellow. Thanks indeed.
 

Attachments

  • IMG_2383.jpg
    IMG_2383.jpg
    262.6 KB · Views: 55
  • IMG_2382.jpg
    IMG_2382.jpg
    409.7 KB · Views: 36
  • IMG_2384.jpg
    IMG_2384.jpg
    250.9 KB · Views: 39
Sponsored Links
Remove the L and N and then join the switch wires at the wiring center
 
Thanks a lot for you reply. To Join switch wires means to connect 1 and 3 at the wiring box?
Thank you indeed
 
Last edited:
This is the wiring inside the WR1. Thanks
 

Attachments

  • IMG_2541.jpeg
    IMG_2541.jpeg
    393.3 KB · Views: 26
Sponsored Links
1702997164770.png


First disconnect the 230V supply to the WR1 (aka a Drayton SCR)

Then the wires in WR1 terminals 1 & 3 need connecting together. This is best done by tracing them back to the wiring centre and noting where they go. Once you've done that, disconnect them and insert a wire to join together the two terminals that the wires have just been removed from.

I don't always take too much notice of the nomenclature inside the wiring centre lid, because sometimes installers stick to it, and sometimes they don't, so it's better to physically trace the wires. However, if it's correct it will be terminals 2 & 3 "Roomstat Call & Com". From the photos, as best as I can tell yours does look to be that way.
 
View attachment 325737

First disconnect the 230V supply to the WR1 (aka a Drayton SCR)

Then the wires in WR1 terminals 1 & 3 need connecting together. This is best done by tracing them back to the wiring centre and noting where they go. Once you've done that, disconnect them and insert a wire to join together the two terminals that the wires have just been removed from.

I don't always take too much notice of the nomenclature inside the wiring centre lid, because sometimes installers stick to it, and sometimes they don't, so it's better to physically trace the wires. However, if it's correct it will be terminals 2 & 3 "Roomstat Call & Com". From the photos, as best as I can tell yours does look to be that way.
Thanks. After removing the WR1, I had a low pressure error F22. After several on and off, everything is working now. No idea what was the issue. thanks
 
Last edited:

DIYnot Local

Staff member

If you need to find a tradesperson to get your job done, please try our local search below, or if you are doing it yourself you can find suppliers local to you.

Select the supplier or trade you require, enter your location to begin your search.


Are you a trade or supplier? You can create your listing free at DIYnot Local

 
Back
Top