Replace Drayton LP111 and thermostat with Nest

Joined
3 Oct 2011
Messages
14
Reaction score
0
Location
Renfrewshire
Country
United Kingdom
Hello all,

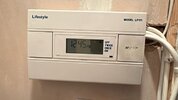
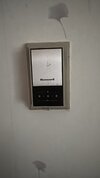
Im looking for some advice. I currently have a Drayton LP111 timer connected to my Vokera Linea compact boiler (no build in timer). I then also have a thermostat on the wall in another room. I am looking to replace both with the Nest heat link.

Ive been digging around on google but cant seem to find any info from someone who has done this before.

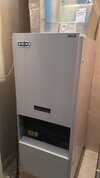
My boiler is the same as this (minus the built in timer):
https://photo.mybuilder.com/2_thumb/4600696_2bae5cd47f.jpg

Can someone give me some pointers on how to do this? any help much appreciated.

Thanks,
Andy
 
Sponsored Links
Step 1 - Install the Heatlink

The Drayton LP111 connections are identified for you in the diagram below:

LP111.JPG

The wires need to be moved from the LP111 terminals, to the Heatlink terminals that carry out the same functions, and are identified for you below. 'N', 'L' and Com(mon') are the same for both, and 'on' at the LP111 corresponds to 'Call for Heat' at the Heatlink. [If your version of the Heatlink has terminals 4 5 & 6, for hot water control, there is nothing to connect to these]

Heatlink.JPG

If there is presently a link on the LP111 between 'L' and 'Com' you will need to reinstate it between 'L' and 'Common' at the Heatlink. Do not add one if there isn't one there now.

Step 2 - Decommission the existing thermostat

Because the Nest carries out the functions of the room thermostat, the old wired thermostat needs to be decommissioned to prevent it overriding the Nest. It can't simply be disconnected as this would leave the heating wiring 'open circuit' and it will not operate. The thermostat can be decommissioned in three ways, in order of preference, they are.

1. Find the origin of the thermostat cable and disconnect it. Then link the terminals where the two switching wires were connected to together

2. Remove the existing thermostat and replace it with a junction box, connect the two switching wires together and isolate the neutral (if there is one)

3. Leave the existing room thermostat in place and set it to the highest setting. (Or put both of the switching wires in 'L' terminal)
 
Last edited:
Thats brilliant. Thanks Stem. thats the process i had in my head, its good to know i was on the right lines. ill aim for option 1 and connect the switching wires for the thermostat at the boiler. i think i know where it appears. we just moved in to this house so we are discovering all sorts of weird and wonderful things haha.
 
OK today is the day I try and connect the nest. Here' h my wiring looks. Anything unusual or will I just follow your instructions?
 

Attachments

  • 20171201_125841.jpg
    20171201_125841.jpg
    158.7 KB · Views: 961
  • 20171201_125850.jpg
    20171201_125850.jpg
    169.1 KB · Views: 1,005
  • 20171201_125846.jpg
    20171201_125846.jpg
    148.8 KB · Views: 925
  • 20171201_125841.jpg
    20171201_125841.jpg
    158.7 KB · Views: 973
  • 15121345824602010423562.jpg
    15121345824602010423562.jpg
    111.8 KB · Views: 2,594
Sponsored Links
Unfortunately I am away at the moment and I can't see the photos too well on my phone. However if the photo with the fruit wallpaper is of the Drayton backplate with the link, and the thermostat backplate with the embossed wallpaper, then both are as I expected to see. The thermostat switching wires are in terminals 2 & 3.
 
Thanks again for getting back to me. I did as you instructed and all is working well. The only part I wasn't sure of was how to take the thermostat out of the equation so it's just turned up full at the moment. Can you give me more info on how to go about that? I'm guessing I connect the blue and brown wires (2 and 3 at thermostat) back at my main switch at the boiler? I think they are the crimped wires in one of my photos? How do I deal with the power that's going to the thermostat? Apologies if I'm asking daft questions or I'm misunderstanding. Ultimately I want to remove the thermostat as its unsightly where it is. I appreciate your help so far.

Andy.
 
You can trace the switching wires in 2 & 3 back to their origin and remove them. Then where they came from, insert a wire link or connect their points of origin together as applicable. The 230V supply cable to the original thermostat can just be disconnected at both ends and removed.
 

DIYnot Local

Staff member

If you need to find a tradesperson to get your job done, please try our local search below, or if you are doing it yourself you can find suppliers local to you.

Select the supplier or trade you require, enter your location to begin your search.


Are you a trade or supplier? You can create your listing free at DIYnot Local

 
Back
Top