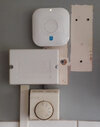
Replace thermostat with Nest heatlink

Joined
20 Sep 2023
Messages
8
Reaction score
1
Country
United Kingdom
Hi,

I'm trying to remove an old Drayton programmer and replace it with Nest heatlink. I've noticed a post already on here with the same system as mine but the cabling is done differently on their programmer. I have 2 cables going into the neutral terminal whereas the other person on here had 1 and then another in the terminal next to the N.

Can someone advise on how to wire this up to nest heatlink please? I also have 2 thermostats in the house, one in hall and one near boiler. Do I have to remove these? (One will be replaced with Nest controller)


Thanks
20230919_152545.jpg
 
Sponsored Links
It looks to me as if you have:

One black into N
Two reds into L
A yellow into 3
A blue into 4

And an earth connection to the backbox.

The connections on the Drayton should be listed on the programmer, terminal 3 is usually Hot Water On and 4 is C/H on.

1695210913199.png


If the above connections are correct, to connect the Heat Link,

Black in N to N
Two Reds in L to L
Yellow in 3 to Heat Link 6
Blue in 4 to Heat Link 3

Link wires will also need to be added between L and the common terminals 2 and 5 on the Heat Link.

This may be a little difficult, as the terminals on the Heat Link are small and you need three wires into the L.
If you are struggling, these connections can be made with a terminal block/wago within the back box, and a single wire can be taken to the Nest.

Your existing thermostats can be kept and turned up to maximum, or removed, but you will have to trace the cables back to the wiring centre and bridge them out.

If you wish to use the Nest thermostat with terminals T1 and T2 and reuse the existing cabling, some further investigation of the cabling and wiring centre will be needed.
Running a new cable may be simpler.
An earth connection to the Heat Link will also be needed.
 
The back plate you show can be one, two, or three outlets, with a programmer, and can also be used with a thermostat so first one needs to look on the back of item removed and see the connection diagram.

I have replaced my messed up system with Nest Gen 3, really a mistake as although it says it connects to Energenie TRV heads it doesn't. But if anything like mine, there will be some where a wiring centre (junction box) and you will need to work out which wires go where to re-use them for the thermostat.

The idea is to have all 230 volt from one plug or FCU so if you ever fit battery back-up it can go to one place, having a thermostat connected to a USB outlet means if supply to that outlet fails even if still a supply to boiler, you have no central heating, so you want to use the T1 and T2 to ensure all comes from one source. It also means the data does not use wireless, it is sent down same two wires.

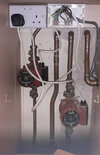
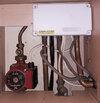
I went from this 20190619_063642.jpg to this New_wiring_centre_etc.jpg there was no way I was going to get all the wires into the Nest so used a wiring centre. Next to the boiler also needed modifying, 20190619_063750.jpg I used a smart socket while working out what needed to be done, then a second wiring centre Second_Wiring_Centre_small.jpg I have two pumps which caused a bit of a complication as the water was going in the reverse direction, so needed to all either non return valves or motorised valves, the plumber selected the latter as on the return side, not into plumbing so left it to him.
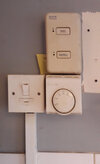
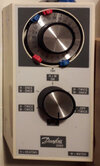
The old programmer has gone Danfoss3060programmer.jpg now replaced with a blanking plate, with a chock block joining the wires so thermostat in the hall.
After doing it myself, first job is to ensure all is working before you start, last thing you want is after trying to work out if you have done something wrong, or if it never worked right to start with. I selected Nest Gen 3 as it allowed full control of heating and hot water from the main house with just two wires going to the flat below with the boiler in it.

The wiring was all up the creak, and the Nest wiring diagrams don't tell you how to wire for C Plan, basic C Plan I had to work it out myself C-Plan_basic_Nest.jpgnot that mine is wired like that as I have two pumps, but with C Plan com is out not in, which confuses many.
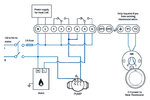
But as it stands we have no idea if yours in C, S, Y, or W plan, to work it out you need to know. Also most fit Nest as it is already OpenTherm, and if using the OpenTherm option you are starting from scratch. Likely second thermostat is a frost stat, but we are guessing, so start off with what your system is.

The only wire colours you can trust are those to motorised valve, as they come pre-wired, so work out what does what from what connections there are to motorised valve.

Good Luck.
 
It looks to me as if you have:

One black into N
Two reds into L
A yellow into 3
A blue into 4

And an earth connection to the backbox.

The connections on the Drayton should be listed on the programmer, terminal 3 is usually Hot Water On and 4 is C/H on.

View attachment 314483

If the above connections are correct, to connect the Heat Link,

Black in N to N
Two Reds in L to L
Yellow in 3 to Heat Link 6
Blue in 4 to Heat Link 3

Link wires will also need to be added between L and the common terminals 2 and 5 on the Heat Link.

This may be a little difficult, as the terminals on the Heat Link are small and you need three wires into the L.
If you are struggling, these connections can be made with a terminal block/wago within the back box, and a single wire can be taken to the Nest.

Your existing thermostats can be kept and turned up to maximum, or removed, but you will have to trace the cables back to the wiring centre and bridge them out.

If you wish to use the Nest thermostat with terminals T1 and T2 and reuse the existing cabling, some further investigation of the cabling and wiring centre will be needed.
Running a new cable may be simpler.
An earth connection to the Heat Link will also be needed.
Thank you so much for your detailed response I really appreciate that. I've got it all wired up as you said and it does seem to be working, however when it is heating the green light doesn't show up on the nest heatlink. It is definitely heating though. Any ideas why?

Thanks
 
Sponsored Links
however when it is heating the green light doesn't show up on the nest heatlink. It is definitely heating though. Any ideas why?
Sorry, no idea.
The green status light should be on when the heat link is on and connected to the thermostat. The heat and hot water symbols should also illuminate in green, when there is a call to heat...


Do they illuminate when the override button on the heat link is pressed?
 
Sorry, no idea.
The green status light should be on when the heat link is on and connected to the thermostat. The heat and hot water symbols should also illuminate in green, when there is a call to heat...


Do they illuminate when the override button on the heat link is pressed?
Yes they all illuminate when I press overide button. It's definitely working as normal just not the lights weirdly
 
Hi again, if I wanted to remove the old thermostat dial and replace with nest whats the best way to wire it in? There's 3 cables. If I can't remove it can I just keep it there and spur another N/L off it for the nest?

Thanks
 
Hi again, if I wanted to remove the old thermostat dial and replace with nest whats the best way to wire it in? There's 3 cables. If I can't remove it can I just keep it there and spur another N/L off it for the nest?

Thanks
You could use 2 wires for the T1 and T2 for the thermostat power and safely terminate any other wires.
 
Today although not when I rewired the central heating, the central heating is battery backed, for this to work all items for the central heating need to be either battery powered or supplied from one outlet, having a thermostat powered by another circuit has always been frowned on, and it does not matter if the power supply is integral in the thermostat or if some USB supply, so use of T1 and T2 is really the best way. If you can over ride the thermostat then not so important, but you may not have solar panels now, but you may get them in the future and then you will have a battery which could ensure heating runs even with a power cut.
 
You could use 2 wires for the T1 and T2 for the thermostat power and safely terminate any other wires.
Would this still work if the thermostat has to be set to max for the nest to work? Thanks
 
Would this still work if the thermostat has to be set to max for the nest to work? Thanks
I think you’ve misinterpreted what I’ve said with some other information. If you put the nest thermostat in place of existing thermostat then there’s no thermostat to set to max. If you’re leaving existing on the wall and using the usb cable then you would need to set existing to max or join the 2 switch wires together
 

DIYnot Local

Staff member

If you need to find a tradesperson to get your job done, please try our local search below, or if you are doing it yourself you can find suppliers local to you.

Select the supplier or trade you require, enter your location to begin your search.


Are you a trade or supplier? You can create your listing free at DIYnot Local

 
Sponsored Links
Back
Top