Replace Window for UPVC Door

Joined
23 Mar 2013
Messages
19
Reaction score
0
Location
Essex
Country
United Kingdom
Hello all,


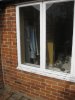
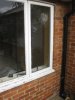
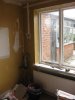
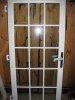
I will be removing this window, cutting the brick out and fitting UPVC French Doors. Of course, after removing the radiator!

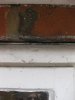
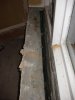
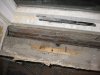
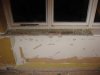
Across the bottom there is a DPC in the brick from the outside.
Rough brick opening 1800 x 1900 to the DPC (Custom made to size due to low height)
Cavity Wall with a depth of about 100mm


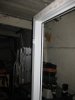
Q1. It is only recently I found out about cavity closers and would like to use them to do a good install. I will of course have good access to the bottom cavity and part of the side cavities. Do I need to install cavity closers all the way up the sides and top?

Q2. Will the inside brick need to be cut slightly wider to allow for internal render and finishing to match the existing width?

Q3. How should I best cover the interior sides where I have cut the brick? Bonding coat, Plasterboard? (This will be plastered to finish)


These are the basic install notes I have gathered on the internet to share with others. Please add/correct where necessary:
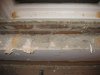
  1. Damp proof course with flash band along the bottom, on top of Cavity Closer.
  2. Run this flash band up the sides a bit as well.
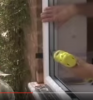
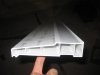
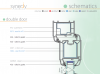
  3. Seal between end of sill and frame (see 'Seal the frame.png' attached)
  4. 2 beads of sealant along the bottom to sit the frame on top
  5. Fix the frame to brick using masonry screws with a packer close to screw to stop frame distortion (see 'Packers and Screws.png' attached)
  6. Low expansion foam around the sides and tops, cut when dry
  7. Suitable sealant around the outside and under sill
 

Attachments

  • Outside.JPG
    Outside.JPG
    313 KB · Views: 810
  • Outside left.JPG
    Outside left.JPG
    104 KB · Views: 689
  • Outside right.JPG
    Outside right.JPG
    97.9 KB · Views: 560
  • Inside left.JPG
    Inside left.JPG
    93.6 KB · Views: 501
  • Inside right.JPG
    Inside right.JPG
    103.3 KB · Views: 483
  • Packers and Screws.png
    Packers and Screws.png
    283.6 KB · Views: 654
  • Seal the frame.png
    Seal the frame.png
    659.5 KB · Views: 6,892
Sponsored Links
Good job on the research you have pretty much covered everything there.

1. You dont have to but its good if you can. You wont know what is behind there until you take the window out, You may have open cavity's or brick closed cavity behind it.

2. Not quite sure what your asking here and Im about to go out so I will leave this one for now.

3. Dot and dab some plasterboard on is best

Quick tip
Internally use a hammer drill to drill a series of holes down about 25mm in further from the plaster reveals (this will allow for plasterboard, Adhesive plus skim) much less messy than disc cutting indoors and gives a good rough edge for bonding.
 
Thank you Gazman16! Good tip.

I have had the French doors delivered today, they are very heavy, luckily the doors come off the hinges.

So the sill is not attached to the frame already and I have found two websites that say different things.

Q1 Should I fix the sill to the frame then fit into opening -or- fit the sill to the opening then sit the frame onto the sill already in the opening?
(which screws are best for fixing the frame to the sill)

Q2 The opening is about 1.8m wide - do I need screws into the bottom or the tops of the frame?
 
1. Personally I put the cill in first this way you can horn it neatly around the brickwork and do a bit of basic leveling ready to accept the door, Then put the door frame in place check your upright levels (incase your bricks are out) then take the frame back out seal it and put the door back and fix it to the cill.
Cill fixings depend on your threshold option of your door. For a low aluminum thresh 40mm screws (4 evenly spaced) for a low PVC thresh 60-70mm screws, For a standard PVC thresh (same depth as the frame sides) your going to need 80-90mm.

Fixings should go into the cill but not all the way through it as it will both lift the frame and possibly cause drainage problems. Try to fix through the back edge again to avoid the drainage channels that are in the external edge of the frame.

2. Bottom no. Top maybe but preferably no. Once everything is leveled and fixed at the sides put the slave door in, Close it and put packers or wedges above and below it (to prevent expanding foam from bowing the frame) then foam and wait about an hour for it to harden.
Hang the 2nd door and try them/make any needed adjustments.
Close the door and lock it a few times to see how much movement is in the top of the frame. Its a judgment call whether or not to put a fixing in the middle of the top. It depends what there is to fix to (with some lintels it could crack them or cause a leak) It looks like you may have loose bricks possibly supported with an "L shaped steel" or catnic or maybe nothing.

Can you see a metal edge of a lintel below the bricks? Also are you getting this signed off by building control?
 
Sponsored Links
Yes there is a metal edge, in the corners it looks like it goes out further than the window frame, see photo metal-lintel.jpg.

Q1. Does the sill need to be fixed to the DPC it sits on with any type of adhesive/sealant? It just seams like a long length of UPVC to be not fixed which will be kicked as it is stepped over.

I think I may of ordered the wrong size door (perhaps I should of included this in my sizes). I had not included in my door sizing to count for a step to rest over both courses of brick and then sit the sill/frame on this. The problem I am having is what to rest the middle edge of the inside step on, see diagram where the arrow is, to stop it from pivoting. Most of the step (100mm) will rest on the inside course of bricks, but the other part of the step has got nothing to rest on, as it is a door step, I am guessing it needs to be quite secure. I am trying to work out how to fix an inside step to cover the cavity?
I will using standard planned timber sat on a DPC.
Inside-Step-Problem.png
 

Attachments

  • metal-lintel.jpg
    metal-lintel.jpg
    84.2 KB · Views: 541
Looks like a Catnic lintel up there which is good news. As I said if you absolutely must get a fixing up in the middle then you can but If you can avoid it then do.

1. You can bed the whole thing down on silicone but it will make leveling up tricky/messy. The combination of the frame and cill fixed together is enough to prevent movement plus when its all fitted you can pump some sealant underneath which will firm it up even more.

Making good the floor is always the trickiest bit. There are several different ways to do it but it mainly depends on weather you have a suspended timber floor or a concrete floor?

Have you got the doors in yet?, A pic of the floor/cavity would help.
Are you getting building control to sign this off (as you should be doing)? Different building inspectors may want different things.
 
It is a concrete floor, the wall in the pictures that I will be cutting out is about 700mm high and the cavity is about 1m deep from the top of this wall & 50mm wide cavity. However, only about 500mm of this wall is coming out due to the DPC on the outside as we measured from the DPC to the lintel to get the biggest door possible as it is quite low - 1.8m high.

The doors are not in yet. Will this help in building a sturdy step?

We are not getting the building control in. (There was a problem with our window installer, so we decided to not worry about this door and claim they were all here before.)

Q2 - I was reading on a website that I should be screwing through the metal frame inside the UPVC frame to the brick work. Is this correct?
In the picture Door-Frame.jpg, this is from the outside of the frame, with the door hinge fitting visible - Door-Frame.jpg. I am presuming that the hinge fitting is fixed to metal in the frame.
 

Attachments

  • cavity-1.jpg
    cavity-1.jpg
    95.5 KB · Views: 544
  • cavity-2.jpg
    cavity-2.jpg
    156.5 KB · Views: 511
  • cavity-3.jpg
    cavity-3.jpg
    179.3 KB · Views: 546
  • cavity-4.jpg
    cavity-4.jpg
    93.2 KB · Views: 735
  • cill-profile.jpg
    cill-profile.jpg
    66.1 KB · Views: 461
  • Door-Frame.jpg
    Door-Frame.jpg
    86.5 KB · Views: 437
  • door.jpg
    door.jpg
    104.5 KB · Views: 384
  • frame-close.jpg
    frame-close.jpg
    62.5 KB · Views: 323
As I said lots of ways to go about it, I will list a few below but it is kind of a case of creative bodging.

1. Fix a timber batten (wrapped in DPC) to the external bricks level with the floor. Then fix your timber threshold into both that and the bricks on the internal side.
2. Remove the internal course of bricks down below floor level. Slate, DPC and concrete across the gap. Again maybe with a baton attached to the external bricks to support the slate.
3. Trap some DPM (damp proof membrane) under the door, Loop it down into the cavity at least 100mm and back up over your floor. Hold it in place by nailing some wood baten into the floor or use some heavy weights (a good time to have a bunch of bricks laying around) and fill with concrete. Once it sets it will hold solid.

Number 2 is best if you can find a way to support the slate 100mm or lower down as you can then also add some celotex insulation to prevent cold bridging.

Another quick tip, Take the internal wall out the day before to give you more time with the rest of the job.

For any other window fitters/builders reading this feel free to add how you do it if you have a better method.
 
I will probably do option 1, trying to keep it simple but still effective!

Do I need to screw through the reinforced metal within the UPVC frame to the brickwork?
There are photos of the frame above.
 
OK, so I have figured out that the reinforcement covers the full width of the frame, I thought it would be a single strip on the outside face, so was wondering if I should screw through it or not. So now I have to which changes the fixings I was going to use.

I was going to use: http://www.screwfix.com/p/easydrive-flat-countersunk-concrete-screws-7-5-x-100mm-pack-of-100/3839h

But now I am going to use: http://www.screwfix.com/p/rawlplug-universal-ffi-frame-fixings-10-x-100mm-pack-of-25/73814

Good choice?
 

Attachments

  • Frame Cutout Diagram.png
    Frame Cutout Diagram.png
    258.8 KB · Views: 423
OK, so I have figured out that the reinforcement covers the full width of the frame, I thought it would be a single strip on the outside face, so was wondering if I should screw through it or not. So now I have to which changes the fixings I was going to use.

I was going to use: http://www.screwfix.com/p/easydrive-flat-countersunk-concrete-screws-7-5-x-100mm-pack-of-100/3839h

But now I am going to use: http://www.screwfix.com/p/rawlplug-universal-ffi-frame-fixings-10-x-100mm-pack-of-25/73814

Good choice?
 
Stick with the concrete fixings they are much better and self packing. Drill through the frame with a 6mm HSS bit first (optionally countersink the PVC a bit) then hammer drill and drive in the fixing.
 

DIYnot Local

Staff member

If you need to find a tradesperson to get your job done, please try our local search below, or if you are doing it yourself you can find suppliers local to you.

Select the supplier or trade you require, enter your location to begin your search.


Are you a trade or supplier? You can create your listing free at DIYnot Local

 
Sponsored Links
Back
Top