Replacing Fill Valve on Toilet

Joined
5 Sep 2012
Messages
66
Reaction score
0
Location
Kent
Country
United Kingdom
Hi everyone,

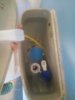
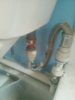
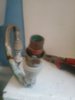
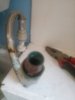
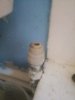
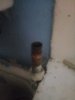
I have water slowly dripping into the bowl from the cistern. I've tried adjusting the level of the fill valve with the screwdriver and then when the water pours back into the cistern (after switching the water back on) the level looks correct once it stops filling, but after 30 mins or so, the water level gets higher and higher and then ends up going over the top of the fill valve and down the overflow tube and into the cistern.

I am guessing that the fill valve needs replacing (or perhaps even the washer at the bottom of the cistern where the fill valve enters?). It's a bottom entry fill valve. Please can someone point me towards the right product(s) to buy in B&Q at https://www.diy.com/search?Ntt=fill+valve ?

Thank you for your help! :)
 

Attachments

  • IMG_20181120_120113.jpg
    IMG_20181120_120113.jpg
    249.8 KB · Views: 136
Sponsored Links
Thanks for your reply.

I bought this part, but at first I couldn't install it without water leaking from the washer used by the hole that this is inserted in. I have instead used the washer from the old one (which is slightly different in shape) and it seems to be holding.

However, a new problem has now occurred. When I switch the water back on, water starts coming out of the area where the water supply connects to the threaded part of the fill valve (the nut). I have attached a photo and circled the part I mean. Does anyone know how I rectify this? Thank you!
 

Attachments

  • IMG_20181122_124813.jpg
    IMG_20181122_124813.jpg
    190.5 KB · Views: 101
I would use a product like Fernox LSX. It is a silicone sealer and will stop any water passing through the joint.
 
Sponsored Links
There is a seal which needs replacing , sits in the fitting , loosen the nut off and you will see it. Be careful not to cross thread the nut onto the tail of the fill valve when re assembling.
 
Thank you both.

I've attached photos of what I can see once the water supply pipe nut is loosened. When you say about there being a seal, where do you mean?
 

Attachments

  • IMG_20181122_135706.jpg
    IMG_20181122_135706.jpg
    176 KB · Views: 135
  • IMG_20181122_135714.jpg
    IMG_20181122_135714.jpg
    176.4 KB · Views: 125
  • IMG_20181122_135700.jpg
    IMG_20181122_135700.jpg
    177.2 KB · Views: 125
The fitting you have is quite simply the wrong thing completely. It has an olive ,which is a compression fitting part. Its good fortune that it worked on the old valve. Ignore my previous post ,it looked like a tap connector on your pic ,i can see clearly now that it is not. If your plumbing skills are upto it ,you should re plumb from the isolation valve. If not, replace the flexi hose for a flexible tap connector hose 1/2 inch bsp to 15 mm length around 500 mm.
 
The fitting you have is quite simply the wrong thing completely. It has an olive ,which is a compression fitting part. Its good fortune that it worked on the old valve. Ignore my previous post ,it looked like a tap connector on your pic ,i can see clearly now that it is not. If your plumbing skills are upto it ,you should re plumb from the isolation valve. If not, replace the flexi hose for a flexible tap connector hose 1/2 inch bsp to 15 mm length around 500 mm.

My plumbing skills are not great to be honest haha, I've changed a ballcock in the loft tank previously and thought I could sort this problem out on my own but I've failed so far!

I have found a flexi hose on Screwfix:

https://www.screwfix.com/p/jg-speed...p-connector-hoses-15mm-x-x-500mm-2-pack/1588g

I assume this is what you mean? To disconnect the old hose, can I literally just pull off the old one from the pipe and replace and then connect this to the new fill valve thread? Is it that simple?

Thanks again for your help, I'm most grateful.
 
The link is a pack of two ,but you only need one. Your existing hose is probably only 300 mm long i said 500mm ,so you can hopefully make softer bends. On your existing fitting ,the grey plastic end that's attatched to the supply pipe ( just above the isolator) , will come off. But you need to pull up the collar ,inward to the fitting, whilst pulling up on the plastic fitting itself. Slightly twisting at the same time ,if that makes sense. To fit the new one ,clean outside of copper pipe using wire wool .take note of how far the pipe has to be inserted into the new fitting to make a full seal. Push the new fitting onto the pipe ,making sure it is fully inserted all the way ,then pull the fitting lightly upward ( as though you were trying to pull it off again ). The end that goes onto the fill valve has a seal ,usually rubber, just make sure its in place before connection to the valve.
 
Thank you.

I've had a go at removing the old one, but when doing so, the flexi pipe came off, leaving just the push on part of it still on the pipe. This remaining bit doesn't seem to want to budge! Do you have any tips about how to remove it?
 

Attachments

  • IMG_20181122_150649.jpg
    IMG_20181122_150649.jpg
    239.7 KB · Views: 102
Blimey !! Anyway ,see the collar on the end of the plastic , at the copper pipe end. That has to be pulled up into the fitting to release an internal grab ring. The grab ring is what is keeping the fitting onto the pipe. Its a bit fidly !!
Press down on fitting ,pull up on collar
 
Blimey !! Anyway ,see the collar on the end of the plastic , at the copper pipe end. That has to be pulled up into the fitting to release an internal grab ring. The grab ring is what is keeping the fitting onto the pipe. Its a bit fidly !!
Press down on fitting ,pull up on collar

When you say about the collar/copper pipe end, do you mean the top of the plastic or the bottom of it? And when you say "pulled into the fitting" please can you elaborate on what you mean as I'm a bit confused!
 
The collar is the bottom bit of the plastic fitting ,where the pipe goes in. Its part of the fitting ,and it has to be brought inward into the fitting. So ,press the body of the fitting downward ,whilst using your other hands fingers to pull upward on the collar ,bear in mind the collar only moves a small amount.
 
Hurrah! My hands are somewhat sore, but I got it off!

I'll head to Screwfix this evening to buy the new hose and the wire wool.

Thanks for all your help this far!
 

Attachments

  • IMG_20181122_154304.jpg
    IMG_20181122_154304.jpg
    254.2 KB · Views: 94
Ha ha ,is the copper pipe in good condition ? You don't have to buy wire wool ,brillo pad ,scouring pad those little sponge things that the wife uses to clean pans with will do .
 

DIYnot Local

Staff member

If you need to find a tradesperson to get your job done, please try our local search below, or if you are doing it yourself you can find suppliers local to you.

Select the supplier or trade you require, enter your location to begin your search.


Are you a trade or supplier? You can create your listing free at DIYnot Local

 
Sponsored Links
Back
Top