
I currently have a Honeywell wireless thermostat and wired in timer. I want to change to a Nest thermostat. I’ve provided a photo. My question is, when I remove the cover from the blue box do I simply disconnect the timer and wireless receiver wires and then wire in the nest receiver or is it more complicated than this? If it helps I have a WB Combi boiler.


You are using an out of date browser. It may not display this or other websites correctly.
You should upgrade or use an alternative browser.
You should upgrade or use an alternative browser.
Replacing Honeywell wireless with Nest
- Thread starter Sato88
- Start date
You have a Honeywell device of some sort top right, but I can't see from your photo if it's a timeswitch or thermostat. I'm guessing it's a timeswitch and the room stat receiver is the device bottom left.
Can you confirm please?
Can you confirm please?
OK thanks it's a ST9100C Single channel timeswitch, and a BDR91 thermostat receiver.
What type of Nest are you installing? Nest-e, or 3rd Gen? The installation is different.

What type of Nest are you installing? Nest-e, or 3rd Gen? The installation is different.
The third gen. My diy capability extends to replacing light fittings and switches so if it’s any more complicated than swapping a few wires I will get someone in. But I don’t see the point in paying someone if it is as simple as changing a light fitting.
It's not as straightforward as changing a light fitting. You now have two devices, a programmer and a thermostat and are replacing them with a single combined device. I'l explain how it's done and they you can decide if you are competent or not.
The Nest Heat link replaces the ST9100C which has the following wiring connections:

The wires from the ST9100C then go to the new Heat link terminals that have the same function.

ST N = Nest N
ST L = Nest L
ST 4 = Nest 3 heating call for heat
Link Nest L and 2 heating common
Then the BDR 91 needs to be decommissioned. It's wiring is:

The easiest way is to leave the BDR91 wired in and add a wire link between terminals A & B. This will take it out of action, but it will still be powered up and not doing anything.
Another, better option, is to remove the BDR 91 receiver and replace it with a junction box. Put the N and L wires in separate terminals so that they are isolated, and then the wires that came from A and B are connected together in another terminal to complete the circuit.
Alternatively, the best option, the BDR91 and its cable can be removed completely, and the link made inside the wiring centre instead. The terminals where the wires that went to A and B have been removed from are simply connected together.
Finally, the Nest thermostat can be powered via a plug in power supply, or alternatively by connecting it to the 12v terminals T1 and T2 at the Heat link.
The Nest Heat link replaces the ST9100C which has the following wiring connections:
The wires from the ST9100C then go to the new Heat link terminals that have the same function.
ST N = Nest N
ST L = Nest L
ST 4 = Nest 3 heating call for heat
Link Nest L and 2 heating common
Then the BDR 91 needs to be decommissioned. It's wiring is:
The easiest way is to leave the BDR91 wired in and add a wire link between terminals A & B. This will take it out of action, but it will still be powered up and not doing anything.
Another, better option, is to remove the BDR 91 receiver and replace it with a junction box. Put the N and L wires in separate terminals so that they are isolated, and then the wires that came from A and B are connected together in another terminal to complete the circuit.
Alternatively, the best option, the BDR91 and its cable can be removed completely, and the link made inside the wiring centre instead. The terminals where the wires that went to A and B have been removed from are simply connected together.
Finally, the Nest thermostat can be powered via a plug in power supply, or alternatively by connecting it to the 12v terminals T1 and T2 at the Heat link.
Thanks for the detailed instruction. After reading a few times it all makes sense.
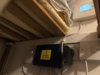
So after my Nest arrived I killed the power and opened up the ST9100C and I have an extra wire going into ST1 (looks like an earth wire to me), so I opened the blue box (sorry I don’t know what it’s called) and followed the wire which is in a connector with a black wire that runs up into the loft and to the boiler.
In the second photo you can see the yellow/greenwire that comes from ST1 enter a connector just under the number 8, the black wire that’s connected to the same connector then disappears with the wires that goes up into the loft where the boiler is.
The green and yellow wire is not an earth connection. It is being used as a switching wire.
So, just a slight change then:
ST N = Nest N
ST L = Nest L
ST 1 = Nest 2 heating common
ST 4 = Nest 3 heating call for heat
DO NOT Make the link between Nest L and 2 that I mentioned before. The original installer has used the green / yellow earth wire instead, and it may not be at mains voltage.
If you open up the BDR91 thermostat receiver and post a photo of the wiring I'll tell you what needs doing there.
The "blue box" is a wiring centre.
Last edited:
Thank you so much for your help. I followed your very clear instructions and managed to install it with no problems. I removed the BDR91 thermostat receiver completely by joining the 2 connections in the junction box so I have a nice clean layout.
Perfect. That was going to be my suggestion, assuming the black and green/yellow wires were in A & B

Hi. Just one final question. I’ve just removed a very old unused thermostat controller and I’ve discovered a hole through the wall that leads to the airing cupboard and as a bonus the screw holes for the old thermostat line up exactly with the nest wall bracket. So rather than have the control unit on a shelf using a usb lead I’m going to put it on the wall and use the old cable I removed earlier. I understand how to wire it but the manual says I need to also use an Earth cable, my question is where to I take the other end of the Earth cable to? In the photo of the junction box I posted earlier the bottom set of connectors have several earth cables attached, but will they actually be earthed or are they just there to keep them out of the way? And if they aren’t earthed where do I need to run the Earth cable to?
I always prefer to wire the Thermostat to the Heat link, but it's not always possible, so you are fortunate.")


You require a connection to the Heat link earth terminal to be made when using T1 & T2 to power the thermostat. [Only T1 & T2 are connected to the thermostat, the thermostat itself doesn't need an earth, onlt the Heat link does] But as you have noticed, not all green / yellow wires in your installation are actually an earth.
I suspect that the cable circled below comes from the fused connection unit, so that should have a 'real' earth in it. Check it out, and if it does make a connection between that and the Heat link earth terminal.
DIYnot Local
Staff member
If you need to find a tradesperson to get your job done, please try our local search below, or if you are doing it yourself you can find suppliers local to you.
Select the supplier or trade you require, enter your location to begin your search.
Please select a service and enter a location to continue...
Are you a trade or supplier? You can create your listing free at DIYnot Local
Similar threads
- Replies
- 2
- Views
- 4K
- Replies
- 1
- Views
- 3K
- Replies
- 5
- Views
- 5K
- Replies
- 8
- Views
- 16K