- Joined
- 31 Dec 2017
- Messages
- 4
- Reaction score
- 0
- Country

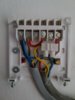
I bought a HIVE installation kit, and have spent several hours today trying to work out how the wiring should go within the receiver. The closest I found was here:
https://www.diynot.com/diy/threads/horstmann-to-hive-wiring-check-please.476261/
but it's not completely the same.
I have a room thermostat, the wiring within my current timer looks identical to the one in the post, which is for a gravity fed, part pumped system. I have a combi boiler in the loft (which is difficult for me to get to).
It looks like the wiring from the thermostat Sunvic TLM2253 goes directly to the current timer (would this be right ?), if this is the case, it will be easy for me to just remove it, as I can see all of the cable.
The current wiring within the timer is attached, and from what I can tell, the only cable going into 4 is from the thermostat. If the thermostat was removed completely, which cable should go in there instead ?
Do any adjustments need to be made in the boiler once the thermostat is removed ?. It's a Greenstar 24/28i junior.
I'm trying to save the cost of installation, and would like to fit it ASAP. It feels like it should be really straightforward, but i'm going around in circles reading forums.
Any advice or direction would be gratefully received.