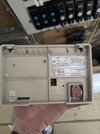
Is it possible to replace this old Potterton programmer with a heatmiser stat to control CH and HW?
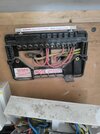
You can replace the EP2001 for the Heatmiser, by moving the wires from the EP2001 terminals to the Heatmiser terminals that have exactly the same function. So:
EP2001 terminal N = Heatmiser N*
EP2001 terminal L = Heatmiser L*
EP2001 terminal 3 (HW on) = Heatmiser HW
EP2001 terminal 4 (CH on) = Heatmiser CH
EP2001 terminal 5 = Heatmiser C
*NOTE: If the Heatmiser is already installed for the UFH (not sure from your post) then it will already have N & L connected to it. In which case the red live wires of the EP2001 (one of them is in the L terminal the other is in terminal 5) can be connected together in a terminal block, and the wires in N of the EP2001 can be connected together in a terminal block. The link presently between L and 5 would then be used to connect the Heatmiser terminals L to C. The entire heating system controls should be supplied from the same fused spur.
am I right in thinking the cable entering from the right on the current setup is the room stat and can be done away with?
I can't see the room thermostat wiring in the picture, so it will probably be connected in elsewhere. The cable on the right with the wires in terminals 3 & 4 are the control wires that become live when either the HW or CH are required respectively. (Don't be fooled by the black insulation of the wire in 4 into thinking that it is a neutral. It's a live and should have a red sleeve on to show this)
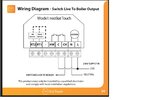
The old wired thermostat needs to be decommissioned to prevent it overriding the new one. It can't simply be disconnected as this would leave the heating wiring 'open circuit' and it will not operate. The thermostat can be decommissioned in three ways generally in order of preference (or professionalism), the methods for thermostat removal are:
1. Find the origin of the thermostat cable. Note where the wires are connected and disconnect the cable. Then link the terminals where the two ‘live’ switching wires have just been removed from together.
2. Remove the existing thermostat and replace it with a junction box, connect the two ‘live’ switching wires together and isolate the neutral (if there is one)
3. Leave the existing room thermostat in place and join the ‘live’ switching wires together in a separate connector that you can tuck away in the corner of it.
Sorry I don't know it that is compatible or not. Maybe someone else will be along that knows, or your supplier can assist.