Replacing stud wall at end of bath

Joined
19 Apr 2011
Messages
28
Reaction score
0
Location
Midlothian
Country
United Kingdom
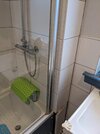
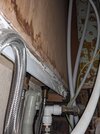
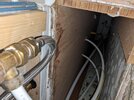
Hi. I have a stud wall at the tap end of my bath (I say it's a stud wall, but it doesn't seem to have a proper frame). The tiles over it have become cracked over time, presumably because of movement, so I want to replace them with wet wall panels, but I'm not sure what to do about the stud wall in general. The tiles are currently on a plywood (?) board which comes only as far as the edge of the bath, and you can see from the photos that the seal has failed there. You can also see that there is not much room behind the taps with the way it has been installed. If I remove the tiles, should I...
- Remove the board behind them and replace it with plywood, or moisture resistant plasterboard and then put the wet wall board over the top? If so, should I take the plywood/plasterboard down to the floor or just to the edge of the bath?
- Remove the board and replace it with the wet wall panel?
- Build a proper stud frame and put the plywood/wet wall panel over that?

Thanks in advance for any help.
 

Attachments

  • PXL_20231120_095733812.jpg
    PXL_20231120_095733812.jpg
    141.8 KB · Views: 60
  • PXL_20231120_095752480.jpg
    PXL_20231120_095752480.jpg
    189.6 KB · Views: 56
  • PXL_20231120_095821748.jpg
    PXL_20231120_095821748.jpg
    279.9 KB · Views: 49
  • PXL_20231120_100207992.jpg
    PXL_20231120_100207992.jpg
    269.5 KB · Views: 54
Sponsored Links
That was definitely never sufficient, the movement is obvious in the cracked sealant on the 3rd photo.

A proper frame with tileboard screwed on is probably the only option that will last. Tank the whole lot so it's watertight then put whatever cosmetic surface you like on top, e.g. tile, panel, etc.

It's in a shower so is likely to get leaned on. Plus you've got the space for a frame so may as well use it instead of wasting it.
 
Shower panel ( the ply backed variety ) will not require any backing , can be installed on frame .
The loose tile looks like it was caused by poorly installed shower panel .
 
Thanks @Ivor Windybottom and @foxhole for your helpful replies. If I used a ply-backed shower panel without anything behind it, would I just take it down onto the edge of the bath, or go behind it? And if I put tileboard or plywood behind it, would I take that down to the floor, or at least beyond the edge of the bath, with the shower panel butting the edge of the bath?
 
Sponsored Links
Whatever you fit has to drop below the rim of the bath, to enable correct sealing .
 
Thanks @foxhole . If I replace the tiles behind the shower with a wet wall panel, is there any way to join it with the tiling to the left of the shower, or will I have to take the panels all the way around the corner at least (/replace all the tiling?)?
 
Ideally you should tank the panel, i.e. tape over any screw holes, around the corner and along the join to the bath, apply tanking solution to the whole surface then tile the lot, then silicone sealant down the corner. Then you have a double seal in the corners, so any water finding its way down the edge of the sealant via the grout will be stopped from getting through to the underlying board. So re-tiling would be ideal.

In reality you'll probably be fine just butting your new tiles or board up to the existing tiles then very carefully running a sealant bead down the corner. Use tile spacers or similar to ensure there's a 3-4mm gap between the old and new surfaces so the sealant can fill the gap between them rather than just sitting on the top.

As an added precaution, if using board under tiles then seal the gap between the board and wall too. Then at least you have a second line of defence protecting the timber frame behind it.

Use a proper tool for the sealant, not the botchers spitting on your finger method!...


Pic of my shower corner below, this was done using the method in the video with the 8mm bevel tool. Vertical first (grey in my case) , then horizontal after it's set (white in my case). Looks better than any pro job I've ever seen...

IMG_20231121_114101.jpg
 
Thanks @foxhole . If I replace the tiles behind the shower with a wet wall panel, is there any way to join it with the tiling to the left of the shower, or will I have to take the panels all the way around the corner at least (/replace all the tiling?)?
Better to replace everything with new panels.With require removing bath .Example below of panels used around my shower.
 
Thanks @foxhole and @Ivor Windybottom for all your help. I'll try to replace just the section with the broken tiles first to limit the cost, but it will depend whether I can remove that section without damaging the adjacent tiles. I'll build a frame and put plywood or tile board on it past the lip of the bath, tank it and then either tile or wet board over it.
 
Use waterproof (plastic foam) tile board, not plywood, which will not survive damp and eventually rot and swell whether supposedly waterproof or not. A shower back wall is as extreme an environment as you get.

There's no good reason not to use the right stuff. Tileboard is widely available from B&Q, tile shops etc. Different thicknesses available, select first before designing timer frame to accommodate its thickness.
 
OK, thanks @Ivor Windybottom . Are the tile boards strong enough to prevent the kind of movement that has led to cracking in the existing tiles? Do you need to avoid joins in tile boards by using large enough ones? Do they need tanking if they're waterproof or just any joins/edges? Sorry for all the extra questions!
 
Definitely, they're as strong as plywood. Basically rigid plastic foam (not spongy stuff), with a cement face on each side. Have a look in B&Q, you can handle one and check for yourself.

You need stainless screws and washers (I forget their proper name, mostly used for insulation). See photo below of my shower room part-done, where I used B&Q tile board including a pre-made corner to extend a wall out to make the shower deeper. I'd just put the scrim tape over the screws and joints here. After this (not photographed), I used a tanking kit to seal over all the screws, joints and corners of the walls, not sure if necessary for tileboard but my shower was mostly plastered block, stripped back to the old backing plaster.

IMG_20200710_161940.jpg


IMG_20210606_144006.jpg
 
Pretty sure you'll avoid joints for your job, I glued the joints I had and just used scrim tape outside the shower, used tanking solution inside the shower. I only had joints as I made something pretty elaborate and used a pre-made corner so it wasn't as wide as I needed it.

You probably should seal over the screws though, just as a precaution. Although arguably possibly overkill. Always better to over-do than under though!

You could buy a tanking kit but it would probably be about 90% unused in your case. Not needed on the board, only over screws or joints.
 
Great- thanks again @Ivor Windybottom . Tanking kits seem very expensive so I'll see if I can finding something small enough so as not to waste loads. Been looking at qboard for the boards
 

DIYnot Local

Staff member

If you need to find a tradesperson to get your job done, please try our local search below, or if you are doing it yourself you can find suppliers local to you.

Select the supplier or trade you require, enter your location to begin your search.


Are you a trade or supplier? You can create your listing free at DIYnot Local

 
Sponsored Links
Back
Top