Replacing Triton TCO

Joined
26 Aug 2010
Messages
13
Reaction score
0
Location
Sussex
Country
United Kingdom
Hello,
I have a faulty TCO determined by continuity test. I have a new TCO ready to fit, however I need some guidance.

I have removed the old TCO and it has some white gunk on the bottom - like cream. What is the purpose of this - do I need to apply some to the bottom of the new TCO?

Also, I am not able to get the new TCO to fit flush with the bottom of the can - is this necessary - i.e is it necessary that the bottom of the TCO is in contact with the can?

Finally, how does the TCO work? DOes the bottom of the TCO sense the top of the can getting too hot and then open the circuit?

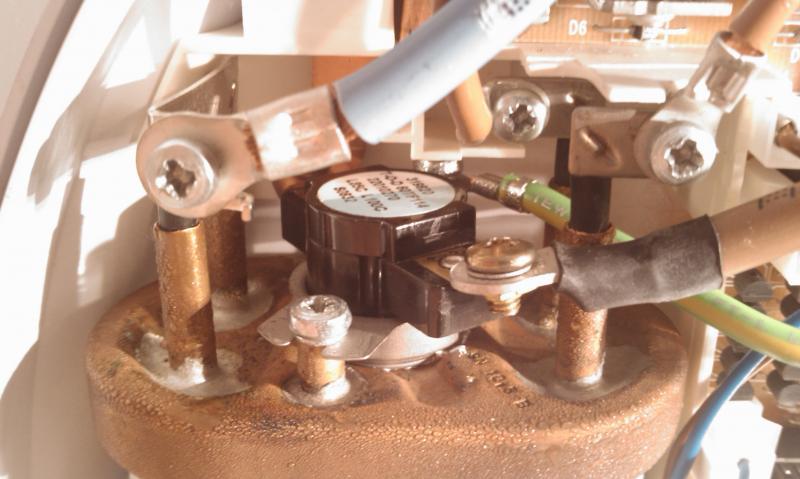
A picture of the TCO in situ, part number 22010270 is below.
(Copied this from warrentdo - thanks!)

Thanks in advance

 
Sponsored Links
that is thermal grease and no always fit them clean no grease.

yes as you say it detects heat from the can and the centre of the tco will pop in and cause open circuit.

they are a 2 stage tco.
 
OK thanks. So does that mean that it does need to sit flush then?
The original one is not actually flush itself but closer than I can get the new at present. Did not want to force it in case i damaged it.
 
OK thanks. So does that mean that it does need to sit flush then?

really yes or you won't get a overheat on the tco if the can ever does.
The original one is not actually flush itself but closer than I can get the new at present. Did not want to force it in case i damaged it.

strange never had that happen can you see why it won't sit flush ?
ie the lip where it screws to the can etc.
 
Sponsored Links
Im replacing it while the shower and all is still attached to the wall. Dont want to mess about with taking it off.

The space is a bit cramped and im finding that the edge of the TCO furthest from me is sitting in the little hole on the can, but the edge closest to me is not. Basically its not going in straight i guess.

its not a long way from the can but id feel better if the thing was level..

Shame I cant find my camera a photo would help explain
 
Im replacing it while the shower and all is still attached to the wall. Dont want to mess about with taking it off.
thats ok i never take them off the wall for that.
The space is a bit cramped and im finding that the edge of the TCO furthest from me is sitting in the little hole on the can, but the edge closest to me is not. Basically its not going in straight i guess.
yes i would say so.
can you loosen it and let the screws pull it in ?
its not a long way from the can but id feel better if the thing was level..
level will be better.
Shame I cant find my camera a photo would help explain

is strange.
how long did the old tco last ? and you say that never fitted fully.
 
Ahh, actualy ignore that, i have it flat now. Not great light in the bathroom and i think it was a trick of the light!

One more quick question if thats OK?

I broke the TCO myself while cleaning out the scale trap as, i think, in attempt to flush through i turned the shower on with the ribbon cable attached.

Just to confirm, i need to turn on power at the isolating switch with the ribbon cable disconnected and then connect it again once flushed through?
 
you don't have to remove the ribbon but make sure it's on fully cold.
take it you had it on normal shower setting ?
 
errr - dont think it has a setting other than normal. basically a flow dial - cold1, hot1 or hot2 and a temperature dial.

THanks for your help. THink ill have to stop for tonight as the missus is hitting the hay and i can get the damn screw at the back to stay in - nor can keep the tco flat once screwed in.

Ill try again tommorrow with better light and some sleep.
 
So stick the top dial on cold (looks like a snowflake) and turn the bottom dial fully clockwise so full cold...?

sorry if im being dense here, just want to make sure i get it right so i dont blow the tco again!
 
top dial on snowflake.
bottom dial so the word triton is level.
remove showerhead leave hose pointing to waste.
 
thanks for the clarification...

IM not there yet though... Cant get the screw at the back in.

Due to how tight the enclosure is I cant get the screw at the right angle to go in the hole - and its too small to do with fingers....

Defeated so far by such a simple thing ! :mad:
 
Hurrah - all done.

resorted to suing an instrument screwdrive and pliers to the troublesome screw in.

Was a bit worried as first time I tested it (as per user manual since I already had the ribbon cable disconnected) and it did not work at tall.

Attached ribbon cable and replaced cover and hey presto we now have a working shower again.

Thanks for your help serco.
 

DIYnot Local

Staff member

If you need to find a tradesperson to get your job done, please try our local search below, or if you are doing it yourself you can find suppliers local to you.

Select the supplier or trade you require, enter your location to begin your search.


Are you a trade or supplier? You can create your listing free at DIYnot Local

 
Sponsored Links
Back
Top