Rotten joists and studs holding up roof

Joined
24 Nov 2013
Messages
328
Reaction score
12
Location
Berkshire
Country
United Kingdom
Hello all

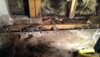
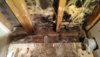
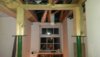
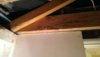
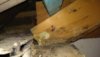
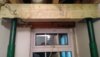
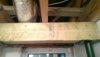
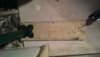
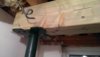
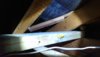
Today I took the plasterboard off an external stud wall (not sure if that is even allowed these days?). What I found was that there was a heck of lot of water damage to the joist and also the bottom of the studs. As the photos show, this doubled up joist was holding a small window and three trusses of the roof.

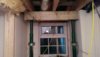
Question is what to do about it ? I already had a pair of small acro0 which I've used to shore up the trusses overnight (just to give me peace of mind really since nothing has changed).

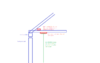
I'm going to buy some acro1s tomorrow and I'm thinking I can use those with a better needle (would a pair of 4x2 screwed and glued be good enough ?).

Some of the studs like under the window I think I could replace fully one by one. But not sure what to do about the full height studs on the left and right which are holding up the roof and have rotted away at the bottom. Could I cut away the bottom section and then tap in a good fitting new stud? Perhaps add a bit of sistering over the joint? Or would that be a bodge?

Any practical advice would be very much appreciated.

P.S. The span of the joist is 1M and it is simply a length of a pair of 4x2s . There is a masonry wall either wide and the joist (what is left of it ) is fixed with jiffy hangers. Once propped, I was thinking I could cut the last strands of the joist and pull it away.
 

Attachments

  • from_ground.jpg
    from_ground.jpg
    345.5 KB · Views: 415
  • IMAG0130_1.jpg
    IMAG0130_1.jpg
    290 KB · Views: 418
  • temp_prop_1.jpg
    temp_prop_1.jpg
    154.9 KB · Views: 390
Sponsored Links
The hardest part will be cutting out and replacing the rotten sole plate (timber running along the bottom). The vertical double studs (cripple studs) support the lintel over the window so are quite important. You could cut out and splice repairs to the rotten sections but I would strengthen the repair by adding new short studs to both sides bolted right through. What is the external cladding? It might be easier to remove the cladding and do the sole plate from the outside.

Regarding propping the roof, at the moment you are just propping the ceiling joists. That is a bit risky as it relies on the connection between the joists and rafters/wallplate stopping the roof from dropping. Also you are quite a long way out from the main wallplate so you are creating a long cantilever. I would move the props closer to the window and fix a timber across the top of the joists also fixed to the rafters like a temporary wallplate so you know the rafter feet will be supported by the joists.

I'm not sure what is going on with those acros with the vertical timber props balanced on top, could you only get short ones or is it a very high ceiling? That is a recipe for disaster. Get acros that will reach from floor to ceiling and have a length of 6x2 (possibly doubled up) across the top fixed to the joists.

Also you will have to identify what caused the dampness in the first place otherwise the rest of the building could be at risk and your repairs will not last very long.

I suspect this sort of thing will become more common with all the crappy timber frame houses that were thrown up in the 80's and 90's.
 
Firstly many thanks indeed for that clear answer and clearly showing what I'm doing wrong!

The wood on the acro was just very temporary until I get my larger props later today. I understand your point about moving it closer and also supporting the rafter. I'll use my existing smaller acrow0s and strongboys to hold the window.

One thought I did have was whether the existing top plate is also being held by the masonry walls on either side but I don't want to take any chances so plan to do it the way you advise.

One question is just to confirm if I have the detail of what you describe right in my attached diagram - I have a feeling its not right? I'm not sure if I need to triangle the edges or how flush they need to be against the rafters? ALso I've only got 2 acrow1 props coming and there are 3 rafters - maybe another 2x6 on the bottom of the rafters to support the middle one?

Incidentally this lash up was indeed constructed in the early 1990s before we bought the house. I've attached a pic from outside. Oh and the water damage was caused by a leaking roof (for a number of years). I fixed that with help from this forum 2 months ago and despite appearances the rotten area is bone dry as is the felt cladding.
 

Attachments

  • outside.jpg
    outside.jpg
    324.7 KB · Views: 302
  • proposed_prop.jpg
    proposed_prop.jpg
    49.5 KB · Views: 294
Last edited:
Sorry for the multiple posts but I think this is what you mean? Problem I have with that is because the floor joist is smashed I've nothing to put the prop on. The floor below (see outside) is a flat roof and not sure how strong it is.

Edit: I should add I can of course get the props much closer to the window than shown. The last joist is maybe 400mm or 500mm way so I guess I need to figure out a way of propping both ceiling joist and rafter at the same time. Maybe bolting some timber to the outside of it?
 

Attachments

  • proposed_prop_second_attempt.jpg
    proposed_prop_second_attempt.jpg
    38.2 KB · Views: 211
Last edited:
Sponsored Links
The 6x2 would go under the ceiling joists sitting on top of the acros.

The temporary wall plate would go on top of the ceiling joists, laid flat and pushed right up tight to where the rafter feet come down so the rafter feet can rest on the temporary wall plate. if I get time I'll scribble down a sketch.
 
Right I _think_ I have understood that and many thanks once again! I've attached my latest "drawing" - I hope I'm getting closer to what you suggest and I hope it means you don't need to waste more time with a drawing (not that you have to anyway obviously)? I went to the merchants today and now have a 4.8M length of 6x2 that I can cut up and some 4x2. I also have the two acrows.

ALso uploaded pics including one taken from the wall plate looking at a rafter. At best it looks like they are only nailed together with perhaps only one nail.
 

Attachments

  • latest_prop_proposed.png
    latest_prop_proposed.png
    22.3 KB · Views: 287
  • rafter_ceiling.jpg
    rafter_ceiling.jpg
    139.2 KB · Views: 268
  • rafter_wallplate.jpg
    rafter_wallplate.jpg
    182.2 KB · Views: 264
given the dangerous business with your propping, do you feel you can do whats now necessary for cutting out supportin plates and studding an maybe joists?

what you've got is water from two roof planes cascadin downagainst that strange covered wall abutment.
thats not workin, proper abutment flashing needs detailing there.
you also need to re-arrange the gutter and valley soaker to discharge into a down pipe ffrom the top gutter into the lower gutter.

inside ref the pics you need to investigate under the partition to the left,
and whats happening at the top of wall studs in the room below.
whats happening at the right hand side of the window wall?

might be best to lift the last sheet of c/board or ply to see whats happenin an if bolt-on joists etc are needed
no need for acrow support for window frame if its pinned to the studs on either side. the studs are nailed into the top plate.

whats on the other side of the felt paper?

why not open up an expose an then post more pics?
 
just seen your latest pics - you should seriously consider taking down that whole wall an re-doing it all properly.
 
given the dangerous business with your propping, do you feel you can do whats now necessary for cutting out supportin plates and studding an maybe joists?

what you've got is water from two roof planes cascadin down against that strange covered wall abutment.
thats not workin, proper abutment flashing needs detailing there.
?

There is a lead flashing at the intersection between the roof and that wall - not sure its visible in the pictures. There is no leak there it is all bone dry despite copious rain recently. There was a leak in the roof which I've fixed with help from others and despite your "advice" that I should spend thousands that I don't have. I've reported your post for harassment because almost every post I start you jump in and say what I am doing is dangerous and that I can't manage it. What I did with the acrows was not dangerous because they were not propping anything up and even if they were it was less dangerous than doing nothing. I have since bought larger acrows. And if anything really is dangerous, why not as Wessex was doing clearly explain instead of just pointing the finger and saying "haha your roof is gonna cave in..." as you seem to like to do.

In the unlikely even that wessex01 will still engage with this thread, if the diagram is roughly right, I was thinking to wedge thinner wood such as some 18mm ply I have instead of the 4x2 ?

Edit: I think I can get the prop under the temporary "wallplate" - at least very close. Assuming I'm on the right lines with the latest diagram....
 
Last edited:
Right I _think_ I have understood that and many thanks once again! I've attached my latest "drawing" - I hope I'm getting closer to what you suggest and I hope it means you don't need to waste more time with a drawing (not that you have to anyway obviously)? I went to the merchants today and now have a 4.8M length of 6x2 that I can cut up and some 4x2. I also have the two acrows.

ALso uploaded pics including one taken from the wall plate looking at a rafter. At best it looks like they are only nailed together with perhaps only one nail.

That's it, you've got it. Just make sure everything is fixed in place and get the props up nice and tight (not too tight or you might start lifting the roof) and you'll be fine.
 
Brilliant thanks! (I'll post up the pics of the house collapse when its all done and particularly for Bob's pleasure :D )
 
i'm so sorry you seem to have other issues on top of your building difficulties.
i've no idea who you are, your user name and posts mean nothing at all to me but if your intendin to use ply for that purpose then my heads up was pretty timely.

all well trained apprentices are told first day on the job " this is the buildin trade not the circus - never take risks".
 
Hopefully ready for work (or collapse!) tomorrow.

The acrows are sited on a scaffold board which is on top of the floorboard lined up over another joist so I think most of the weight will be on that joist but hopefully some will be spread to others via scaffold and floorboard. I hammer tapped the "wedge" 4x2 and then drove a single screw into each ceiling joist to hold it tight.

It feels solid and its definitely a lot better than it was but is it good enough......

Oh the "needle" is also a pair of 6x2. Hope I got it the right way round - slightly worried it could flip over under serious pressure?

Edit: I think I should fix a screw or two of the needle into the joists to help prevent it flipping over
 

Attachments

  • 1_overall.jpg
    1_overall.jpg
    174.1 KB · Views: 278
  • 2_closer.jpg
    2_closer.jpg
    180.1 KB · Views: 269
  • 3_wedge.jpg
    3_wedge.jpg
    175 KB · Views: 241
  • acrow_base.jpg
    acrow_base.jpg
    133.8 KB · Views: 261
  • acrow_top.jpg
    acrow_top.jpg
    174.1 KB · Views: 254
  • rafter_wedged.jpg
    rafter_wedged.jpg
    204.3 KB · Views: 244
Last edited:
Your 6x2’s would be better ontop of each other and with a couple of screws through the acro into the wood incase 1 slips.

Good luck and i’m also looking forward to the pics of the house collapse ;)
 
All looks fine to me. My only very slight concern is that the acro seems to be sat on top of one floor joist. Ideally I would have liked to have seen a spreader to share the load across 2 or 3 floor joists. However, looking at the external photos we are only talking about a small section of roof so the load is probably quite modest.
 

DIYnot Local

Staff member

If you need to find a tradesperson to get your job done, please try our local search below, or if you are doing it yourself you can find suppliers local to you.

Select the supplier or trade you require, enter your location to begin your search.


Are you a trade or supplier? You can create your listing free at DIYnot Local

 
Sponsored Links
Back
Top