Sonoff Mini - Wiring to row of ceiling LEDs

Joined
2 Sep 2015
Messages
330
Reaction score
6
Country
United Kingdom
Query about Sonoff and if i am thinking correctly on how these work.

I have x6 LED reccessed ceiling lights
7W
Operating Voltage: AC 220-240 Volts

Wiring is the 3 plate/loop system.

Lights are connected to a dimmer switch.

My plan is to install a mini sonoff at the first light. This will allow me to have the two options to turn on/off light.
1. From current dimmer switch
2. From sonoff app/alexa etc

If my understanding is correct, the switch terminals on the mini are at a lower current. Sonoff descriptions states its OK to connect to a rocker switch.

I would like to keep the dimming capabilty from the switch. Will this work? Or will it be advisable changing the wall switch to a standard rocker and using dimming capability via sonoff app/alexa etc.

Many thanks
 
Last edited:
Sponsored Links
Just looked at the manual. the S1 and S2 contacts have no way to read anything but an open or closed switch contact.

There would actually be no way to design it to read a phase control dimmer switch, assuming this side of it is at logic level, someone could make one that read a wall control based on resistance or rotary encoders, but thats by the by

You could connect dimmer switch after the live output but then:

A) You would have to disable dimming on the Sonoff unit otherwise you'd get something akin to a bad 70's disco
B) If you wanted a wall switch to work in conjunction with the Sonoff controls, you'd need another 2 cores
C) If you don't have the wall switch as above then if you switch it off on the app then thats the only way to switch it back on, which means you are sitting in the dark when the app or your internet connection goes down.
 
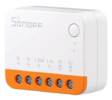
If this 1699174149707.pngis the relay you are talking about then the contacts are not volt free, so you can't have a dimmer before it, with a standard ceiling rose in the UK the standard way to wire is to use the ceiling rose as a junction box, if your house is wired this way, then you can use the existing switch wires and have a simple on/off switch wired to S1 and S2 so it does not matter if the lamp is on or off the switch will charge state. So switch then works like a two way switch with the wifi controls.

Or you can take the L out to the switch and then have the return go to the lights, this means the dimmer will over ride the switch and the dimmer will work and there is no way to turn on lights with app if dimmer is off, and no way lights on with dimmer if the app is off.

If the switch is used as a junction box rather than ceiling rose, then it depends on the design of the switch, with some the dimmer and switch can be used independently, if this is the case then maybe you can wire it differently, but picture of back of dimmer switch or link to spec for dimmer switch will be required to work it out, and one would need a large back box to house it all, plastic of course radio waves will not go through metal.
 
Last edited:
Thanks both.

So, If i
forfeited the dimmer switch and replaced with a rocker type, on/off.

Connected Sonoff mini to before switch

This would allow simple on off of the lights via switch and wifi control.
In addition it will allow dimming capability via WiFi but not by switch as it would have been replaced by rocker.

I can live without the physical dimmers if I can set up a scenarios via WiFi alexa etc.
 
Sponsored Links
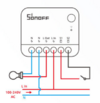
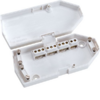
The instructions are clear enough 1699177873840.pngthe S1 and S2 terminals are normally extra low voltage so no mains connection to your switch. In your ceiling likely some junction box like this 1699178135332.png the Sonoff relay will need to go in an enclosure near to this, a surface mounted back box screwed to beams with a blanking plate or similar, in my case the down lights were in a large enclosure DSC_6062_1.jpg so did not need a junction box for the smart relay, 20220529_211956.jpgDSC_6799.jpg and I used the two way switching version of wiring. It makes it so much easier with pictures, we are guessing what you have, the ceiling rose is often the junction box and it is often replaced with the lighting junction box shown 1699178135332.pngbut some people do use maintenance free boxes, or simple back box and blanking plate and some strip connectors inside it.

If originally fitted with down lights often the switch back box is used as a junction box, this can be a problem with getting the room to fit the relay, we are guessing at what you have, and a picture can replace a 1000 words.

Mine work with Google Nest Mini's and hey google turn on landing lights works well, I used a twin contact relay so centre lamp can be independently controlled from the outer four and the centre one is colour changing bulb so have these effects Centre_bulb_colours.jpg using just centre bulb. I avoid using the first one as not living in a red light district.
 
Last edited:
Thanks for the details.

There are no junctions boxes.

Currebtly the live goes to the ceiling, here it connects to switch wire which loops back to the down light.

The returning switch wire to the light is labelled as a live switch.
 
You can't really use the whole ceiling void as a junction box, seems some corrective work also needs to be done. I am dyslexic, looking at your spelling so are you, and this means one can easy miss write or miss read what has been said, so pictures are currebtly (I would spell it currently) the best method so mistakes are not made.

It seems the wiring is just loose in the ceiling space, but I am not sure, as said as original either the ceiling rose or the switch back box doubles as a back box, which method was used will change how wired, so pictures are best so no mistakes are made.
 
I've got a new phone, hence the spelling mistakes

The wiring is loose, clipped into concrete beams (block and beam).
 

DIYnot Local

Staff member

If you need to find a tradesperson to get your job done, please try our local search below, or if you are doing it yourself you can find suppliers local to you.

Select the supplier or trade you require, enter your location to begin your search.


Are you a trade or supplier? You can create your listing free at DIYnot Local

 
Sponsored Links
Back
Top