Support spacings below 8'x4'x18mm ply substrate?

Cold. And whoever laid the conc. didn't mesh it so there are some interesting cracks. The Sikha Rapid that dropped into the cracks hasn't cracked since setting tho, and it's been there all winter so I doubt it will move..

50/60mm of PIR and a 35mm floating screed would have done it for me but good luck with your project.

I'm another one who goes through all the CLS at Wickes/B&Q and takes all the straight ones, I wonder if we're the reason they have such a reputation for "banana" wood!
 
Sponsored Links
The packer thicknesses aren't that thick, varying from 9-25mm. And off to the right the CLS will be used flat, as it's quite shallow there. Maybe screw/glue packs to underside of frames, like baseplates?
P_20220414_121216.jpg P_20220414_121205.jpg
 
The packer thicknesses aren't that thick, varying from 9-25mm. And off to the right the CLS will be used flat, as it's quite shallow there. Maybe screw/glue packs to underside of frames, like baseplates?
You just need to find some way to stop them moving around until you've get the sub-floor on, so perhaps grip adhesive or oval nails (nailed diagonally through the sides of the joists) just to pinch them in place? TBH I think that screwing them to the underside will be a bit of a pallaver and how do you add a 2mm packer if you find you need one?
 
A subfloor being just the ply sheets.

Ply packs not fixed down.

What max distance between ply pack supports under joists?

Thank you.
 
Last edited:
Sponsored Links
So, packs at end and mid points take the spring out of 63x38, but I should put in more? Lots of packs.

Off to the right, where the CLS needs to be used flat I was going to use 89x38? To beef it up a little, and to take some decent screws in 100x100 angle brackets? Maybe some mending plates on the undersides too.

Maybe Gorilla screw/glue adjacent frames together as they may creak if just screwed?
 
Last edited:
After the rad arrives and I get the tails sorted, I was wondering if I should glue the ply sheeting down on this side before continuing with the tricky 'flat CLS, part.

What screws to fix ply sheets down, at what spacings?

Do I just draw the the sheeting down with screws or add my own weight too?

Toolstation does a cheaper D4, but it sets in 10 minutes, wow, not much time for adjustment!
DSC03529.JPG
 
Last edited:
Enough packs?

I dogged the CLS frames together with some carver clamps and put in a load of 75mm coach screws, that, plus the ply glued on top, should see off any creaking.

I had some shuttering ply - 15mm, a very handy size.

Is ply always a uniform thickness? I only bought the 1st 4, I need 4 more.

Should I wait until I have all the CLS frames/ply sorted, then glue all the ply down in one go.
 

Attachments

  • P_20220428_152625.jpg
    P_20220428_152625.jpg
    242.6 KB · Views: 49
Last edited:
I had some shuttering ply - 15mm, a very handy size.

Is ply always a uniform thickness? I only bought the 1st 4, I need 4 more.
Not really. Shuttering ply especially seems to vary a bit. TBH I use ply for the thicker packers and use plastic shims to make the rest up (always using the smallest number o packers possible)

Should I wait until I have all the CLS frames/ply sorted, then glue all the ply down in one go.
I normally do. Easier to level a floor at one go

I don't know what has happened to my account but I stopped gettin notifications for a number of threads for some reason and some of my posts have gone AWOL, including one from this thread.

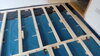
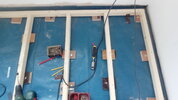
The way I normally level a frame up is to set it in position, then lift it onto four plywood blocks (one near each corner) and finally get the correct level with more plywood and/or plastic shim packers as required (shown as a horseshoe packer below). To stop the packers from moving I screw down through the plywood packers first into the floor (in the case of a concrete floor that means SDS drill, brown plug and a screw - don't worry about piercing the DPM). The loose shims are then popped on top and the floor levelled again.

Floor Frame Packing 001.jpg


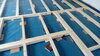
The joists are angle nailed through the edges of and through the plastic shim packers into the plywood to pin them in place. This can also be done with screws, although with obtuse angles like these it is safer to pilot drill holes first to prevent slipping. It is a bit difficult to represent this, but hopefully this sketch illustrates what I amd getting at

Floor Frame Packing 002.jpg


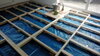
Once you have the frame in place you can angle plate it (again near the four corners) down to the concrete and screw to the sides of the timber frames.

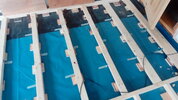
Once that is done, you can infill packers beneath the joists, checking for level as you go - the packers need to be on something like 400mm centres, like the joists are. Adjacent frames need to be screwed together. You'll use a lot of screws doing this, hence the need for a cordless drill/driver
 
I pinned using oval head nals (50mm). Creaky! Very! I took them out.

My conc substrate is sloping off slightly, packs and shims tend to hit a pinch point so are not supporting uniformly. Ok to achieve level tho.

Why not set up the frames with packs/shims and brackets, once happy, drop 200mm or 300mm CLS brothers down adjacent the frames, onto the membrane, and glued to CLS frames?
 
Last edited:
If things are creaking then either your frames aren't screwed up tight at the joints (2 or 3 no 5.0 x 80-100mm screws driven tight at every joint) or you haven't packed up tightly.

SDS the thick plywood packers down to the concrete near the corners of the frames, tight - so they cannot move. Level up the frame on shim packers to the correct level putting your body weight on them to ensure there are no gaps. I'd normally skew screw down tight through the joists and packers into the plywood at this point, then add the angle plates SDSd down to the floor and screwed to the sides of the joists, but as you don't have a impact driver I suggested nailing to stop the packers moving or even being 'spat out', but everything needs to be fixed hard down to the floor to prevent movement - do one then move to the next one and repeat. If you have squeaking you have movement which indicates that you aren't pulling everything up tight before you bracket to the floor. You really need those four corner fixings in before moving onto the intermediates, and the intermediates need to be fixed down hard as well

Incidentally, how are you checking for level?
 
Last edited by a moderator:
Long bubble.

Unfixed brother on floor (in a corner in this case)
 

Attachments

  • P_20220507_105007.jpg
    P_20220507_105007.jpg
    133.2 KB · Views: 44
Maybe I'll glue some short support brothers adjacent the CLS frames. Screwing the brothers could lift the frames if the screws weren't perpendicular. Maybe just a gravity fit, with glue.
 

Attachments

  • P_20220508_141933.jpg
    P_20220508_141933.jpg
    169.3 KB · Views: 55
  • P_20220508_142033.jpg
    P_20220508_142033.jpg
    228.2 KB · Views: 49
  • P_20220508_142051.jpg
    P_20220508_142051.jpg
    154.9 KB · Views: 50
  • P_20220508_142114.jpg
    P_20220508_142114.jpg
    178 KB · Views: 45
You need ensure that your brackets are fixed into the concrete floor. You also need to ensure that wherever you have brackets you have packers next to the brackets because the brackets won't carry the weight of the floor without bending. The packings need to be tight, at 400mm (approx) centres, and fixed to both the concrete floor beneath and the joists. The idea is to connect the joists to the floor securely so that nothing can move or creak
 
Each pack with one pan head masonry 60mm x 6 into a 45mm 7 brown wall plug. Vacuum cleaner to remove that little pile of spoil the drill deposits under the nembrane! Not easy work, but gets faster after the corners are set.
 

Attachments

  • P_20220517_120557.jpg
    P_20220517_120557.jpg
    180.6 KB · Views: 43
  • P_20220517_120642.jpg
    P_20220517_120642.jpg
    154 KB · Views: 46

DIYnot Local

Staff member

If you need to find a tradesperson to get your job done, please try our local search below, or if you are doing it yourself you can find suppliers local to you.

Select the supplier or trade you require, enter your location to begin your search.


Are you a trade or supplier? You can create your listing free at DIYnot Local

 
Sponsored Links
Back
Top