Support spacings below 8'x4'x18mm ply substrate?

Sponsored Links
Why haven't you just screeded that floor, or am I completely missing the point?
if I backtracked and went for a screed I think I would need about 70mm - 110mm depth. The conc. substrate has 2 coats of Sikha rapid which didn't have sand scattered over the top coat while still tacky? Mid point/average of about 90mm. App. how much would a 90mmx20m sq screed cost?
 
One downside to screed is how long it takes to set
 
if I backtracked and went for a screed I think I would need about 70mm - 110mm depth. The conc. substrate has 2 coats of Sikha rapid which didn't have sand scattered over the top coat while still tacky? Mid point/average of about 90mm. App. how much would a 90mmx20m sq screed cost?

Sorry, no idea - but you pay your few hundred and it's done. There are other options - you mentioned cold as an issue but I can't see how you'd insulate effectively in that framework, you could self level up to 70mm then lay 50mm celotex and finish with a 22mm chipboard floating floor.

I don't mean to to rude but I find your method quite bizarre to be honest, all those short lengths of timber, doubled up joists, noggins etc - I would have just run some long 2x2 or (3x2s laid flat) across at 400mm centres, levelled up and screwed down the ends, cut myself a load of varying thicknesses of plywood squares and then just packed carefully under at 600mm centres. The packers could be fixed with a thin wood screws to stop them moving. Finish with 8x2x22mm t&g flooring grade chipboard laid perpendicular to the joists (spaced to support the long ends) and screwed every 100mm- job done. Nothing needs to be massively fixed to the sub floor, gravity and the weight of the chipboard will keep it all down

Surely though, you've persevered and it's nearly done now?
 
Sponsored Links
It isn't chipboard, but you're right, it would be a waste to change track.

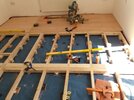
In half the room there just isn't the clearance to Cellotex /screed.

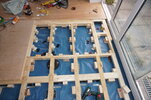
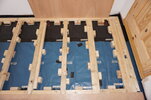
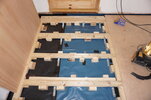
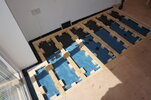
On tops of CLS, knots and areas adjacent planed where slightly proud.. Additional legs fixed once CLS level (Gorilla glued, and quick grip clamped to push air out. Clamp removed after wood draws some moisture from glue, about 20min), gravity fittings essentially, piloted and screwed the once glue set.

Some original outside noggins left in as no screw access once fixed down.

CLS butts PU glued, plus screws (2No. 5x80 min.), others just Gorilla.

CLS/Ply feet chocks Gorilla glued in everywhere I can get them once the CLS is level.

Leaving a 1mm gap between ply boards?

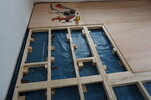
Landings at board edges (only one frame is actually 1.2m x 2.4m).


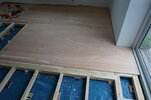
It's very flat and doesn't creak.

Fun fact: Budvar tins are 0.1 thk.
 

Attachments

  • 20220616_130522.jpg
    20220616_130522.jpg
    190.3 KB · Views: 48
  • DSC03548.JPG
    DSC03548.JPG
    227.8 KB · Views: 45
  • DSC03549.JPG
    DSC03549.JPG
    212.1 KB · Views: 46
Last edited:
Ply feet were 120x100, so a small gravity fitted/glued CLS block could go on each foot adjacent to CLS joists. Screws went into all CLS blocks only once glue was set. Interim CLS blocks added.
 

Attachments

  • DSC03554.JPG
    DSC03554.JPG
    279.9 KB · Views: 30
  • DSC03555.JPG
    DSC03555.JPG
    256.9 KB · Views: 31
  • DSC03556.JPG
    DSC03556.JPG
    245.7 KB · Views: 39
  • DSC03559.JPG
    DSC03559.JPG
    233.3 KB · Views: 31

DIYnot Local

Staff member

If you need to find a tradesperson to get your job done, please try our local search below, or if you are doing it yourself you can find suppliers local to you.

Select the supplier or trade you require, enter your location to begin your search.


Are you a trade or supplier? You can create your listing free at DIYnot Local

 
Back
Top