Suspended timber floor. Wall Plates and Over-site Concrete

Joined
17 Oct 2006
Messages
67
Reaction score
3
Location
Surrey
Country
United Kingdom
Here are the reference pics...
(The pictures are showing the SAME wall btw)

[/img] View media item 80626 View media item 80627
My queries:

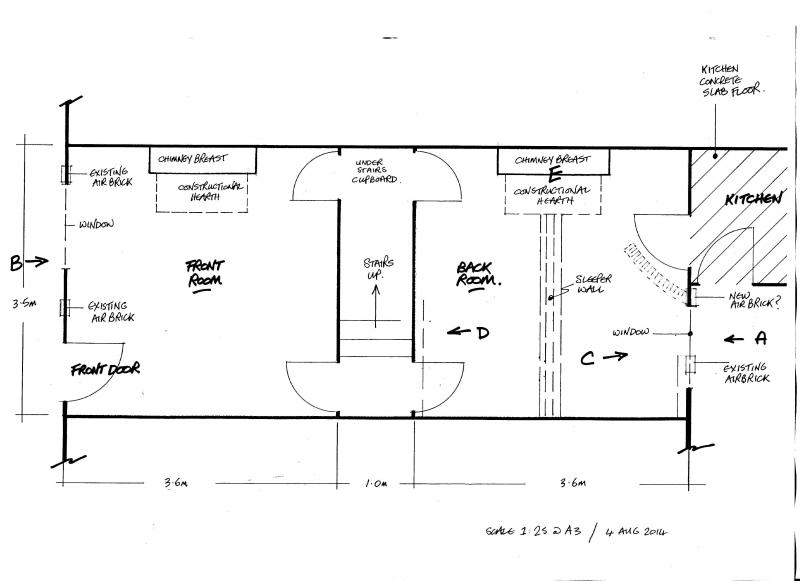
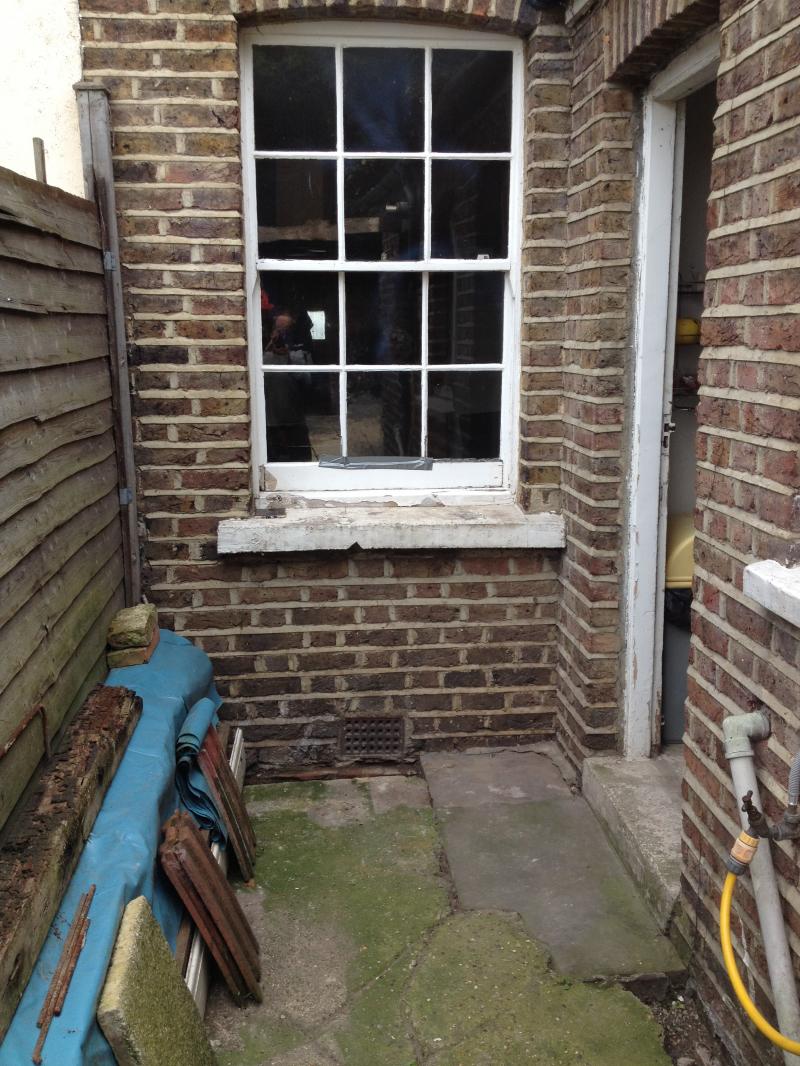
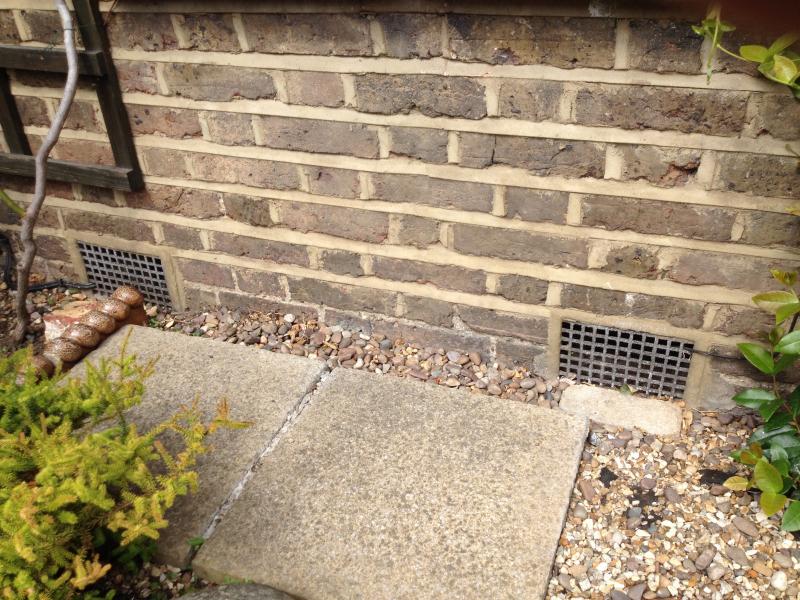
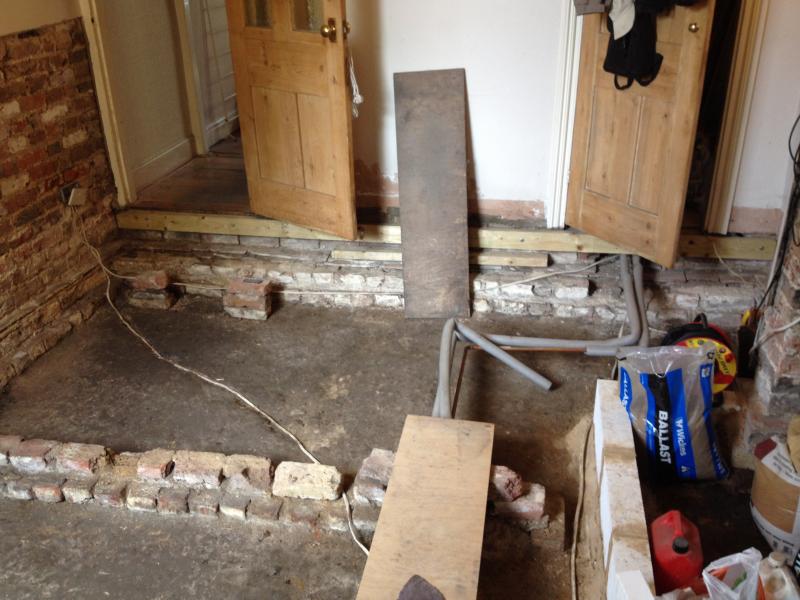
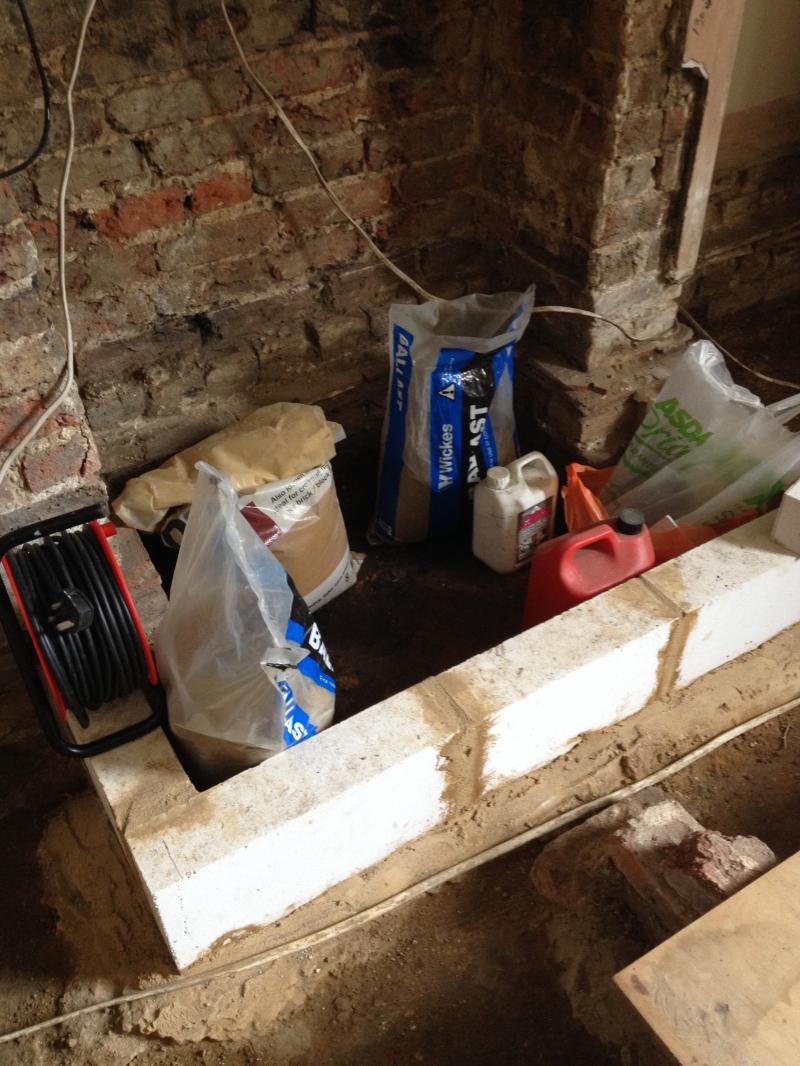
Is it a good idea to lay a concrete oversite? What you are looking at is earth, which has dried over a year but remains damp.
If over-site is a good idea, what should be the construction? Blinding, dpm, concrete thickness etc?

The next question:

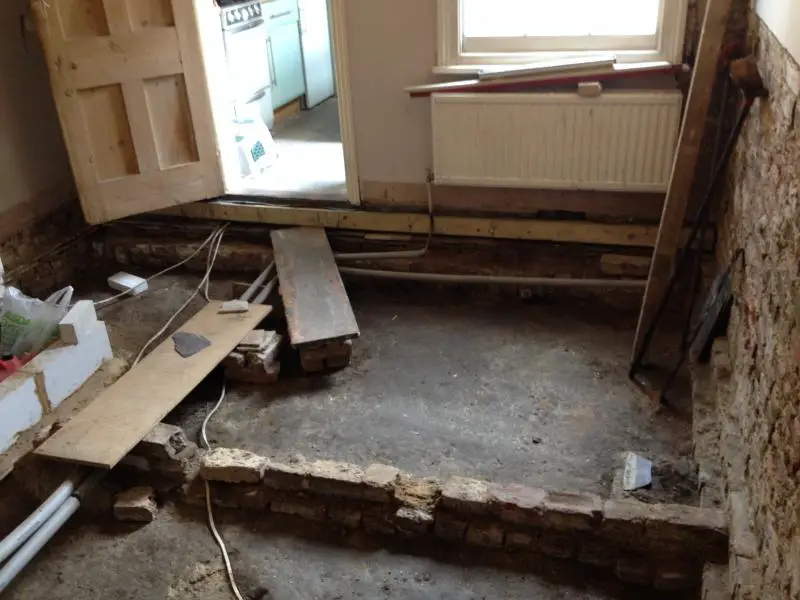
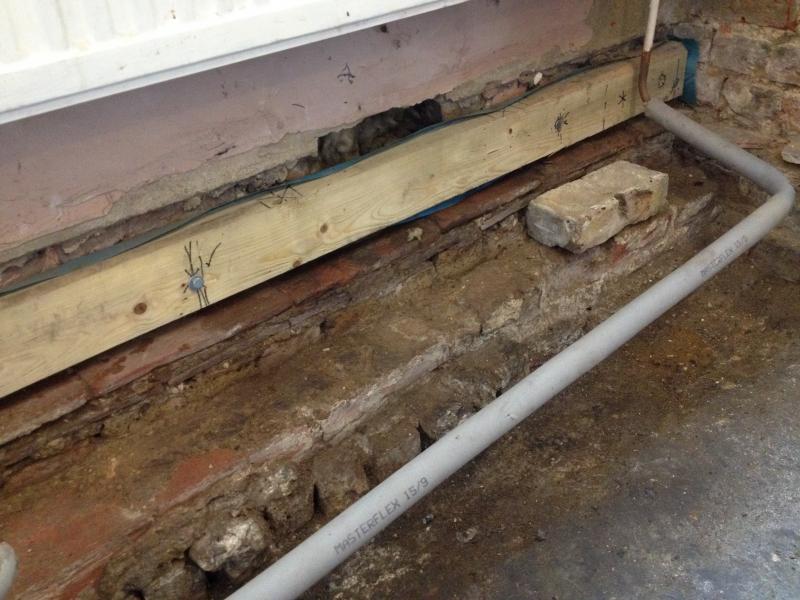
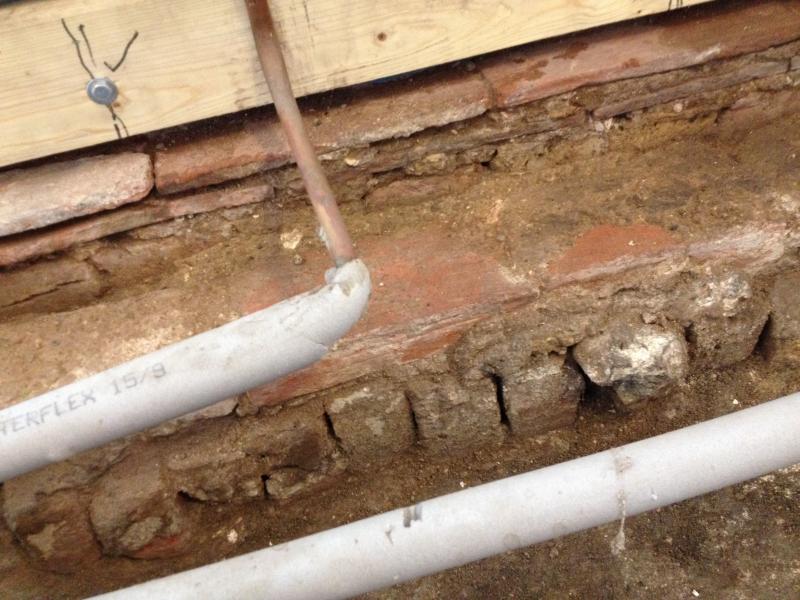
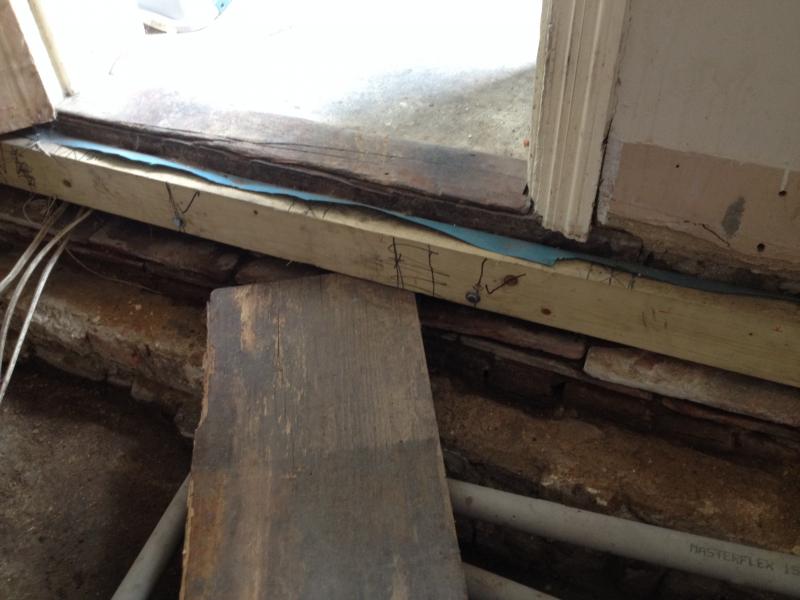
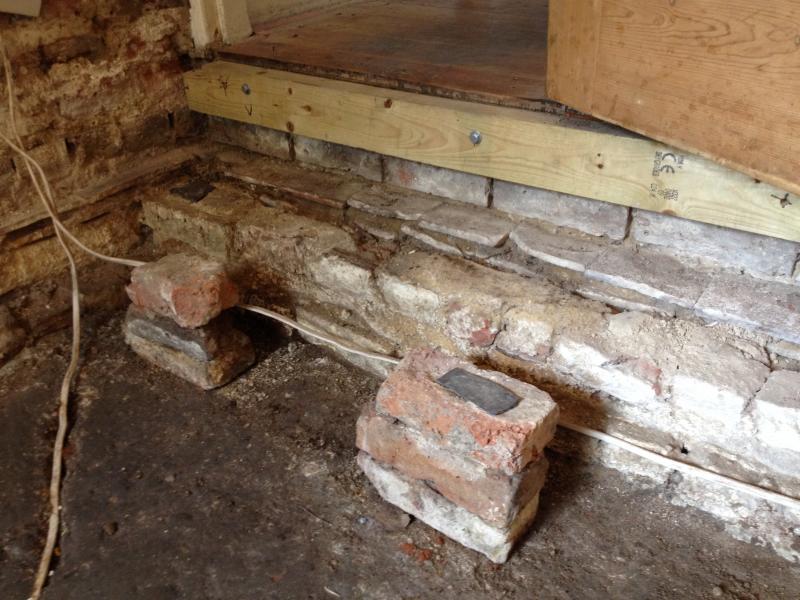
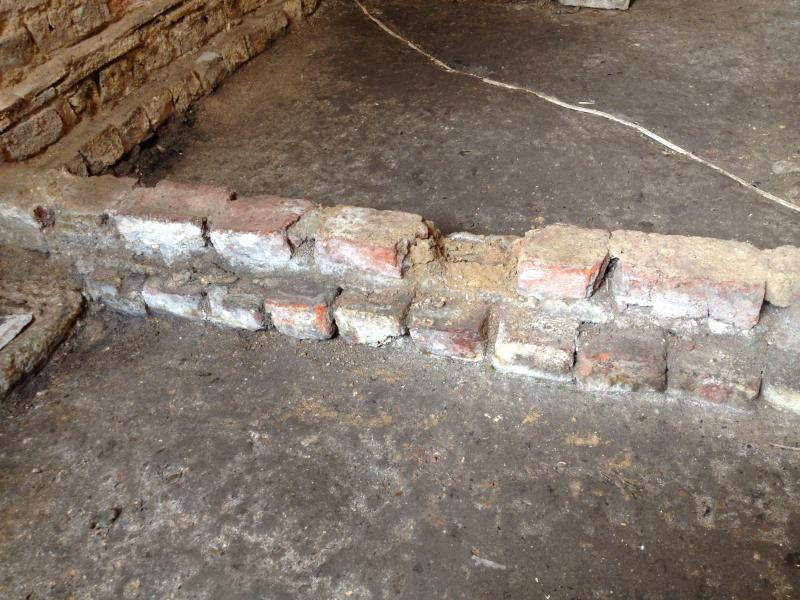
There is a brick shelf wall either end of the room, with a sleeper wall in the centre. The finished joist ht is shown by the timber plate I have bolted to the wall. The new joists will be layed onto the brick shelves and the centre sleeper wall. I have the option of laying the joists onto a new row of brick,mortar then dpm over...then fine tune joist heights with slate...Or to lay a timber wall plate to each (Mortar,dpm,mortar,wall plate).

In other words...what is the purpose of timber wall plates in this situation please, will it help me?...as compared to laying the joists onto a new layer of bricks with no timber wall plate.

(The timber wall plate shown bolted to the wall...WAS plan A. I was going to use joist hangers nailed to this wall plate...but thinking it through, I am a little concerned that the bolts in the wall will rust away and so compromise the whole floor...so have gone back to the idea of using the original shelf walls as originally used! As I have both wall plates fixed to the walls at either end of the room, at the correct height, they will now act as my 'end noggins', but with the main floor weight taken by the shelf walls)
 
Sponsored Links
Do you still have the original joists and floor boards?
What do you propose for the rest of the room and ground floor?

Filling with hardcore and concrete is typically cheaper than a suspended floor but it carries further difficulties such as running pipes and cables, and through ventilation etc.

If the bolts are well secure (ie. in solid brickwork with no damp present) then why not use the "wall plates" with hangers?

The knee wall can be rebuilt and honeycombed for ventilation and the oversite covered with a membrane moisture barrier.

There's far more to doing what you propose than i've mentioned above, and
i'd suggest that you read up all similar past posts and pics -
there are many?

Think about it and come back here if you want?
 
REE: Do you still have the original joists and floor boards?
What do you propose for the rest of the room and ground floor?

Sorry, I made a hash of quoting Rees replies, so my replies are all showing like this! How the hell does the quote thing work?

ME: Original Joists scrapped. Totally rotten. I have about 2/3rds the original boards. Good timber but not enough matching boards now...so intend to lay T&G wbp ply as subfloor...covered in either engineered boards or new T&G floorboards. I haven't yet decided on the FFL...which I realise comes first, Ha! The other room will be the same procedure..rip up old floor, replace joists and fit new wbp ply. This front room has 2 functioning airbricks. The two room are divided by the stairs, bit I can create voids both sides to get the air flowing through from front to back room.

REE: Filling with hardcore and concrete is typically cheaper than a suspended floor but it carries further difficulties such as running pipes and cables, and through ventilation etc.

ME: Not intending to fill with Solid Concrete floor. I have damp walls and so am concerned that this will contribute to the wall dampness. But I did wonder if a concrete layer a couple inches thick was worth doing, over a membrane. Slight problem is that, I am struggling at the moment with only 1 airbrick in the back wall, to vent under the new floor. Due to the layout I cannot get another airbrick at the other side of the room (as this is the door into the kitchen which has a solid concrete floor) so am planning to fit a second airbrick about a foot from the other, but then run concertina plastic tube to get air to the other half of the room.

REE: If the bolts are well secure (ie. in solid brickwork with no damp present) then why not use the "wall plates" with hangers?

ME: The bolts are well secured now...but the walls are damp, especially the external wall. Hence my concerns with the bolts rusting. As a guess...I have a feeling that if I did use this Plan A...it would probably be fine...but I would always be concerned with those bolts rusting.

REE: The knee wall can be rebuilt and honeycombed for ventilation and the oversite covered with a membrane moisture barrier.

ME: The walls are ok. Even though layed directly to earth and with Lime mortar. I am thinking of just adding either an extra row of bricks (or wallplate) and that should do the job. As you say, I was going to remove a few bricks in the middle sleeper wall to maintain the airflow as I am thinking of insulating the floor with Celotex between the joists. The new joists are only 4 x 2, but with the span to the central sleeper wall only 1.8m, the charts show them well within requirements. Fitted at 400 centres.
The wall at the room end seem to be actually part of the wall foundations, so I don't want to touch them..whereas the central sleeper wall is pretty loose actually and I think even I could rip them up, lay a strip foundation and lay a new wall with the existing bricks using cement mortar.

REE: There's far more to doing what you propose than i've mentioned above, and
i'd suggest that you read up all similar past posts and pics -
there are many?

ME: Thanks for your reply Ree, as you can see, I am a complete novice at this..I have read many posts...but just wondered about the merits of using a wall plate compared to laying joists straight on the brick(with dpm of course). What is it's original function and will fitting one make fitting the joists easier. I was wondering about the joists being not flat and how they would sit on a brick wall with no way of fixing them down to hold them flat and square...which I presume is one of the purposes of the wall plate. The original Victorian joists were indeed sitting on a timber plate, but not actually fixed down, so that's what made me wonder why they bothered fitting the timber plates at all!

REE: Think about it and come back here if you want?
 
Yay, finally figured out this quote thing! Maybe I'm doing it wrong as it seems awful long winded to me. Typing all this 'quote=username etc at the start and end of each section..Is that the quickest way to copy part quotes or have I missed something?

Do you still have the original joists and floor boards?
What do you propose for the rest of the room and ground floor?

I got rid of the joists as the ends were all rotten. I was thinking of cutting the ends off and half spanning the room with them alongside new ones, but in the end I got rid and bought full length ones at 4.0m. The room is 3.75m x 3.90m. I still have 2/3rds of the floorboards.
The room and rest of ground floor is the same throughout. Suspended timber joists. Infill insulation Celotex. WBP T&G Ply as sub floor with either Engineered Wood floor or new T&G Floorboards as FFL. Once I've done this back room I will be looking at the front room to do the same. One thing I have to improve is the airflow from front to back. This back room has only one airbrick..the front has two...but at the moment, well since it was built actually (1890's) the airflow does not connect up front to back.

ree said:
Filling with hardcore and concrete is typically cheaper than a suspended floor but it carries further difficulties such as running pipes and cables, and through ventilation etc.

Wasn't thinking of putting in a solid concrete floor as I have read that it MAY cause more problems with damp on the walls (tho I do wonder..won't the dpm wrapped up the wall stop moisture exchange into the wall). Additionally the problems you mention went through my mind, So at the moment I am looking at suspended timber floor method.

ree said:
If the bolts are well secure (ie. in solid brickwork with no damp present) then why not use the "wall plates" with hangers?

I did say bolts...but in fact I did not use bolts! They are in fact Coach Screws, 100 x 8mm with matching 60mm plastic plugs. The wall plate is 45mm thick, so the screw 50mm in the wall allowing for brick irregularities. There IS damp present...according to my mates damp meter...(we won't go into that discussion at the moment!). So I am concerned about any hint of damp compromising the screws..


ree said:
The knee wall can be rebuilt and honeycombed for ventilation and the oversite covered with a membrane moisture barrier.

I am a novice, but I reckon I probably am capable of re-building the centre wall on a strip foundation. I called it a sleeper wall, don't know if that's correct as you call it a 'Knee' wall. At the moment it's loosely held together by lime mortar all direct to the earth. Honeycombe construction I understand...for the air to flow through.
Are you suggesting covering the earth with a DPM Ree and leave it at that...no concrete over. I assume that will aid to keep moisture down at ground level?

ree said:
There's far more to doing what you propose than i've mentioned above, and
i'd suggest that you read up all similar past posts and pics -
there are many?

Think about it and come back here if you want?

I have read many posts...and some times I think I've just confused the issue in my mind. I think it's actually fairly easy job, but when it's the first time doing it it always takes three times as long...and so I want to get it right first time!
Thanks for your feedback.
 
Sponsored Links
Thank you for taking the trouble to come back - most dont and its irritating.

I cant help you with the posting/quoting stuff - i have no idea.

Do section sketches (full size on a piece of ply or plaster board) of the wall plate to FFL, and perhaps a sketch of the sleeper wall to FFL. This way you are in control of your dimensions.

Air flow from front to back is necessary - use 10" x 6" plastic air bricks. Is the hall subarea ventilated? Pics of backyard view below the dining room window, and front elevation at ground level would help.

Yes, simply drop a membrane down and lap it up the walls a little.

Why not slip a DPC behind the wall plate - loosen off the screws. Every third joist could be lightly packed on the "ledge" with a brick and slate. Just for insurance.

Re-arrange any pipework or cables now. Everything to be securely clipped.
Does your water service enter the house in plastic?

If you have to carcass the joists around a hearth come back here.

Consider where to locate your access trap for the crawl space.

As the floor goes down test it for squeaks and movement.

Forget about cutting in a DPC - its hard to do and possibly de-stabilizing.
 
I am grateful for your help Ree. I realize I have given vague info, which must make it difficult to visualize. I will draw a floor plan and couple of photo's to better show the scenario. It's a small house and not a difficult job...but as a novice it's all new stuff for me to learn. I appreciate the advice. I'll be back soon.
 
As Ree suggested, slacken the bolts and slip a piece of DPC behind the plate, cut slots for the bolts in the PCB so that it slides all the way down. The slots will make little difference but if you are concerned pour some liquid DPC down the wall. If its not an excessive amount of work you could replace the bolts with stainless steel to avoid the possibility of rust. Also I would not bother with over site concrete, it will serve no purpose and if you have an under floor water leak it will soak away. What's with those pipes? the right angle bends look to be just bent!!
 
I understand, take your time. All that new stuff that you've been reading will slowly sink in and give you a better and more confident idea of what you are doing.
 
Do section sketches (full size on a piece of ply or plaster board) of the wall plate to FFL, and perhaps a sketch of the sleeper wall to FFL. This way you are in control of your dimensions.
Good idea...do it sometimes in my job (I'm a designer)

ree said:
Air flow from front to back is necessary - use 10" x 6" plastic air bricks. Is the hall subarea ventilated? Pics of backyard view below the dining room window, and front elevation at ground level would help.
Pics uploaded. Air flow is minimal to non existent at the moment, exacerbated further by only one air brick to the rear. If you refer to my plan you can see my proposed new air brick, maybe with some concertina duct tube to get air to that side of room? Getting through the hall/stairs walls can be done tho. I will put 2 or 3 clear gaps through there.


ree said:
Yes, simply drop a membrane down and lap it up the walls a little.
I see you both make same suggestion..thanks! Wasn't looking forward to mixing that amount of concrete!

ree said:
Why not slip a DPC behind the wall plate - loosen off the screws. Every third joist could be lightly packed on the "ledge" with a brick and slate. Just for insurance.
Knew all about the DPM's to the plates...BUT completely forgot to fit them! So I actually un bolted completely one plate, took it off and fitted DPM and re fitted plate. Heart in mouth tightning bolts again...didn't want a loose spinner! All good tho, tightened up nicely. Same to do to other, if I follow your advice about using both methods of support..ie, plate and wall. With the wall taking the weight off the wall fixings. My neighbour (who does lots of work on his rental houses) suggested the same.

ree said:
Re-arrange any pipework or cables now. Everything to be securely clipped.
Does your water service enter the house in plastic?
Ok.
Water enters in......wait for it......Lead. Then onto copper at the entry point.

ree said:
If you have to carcass the joists around a hearth come back here.
Mmmm, carcassing joints. What is that? I'm not sure, but I don't think our regs require this. I'm guessing in the states the regs might be different. Lots of woodburners over there. I was toying with wood burner idea, so completely removed the old hearth and built this retainer to proper regs dimensions. To complete infill would be crushed hardcore, sand blinding, DPM. Followed by concrete and screed finish...then Decorative hearth. Though, as it stands with finance...I might actually just fly the floor over the hearth and forget the wood burner idea. The blockwork will remain under the floor. Yet to decide.

ree said:
Consider where to locate your access trap for the crawl space.
You might now see from the photos...the gap below the bottom of the joists to the earth will be apprx. 8-10"...so no access required!

ree said:
As the floor goes down test it for squeaks and movement.
okedoke.

ree said:
Forget about cutting in a DPC - its hard to do and possibly de-stabilizing.
This was reference to my other post I assume. I had come to the same conclusion Ree...actually the situation is even more difficult...the wall is a party wall, double skin brick, no cavity. No chance of slipping a DPM in...and of course...if it could be done...I'm sure it would have been done before!

Here are plan & pics...if you look back at my previous posts, you should find some pics that show the condition of this room a while ago..and work I've done to the fireplace.


VIEW A
VIEW B
VIEW C
VIEW D
SLEEPER WALL
HEARTH

As far as I can see...there is NO DPL built into the brickwork. If you focus onto the foundations of the wall inside the house, you will see 2 thin layers of what look likes terracotta tiles built into the brick. Whether this was meant to act as some sort of damp suppressor I can only guess that it was...but it's not very good! It certainly isn't slate.
My thoughts then turn to the exterior ground levels and whether they have any bearing on the damp...though the ground does not SEEM to have a DPL to be below, I'm wondering is splash up is contributing to the damp walls. I am also looking at the condition of the window cills above those walls. They need some serious attention. Under the cill to the rear...view A...the cill has disintegrated and the drip channel has long since gone. I assume water just run under and onto the wall. The bottom of the window frame, where it meets the cill, needs attention, as does the pointing to the whole frame. Looks like water has quite a few ingress opportunities.

Re the electrical cable. These disappear through the concrete slab which is the kitchen floor. All I will be able to do with these is clip them to the underside of the joists, off the dpm which I've fitted on top of the earth.

Maltaron and Ree, thanks for your feedback, very useful. I look forward to your thoughts.
 
As Ree suggested, slacken the bolts and slip a piece of DPC behind the plate, cut slots for the bolts in the PCB so that it slides all the way down. The slots will make little difference but if you are concerned pour some liquid DPC down the wall. If its not an excessive amount of work you could replace the bolts with stainless steel to avoid the possibility of rust. Also I would not bother with over site concrete, it will serve no purpose and if you have an under floor water leak it will soak away. What's with those pipes? the right angle bends look to be just bent!!

Thanks for your advice Maltaron, most useful. See my reply to Ree about the DPM behind the wall plates! I will check and see if my Coach screws, not bolts, are stainless or not and maybe change them. I also have some of those expanding bolts that I might try to fit as a bit more insurance. They're the type you can fit without taking the wall plate off the wall, you just drill straight through the timber and into the wall..I forget what they're called. Re the pipes...actually it's just the photo. The Insulation is a bit twisted, but the copper under is a proper rt. angle joint. If you look at my reply to Ree, you will find further info and photos.
 
Yay, finally figured out this quote thing! Maybe I'm doing it wrong as it seems awful long winded to me.
Well..
Typing all this 'quote=username etc at the start and end of each section..Is that the quickest way to copy part quotes or have I missed something?

For additional part quotes you can simply type "quote" in square brackets before the bit you're quoting, and "/ quote" in square brackets afterwards.

Quote economically and only when necessary ;)

cheers
Richard
 
For additional part quotes you can simply type "quote" in square brackets before the bit you're quoting, and "/ quote" in square brackets afterwards.

["quote"]Quote economically and only when necessary ;)["/quote"]


I tried it...as above Richard, but it doesn't work...What have I done wrong please?
 
I tried it...as above Richard, but it doesn't work...What have I done wrong please?

Ah. I see. I don't need to type the " symbols! Got it. Thanks Richard.
 
The lead water service should be changed to a min 25mm MDPE pipe - run it in a trench (750mm depth) following the lead pipe to the garden(?) wall and leave an open trench, and say 1m curled up your side of the garden wall - the Utility will make the connection - the other end should come up to a stop-cock above the floor.
Change it now with the floor open, if it comes thro the front wall.

Carcass means trimming around the c/breast and hearth - google pics.

Your bolts and plugs are fine, leave them alone.

The wall plates could be notched at air brick positions to allow full ventilation thro.

The DPC double coursed tiles should run to the exterior brick face - your ground surface should be just below that level. At the moment they appear to be bridged at the front and rear elev's.

There was originally, probably an air brick below the front door threshold venting the hallway.

No concertina tubing - simply honeycomb, even half bricks.

Leave the cills until later, they can wait.
 

DIYnot Local

Staff member

If you need to find a tradesperson to get your job done, please try our local search below, or if you are doing it yourself you can find suppliers local to you.

Select the supplier or trade you require, enter your location to begin your search.


Are you a trade or supplier? You can create your listing free at DIYnot Local

 
Sponsored Links
Back
Top