Thermostat wire with Nest 3rd Gen?

Joined
23 Sep 2016
Messages
8
Reaction score
0
Country
United Kingdom
Hi guys, I know there are several Nest posts on here, but couldn't find the answer to my question.

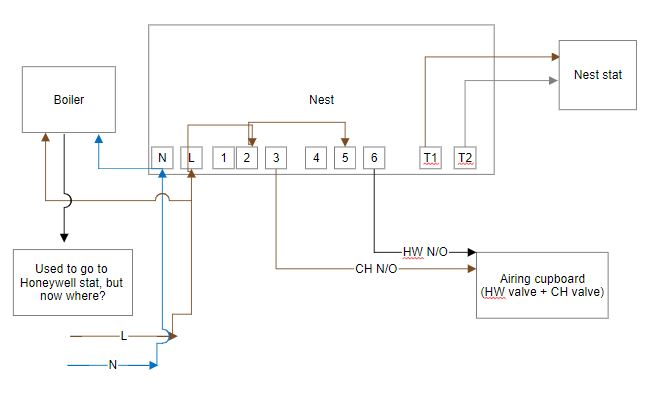
Replacing my UP2 programmer with a Nest 3rd gen looks fairly simple, except one thing. There are three wires to the current Honeywell thermostat, Live, Neutral and one that goes to the boiler. I can't figure out from the Nest wiring diagrams where this wire should go in the Nest programmer. Is it required at all with the Nest system?

If I can find the answer to this one question I'll save myself £50 on installation!

Many thanks in advance guys.
Adam.
 
Sponsored Links
Using the wires between existing UP2 and Honeywell roomstat to connect T1 and T1 on heatlink of Nest to the new Nest room stat which should be placed at the same location of your old stat.
 
Thanks hertsboilers. Yes I'll replace the stat with the Nest one and power it from the 12v output from the Nest 'programmer'. Is the wire from the boiler that goes to the Honeywell stat just redundant?
 
Sponsored Links
Don't know where is this wire from inside the boiler.
Hi mate, yeah. They're are four wires from the boiler. Three go to the control box and are earth, live and neutral and the fourth goes on to the Honeywell stat.
Thanks for your continued support, it is appreciated!
 
Here's a pic of the wiring diagram I drew. Top right says 'to airing cupboard'.
 

Attachments

  • IMG_20160826_172903.jpg
    IMG_20160826_172903.jpg
    61.5 KB · Views: 622
Hi guys,
I went quiet as I didn't end up buying a Nest... until now!

I have connected L to 2 and 5 in the Nest for power to both CH and HW parts.

I have connected the wire that used to go to my UP2 programmer port 3 (HW on) to 6 on the Nest (HW normally open).
I have connected the wire that used to go to my UP2 programmer port 4 (CH on) to 3 on the Nest (CH normally open).

I don't know what to do with the wire that used to go to the Honeywell thermostat from the boiler (hertsboilers, I note you say this should be connected to 3 on the Nest, but then where does the one I currently have in 3 go to?)

The current situation:
Ask Nest to turn on the heating - nothing happens.
Ask Nest to turn on the hot water - the boiler fires up, but there's no water circulation! The boiler gets hot but the HW tank doesn't.

I am very confused - this should be quite simple in theory! (although given I have a spare wire I'm not surprised it isn't working).

I wonder if someone would be kind enough to review my setup and provide advice, please? Many thanks!!

Adam.
 
What motorised valves do you have?
Can you put up a pic of main wiring centre that the motorised valves are wired to
 
And also boiler make/model and pic of wiring inside boiler if can do safety without compromising safety, i.e. Opening wiring area without disturbing any combustion seals etc
 
And also boiler make/model and pic of wiring inside boiler if can do safety without compromising safety, i.e. Opening wiring area without disturbing any combustion seals etc
Thanks for your reply McCombi!
Here's the block the two valves, water pump and tank thermometer are wired into - more complicated than I thought!
2017-07-26 17.57.17.jpg
And here's one of the two valves (Danfoss HPA2)
2017-07-26 17.58.37.jpg

The boiler is an Icos Ideal HE12. I haven't taken any panels off yet as it appears I need to take off the bottom plate before I can take off the front panel to see any wiring. I can have a go at that if it'd be useful though. Given this is looking much more complicated than I first thought I'm beginning to get tempted to pay an expert - I really thought this would be a fairly simple operation at the start! If you do have some tips for me to try I'll certainly give them a go first though.

Many thanks again!
Adam.
 
It's difficult without seeing it, but couple of things to note going by your prev posts.

The wire from boiler you said went to stat prev, are you sure?

As the boiler has a permanent L N E, should have a pump live connected to it also and also needs a switch live to fire boiler when demand created. This wire will be coming from the terminal in main wiring centre that have the orange wires coming from both of the danfoss 2 port motorised valves (white square boxes in pics)

The permanent live in heatlink should be linked to no 2 and no 5 as you have done, then wiring goes as follows.

No 3 (call for heat) should be wired to the brown wire of the central heating 2 port valve (this makes the motor turn in 2 port, opens valve and makes a switch inside the white box which sends power back to boiler switch live via orange wire)

No 5 call for hot water should be wired to/sends voltage to cylinder thermostat common, if cylinder is asking for heat i.e. Thermostat not satisfied, it then sends voltage back down to wiring centre to connect with brown of hot water 2 port valve (white box in pic on the pipes going to cylinder, thus making motor turn, opening waterways and making switch in valve to send power back to boiler to turn on via switch live orange wire.

Hope this helps
 
It's difficult without seeing it, but couple of things to note going by your prev posts.

The wire from boiler you said went to stat prev, are you sure?

McCombi, you legend! When I read what you put in the quote above I thought "yeah, of course, oh, erm, hmm, am I sure, perhaps I got it wrong?..." Then I did what I should've done initially and traced all the wires from the connection box pictured above and found things were a lot different. The result was the spider diagram below...

2017-07-30 21.29.19.jpg

Then, after looking up how my HPA2 valves are wired I eventually managed to figure out how the whole system is wired up, which then allowed me to figure out how to power the system, bypass the old thermostat and wire in the Nest.

The result: IT WORKS!!

The moral of the story is to not assume you know where all the wires go without checking - thankfully I didn't break anything, or anyone :)

Thanks for all your help guys!
Adam.
 

DIYnot Local

Staff member

If you need to find a tradesperson to get your job done, please try our local search below, or if you are doing it yourself you can find suppliers local to you.

Select the supplier or trade you require, enter your location to begin your search.


Are you a trade or supplier? You can create your listing free at DIYnot Local

 
Sponsored Links
Back
Top