Tiles around Velux issue

Joined
11 Feb 2021
Messages
47
Reaction score
1
Country
United Kingdom
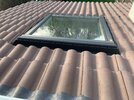
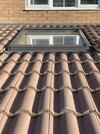
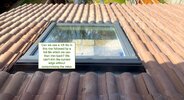
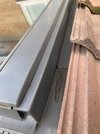
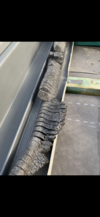
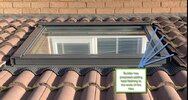
I was hoping to get some roofing advice on an issue with the the way the tiles have been placed around a Velux. The tiles on the left of the velux are sitting quite high as compared to the right. The window has been in-place for about 18 months and last week with the recent rain, there is a slight damp patch just below where this line of raised tiles are located. I have been in contact with Velux who have advised the tiles need to be 'lowered'. Question before I call back my contractor is do all the tiles on the roof need to be re-done? I'm just trying to gauge the effort. Thanks
 

Attachments

  • IMG_9593.jpeg
    IMG_9593.jpeg
    414.7 KB · Views: 136
Sponsored Links
Others will give their opinions, (hard to see on your pics) but the LHS tiles, I think should be cut back slightly, they are probably being kicked up as there is a drip channel underneath pushing them up, I think you are meant to chop the tiles up to the drip channel, not over it as the channel is proud of the flashing and pushes the tile up.

Can you take a pic looking up at the window, from the ground?
 
Thanks Mr Chibs. There is a drainage channel just under the edge of the tiles. The RHS tiles sit quite low to this channel whereas the RHS sit quite proud of it. It these are trimmed back it will expose the foam weather strip that sits just after the main channel. Is there a way to basically match the layout of the RHS as those are absolutely fine? Would a half tile like this https://build4less.co.uk/products/redland-regent-concrete-profiled-half-tile-all-colours and then the cut back full tile work. So the trim to the channel can be achieved without exposing the weather strip. I have also attached a photo looking up
 

Attachments

  • A675EAC6-6535-4C12-8434-C83570ABE0A4.jpeg
    A675EAC6-6535-4C12-8434-C83570ABE0A4.jpeg
    436.2 KB · Views: 153
Regarding the use of the half tile, I have attached a photo of where I was hoping to make use of it. Would this be a workable solution?
 

Attachments

  • half_tile.jpg
    half_tile.jpg
    323.5 KB · Views: 103
Sponsored Links
Using a half will make no difference at all.
From the photos provided I would guess one side has the tile nib left on cocking it up.

Correction would be simple from inside

That aside I guess the leak will be from a trim screw loose .
 
Thanks datarebal. I have attached a photo of the underside of the tile. Would removing the 2 nibs I've highlighted drop the tiles and also a closeup of the tiles in situ that shows the 'gap'? The leak is very likely due to the raised tiles as the foam weather strip was absolutely soaked and was riding over the channel. I've ordered new foam but I'm looking to correct the tiles so they provide similar protection as the RHS.
 

Attachments

  • tile.jpg
    tile.jpg
    295.8 KB · Views: 111
  • IMG_9590.jpeg
    IMG_9590.jpeg
    221.9 KB · Views: 119
You could start with the nibs, when I fitted mine, the 'dip' of the tile fouled the channel, pushing the tile up, when I chopped the tile back, it sat closer down to the window.

I've seen some installs, where the foam is pushed in/removed and the sides of the tiles are mortared in.
 
ideally trimming the tile back would be the way to go but on the LHS there just isn’t enough overlap. Is there anyway we can get the same overlap and trim as the RHS or would that mean a complete overhaul? The RHS sits perfectly
 
It's the tile nibs at the top off the tile .not bottom as you have highlighted.
Try that, then cut the tile to the side flashing upstand if it fouls.
I don't think this is your leak cause though .
 
Thanks again datarebal. Having spoken with velux regarding the leak it’s their opinion rain is getting under the raised tiles so anything that levels them would certainly help. The weather foam strip is definitely compromised, I’ve attached a photo. Also it seems that it’s come apart and trails over the second overflow channel and onto the roof membrane. When saturated its probably letting the water in. I reckon dropping the tiles by removing those nibs and replacing the foam should fix the issues
 

Attachments

  • D3E55FB6-1973-427F-A853-10DCF2326D6F.png
    D3E55FB6-1973-427F-A853-10DCF2326D6F.png
    1.2 MB · Views: 123
Under the tiles and over the edge of their side flashing .. doubtful.

But the tiles do need a tweak
 
Apprentice boy error! The shape of the tile on that side is drawing the water away from the drainage channel, that combined with not cutting the sponge so it sits neatly on the back of the tile to stop this happening cause problems, a BFX collar should have been fitted as well to help prevent water from getting in.
 
Thanks Catlad, I’m hoping getting the nibs removed from the tiles as advised by datarebal and chibs and replacing the sponge which is now completely comprised will go some way to address the problem. I’ll have a look at the collar. Hopefully it can be retro fitted
 
Hello All, I have builder coming around next week to replace the weatherseal foam and to trim the tiles so that tiles don't stand so proud. The builder has also proposed that he could add lead flashing to the ends of the tiles to create a better barrier. Is this a good idea?
 

Attachments

  • 2022-11-06_14-14-22.jpg
    2022-11-06_14-14-22.jpg
    183.4 KB · Views: 88

DIYnot Local

Staff member

If you need to find a tradesperson to get your job done, please try our local search below, or if you are doing it yourself you can find suppliers local to you.

Select the supplier or trade you require, enter your location to begin your search.


Are you a trade or supplier? You can create your listing free at DIYnot Local

 
Sponsored Links
Back
Top