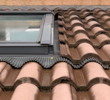
Yes that or cut some small thin till cuts so as to get rid of that curve of the tile that's drawing the water in.

You are using an out of date browser. It may not display this or other websites correctly.
You should upgrade or use an alternative browser.
You should upgrade or use an alternative browser.
Tiles around Velux issue
- Thread starter Phillip Stephens
- Start date
- Joined
- 11 Feb 2021
- Messages
- 51
- Reaction score
- 2
- Country

Thanks Catlad. The builder's made an attempt to trim the tiles. He's not quite done but I reckon with the replaced weatherseal and the reduced up-kick it should hold. He's done a water/spray test and its dry...for now. He said he'll consider the flashing if it continues. I've added a before/after
Attachments
- Joined
- 11 Feb 2021
- Messages
- 51
- Reaction score
- 2
- Country
Indeed they have. Although convincing the builder it would drop the tiles was half the battle. Once the tiles were removed you could see where the water was pooling on the membrane and eventually getting in. I’m hoping this will go some way to address the issue or it’ll have to be some inventive use of flashing

Always lead them...birds just love shoving seeds under the foam, does not take long to poke a hole in the membrane.
- Joined
- 11 Feb 2021
- Messages
- 51
- Reaction score
- 2
- Country

- Joined
- 11 Feb 2021
- Messages
- 51
- Reaction score
- 2
- Country
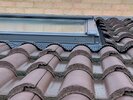
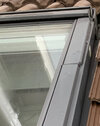
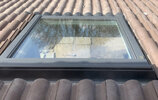
For ref I’ve attached pics of both sides which look the same. There’s never been any leaks from the frame itself
Attachments
- Joined
- 11 Feb 2021
- Messages
- 51
- Reaction score
- 2
- Country
I was meaning to ask how would the flashing be attached to the tile ends. There is no obvious way to keep the flashing in place or should I consider bostik instead
Tuck under the top tile, dress down the tiles and then fold back under the bottom tile, buff the lead and use silicone to stick.
- Joined
- 11 Feb 2021
- Messages
- 51
- Reaction score
- 2
- Country
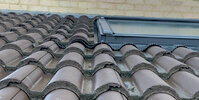
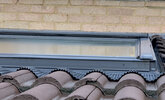
A bit of an update after the tiles were profiled and the weather strip installed. The leaks on the side where the raised tiles were have now stopped. However there is still dampness on the lower left corner moving to the front. I had a look under the tiles for obvious ingress on the membrane but can’t see any signs so I’m not sure where the water is getting in from.
Attachments
I have found that the fakro version leaks down the bottom corners, sealing all the joins of the flashing with silicon stopped it. Also that skirt needs to be flat, again silicone it down.
- Joined
- 11 Feb 2021
- Messages
- 51
- Reaction score
- 2
- Country
Thanks Marty I’ll give that a go. I’ve got to say the Velux weather strip is very flimsy especially the peel off stick on. I might have to reinforce it or use a different product
Am I right in thinking this is one of the new automated top hung skylights?
What is the pitch of the roof?
Data if it is a top hung auto that will be the reason it looks odd.
Not sure what a flimsy weather strip is?
What is the pitch of the roof?
Data if it is a top hung auto that will be the reason it looks odd.
Not sure what a flimsy weather strip is?
DIYnot Local
Staff member
If you need to find a tradesperson to get your job done, please try our local search below, or if you are doing it yourself you can find suppliers local to you.
Select the supplier or trade you require, enter your location to begin your search.
Please select a service and enter a location to continue...
Are you a trade or supplier? You can create your listing free at DIYnot Local