Tiling open porch

Joined
24 Apr 2008
Messages
2,222
Reaction score
468
Location
UK, Wittering, West Sussex
Country
United Kingdom
Hi All
read the info here,
https://www.diynot.com/diy/threads/wall-and-floor-tiling-basics.77709/
but just wanted to ask again, as its an outside area fully exposed to elements, as west facing lot of sun in afternoon, and also we get lots of wind as we are near to the coast , and rain & salt etc into the porch
Rarely get snow , I think only had once in the 25 years and that was a sprinkle

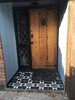
Our outside porch tiling, which has been in place for over 25years (mother-in-law lived here before we purchased)

When it rains water always stays in the top right corner , quite a pool, brother-in-law sealed it all up years ago, so now I'm about to rip it all out , start again and also lay the tiles so they slope toward the path and not towards the door.

been a long while since i bothered to tile anything

The porch is West facing , and fills with leaves and rain all the time.

Wife has not yet chosen tiles, my questions are

Whats the best type of adhesive to use , no-nonsense from screwfix
https://www.screwfix.com/p/no-nonse...kg/429fg#product_additional_details_container

we had a lot of success with thier no-nonsense products, stripper and filler

Grout , again best exterior use .

I will be taking all the panelling out , which is batterned to the wall and replacing
may post a different thread for that

image of porch attached
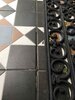
Tiles are 145mm across the top , so probably 150mm with a taper

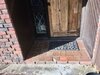
I broke the tile yesterday hoping they may all come up and i could just relay, so now the jobs changed to a complete strip and start again, for the entire thing!!!!!
 

Attachments

  • 1 - 1.jpeg
    1 - 1.jpeg
    111 KB · Views: 340
Last edited:
Sponsored Links
A slope is essential for your little porch to prevent standing water in there. I'd assume the porch is concrete underneath the existing tiles so once they are removed and it's cleaned up make sure you prime using an acrylic tilers primer or SBR. I'd then fix guides each side set at the right gradient and use a straight edge to float a bed of your chosen adhesive onto the base. Let this go off and prime again before tiling. I've not used No nonsense tile adhesive so can't comment on how good it is but I'd recommend using a C2S2 adhesive.
 
thanks for the reply
Once i have taken all the tiles off , I will screed , probably with this
https://www.screwfix.com/p/mapei-ultraplan-3240-self-levelling-compound-25kg/4959f
as used before with son-in-law on house floor and garage floor

we are now thinking of a patterned Porcelain Tile

I only need a small gradient, 1/8th inch in 1 foot
We are about 1m from the door , so a 15mm gradient over that length should be ok ?
I'll look out for the C2S2 adhesive

primer, is this OK, says SBR, or do you recommend a different type
https://www.screwfix.com/p/cementone-sbr-admixture-white-5ltr/91566

Any particular grout type for outside
 
That self levelling compound is very good and the one I always tend to use but obviously this will try to level itself. You'd still have to form a gradient afterwards using your tile adhesive or by adjusting the bed thickness under each tile. Being outside you need a 100% coverage underneath the tiles to help prevent any water getting under and freezing and this is much easier to achieve if you form a nice flat slope prior to tiling. Also by just using the adhesive you are keeping the different layers and potential weak points to a minimum. That's the way I'd go but it's whatever you are comfortable with. SBR is fine to use as a primer. Mapei ultracolour grout is fine to use outdoors and they have plenty of colour choice. Good luck.
 
Sponsored Links
cool thanks
so happy to use just the adhesive only then and skip the screed , as you say keep different material layers down to , and minimise water
sounds like a plan

1) Remove tiles, make good any holes
2) SBR Prime
3) create an adhesive (C2S2) bed with the 15mm gradient
4) SBR Prime
5) then apply adhesive & tiles
 
Perfect, just check you are getting 100% coverage as you begin laying, it is important.
 
all complete , thanks for all the help and support
Now working on the cloakroom project , as the quotes have been really high
image as promised
 

Attachments

  • 1 - 1.jpeg
    1 - 1.jpeg
    77.2 KB · Views: 298
It looks good, bright and welcoming, and pattern matching the glazing cames.
Thing is, just a possibility but you've left a raw unprotected edge, and there's various kinds of protective metal edge trim for just that finish.
 
all the edges had 3 coats of dulux opaque paint and also I sealed with hyppo Pro3 all along the brickwork. so i hope i didnt miss any
whereabouts in case i have
Or do you mean the front of the tiles
We did not know what to do about that edge.
 
A slope is essential for your little porch to prevent standing water in there. I'd assume the porch is concrete underneath the existing tiles so once they are removed and it's cleaned up make sure you prime using an acrylic tilers primer or SBR. I'd then fix guides each side set at the right gradient and use a straight edge to float a bed of your chosen adhesive onto the base. Let this go off and prime again before tiling. I've not used No nonsense tile adhesive so can't comment on how good it is but I'd recommend using a C2S2 adhesive.
not a big fan of no nonsense stuff but did have use for the no nonsense tile adhesive once a good few years back. iirc it had two bags of powder in a tub. it set really fast and hard as flint . freakishly strong . like freakishly strong cement. just saying.
 
i used the Norcros SBR & Norcros Standard Flexible Adhesive after talking direct to the company re the classification C2S2
https://www.wickes.co.uk/Norcros-Standard-Setting-Flexible-Tile-Adhesive-Grey-20kg/p/167671#
A highly polymer fortified flexible grey cement-based adhesive for use on walls & floors in both internal and external locations. It is ideal for use in heavy duty areas such as swimming pools, commercial showers and locations where thermal variation may occur. Setting time is 16 to 24 hours at 20oC.
 
bad news tiles are lifting, noticed in Sept that the grout had cracked, and now today the tiles move!!!!!!
no idea what went wrong
I'll lift in spring and see if i can see anything, meanwhile any ideas
 

Attachments

  • 1 - 1 (3).jpeg
    1 - 1 (3).jpeg
    87.7 KB · Views: 209

DIYnot Local

Staff member

If you need to find a tradesperson to get your job done, please try our local search below, or if you are doing it yourself you can find suppliers local to you.

Select the supplier or trade you require, enter your location to begin your search.


Are you a trade or supplier? You can create your listing free at DIYnot Local

 
Sponsored Links
Back
Top