- Joined
- 25 Jun 2015
- Messages
- 63
- Reaction score
- 0
- Country

Hi,
I'm about to take on a tiling job that will push the limits of my abilities! I would say I'm quite comfortable tiling Bathrooms & Kitchens having done quite a few in the past. However, these steps will certainly test my ability. So was hoping for some advice regarding a few questions I have.
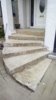
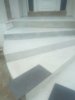
I have attached a picture of the steps in question, which should give you an idea of what I have to do. Although its worth noting that the steps have been relaid with Granite/cement and have a much better finish (Level) than the picture shows.
So, when tiling the nose of the step, I intend for the upstanding tiles to be 'on' the lower tile (a grouting gap will be used too) and the upper step to be on the upstand. As per attached 'Tile doc'. My question is, should I have a 'grout line' between the top of the up-stand and the underside of the upper tile, or should the upper tile sit directly on he up-stand?
Also, as you can see the steps curve, so I will need to cut this curve in the tile. I intend to do this with a Diamond Tip Grinder blade then smooth off the finish with sand paper. However, this cut edge will be left exposed. Do you have any suggestions how you would finish this? Ideally I would colour it to match the colour of the tile (Anthracite Grey).
Many thanks in advance for your help.
I'm about to take on a tiling job that will push the limits of my abilities! I would say I'm quite comfortable tiling Bathrooms & Kitchens having done quite a few in the past. However, these steps will certainly test my ability. So was hoping for some advice regarding a few questions I have.
I have attached a picture of the steps in question, which should give you an idea of what I have to do. Although its worth noting that the steps have been relaid with Granite/cement and have a much better finish (Level) than the picture shows.
So, when tiling the nose of the step, I intend for the upstanding tiles to be 'on' the lower tile (a grouting gap will be used too) and the upper step to be on the upstand. As per attached 'Tile doc'. My question is, should I have a 'grout line' between the top of the up-stand and the underside of the upper tile, or should the upper tile sit directly on he up-stand?
Also, as you can see the steps curve, so I will need to cut this curve in the tile. I intend to do this with a Diamond Tip Grinder blade then smooth off the finish with sand paper. However, this cut edge will be left exposed. Do you have any suggestions how you would finish this? Ideally I would colour it to match the colour of the tile (Anthracite Grey).
Many thanks in advance for your help.