Tone Mapping

Joined
27 Jan 2008
Messages
23,624
Reaction score
2,661
Location
Llanfair Caereinion, Nr Welshpool
Country
United Kingdom
Some bits I understand but other bits I just can't get my head around.

What is my understanding is when you take a picture the RAW image is 16 bit so has more information than can be shown with a 8 bit Jpeg. With a high dynamic range we combine the RAW images resulting in a 32 bit Tiff image which has well over what can be displayed.

So we have to compress this information to within the display limitations of printer or VDU. That's easy understand that bit.

But to use linear tone mapping will produce a picture with a very wishy washy appearance so we use different methods so as to maintain or even in some cases enhance the vibrancy of the picture.

This is where the cloud starts to fall. OK tried making S curves which condenses or expands the central area according to which way around. Also logarithmic as done with Picturenaut. These global methods still produce a rather washed out result. Photomatrix I see uses a local.

From Wikipedia - local (or spatially varying) operators: the parameters of the non-linear function change in each pixel, according to features extracted from the surrounding parameters. In other words, the effect of the algorithm changes in each pixel according to the local features of the image. Those algorithms are more complicated than the global ones, they can show artifacts (e.g. halo effect and ringing), the output can look un-realistic, but they can provide the best performance, since the human vision is mainly sensitive to local contrast.

Now I can't afford Photomatrix so that's out and don't really want that look anyway it does look too unreal.

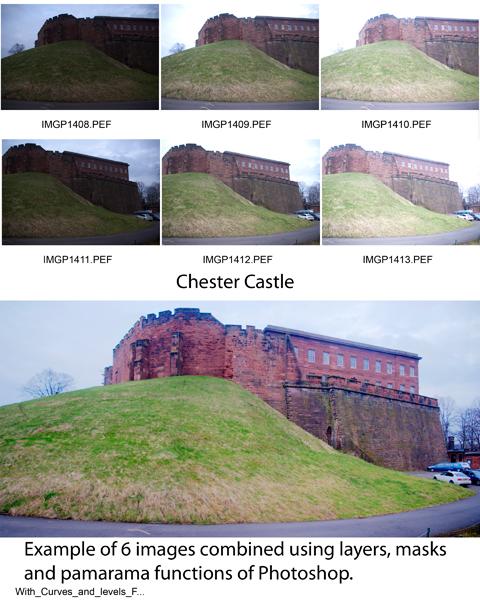
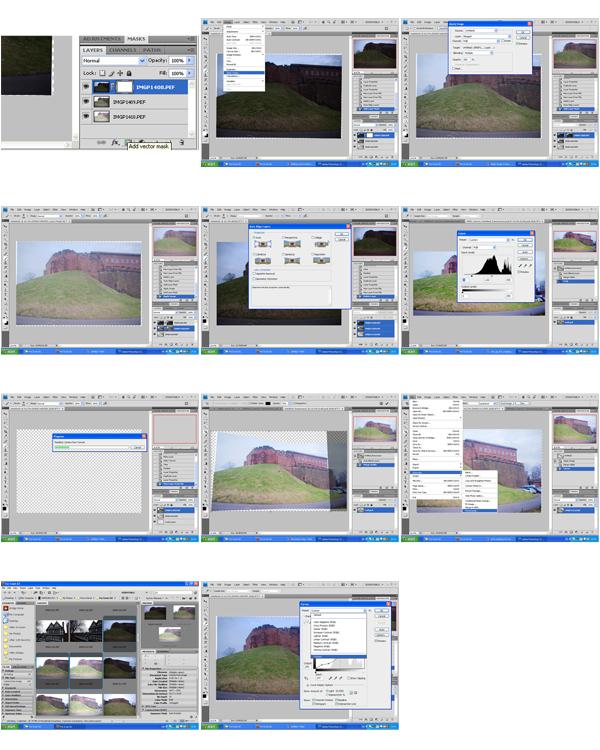
So I have been trying with Photoshop CS4 to use layers, masks, and apply image. But the results have been very mixed. One problem there are so many methods to apply image positive and negative is easy enough but rest becomes again part of that cloud. In the main I have been selecting multiply and to be fair some series of images work well. Others end up useless. Tried swapping order of layers. Which also means swapping + to - but the results are very mixed.

The main problem is to combine one set of 5 images can take up to 10 hours on the PC. So although I will learn in the end it will take a very long time. At the moment if I want to have most likelihood of success I will use Picturenaut to combine and Photoshop CS4 to tone map. But when the layers method works that is by far the better method. So pointers please. How to select which method to use with a set of images, and how to improve the layers and mask method.
 
Sponsored Links
Wouldn't this be better off asked in one of the specialist photography forums?
 
I have found the photo forums seem to be filled with people who have loads of money.

I don't think there is any question Photomatrix is tops as far as HDR goes. So most people who are really into photography will pay the money required to buy the program which will do the job without question.

However my budget is somewhat limited. I was forced to use Photoshop CS4 for my "A" level exam. The college had only CS4 loaded on the classroom apple-macs and in the library CS3 was used with a time limit of 1 hour so to do any work away from classroom one had to have CS4.

In some ways this was a bit upsetting as Picturenaut proved to be in many ways better than CS4 and was free. But RAW 5.7 was so much better than either the bundled software that came with the camera or UFRaw which allows RAW files to be used with Gimp I will admit I am glad I have CS4 loaded.

I think CS4 is really Photoshop 11 and layers and masks goes back to something like Photoshop 2 so has been around for a long time. But I am sure had I paid out for Photomatrix I would not then bother playing with layers and masks to do the same job.

Both Photoshop and Picturenaut use global methods to tone map so to get something which will compete with the local method used by Photomatrix means using layers and masks.

Now by simply using the brush tool with a mask one can select the best bits of three images. Using RAW 5.7 before loading into layers one can reasonably match the three images so the transition is not evident. But to really select best one needs the greys afforded with the use of Apply Image.

However the Apply Image has a host of controls. It starts with Layer where Merged, or one of the layers can be selected. Channel I am sure needs to be RGB and if to tick Invert will depend on the order used with the layers. So far so good. But then we arrive at Blending. The drop down box has 22 options and I have not a clue which to select.

We also have Opacity and Mask. I am sure with loads of time and experiment I could try all the options and in a few months time work out how to select the required function. But it will take months.

So rather than using a photographic forum where likely the members have the money to buy expensive products like Photomatrix and OnOne which although really good are expensive. I hoped asking on this forum I would find the more down to earth guy who still does it the old manual way. Likely learnt his trade when dodge and burn was done in a dark room not with software.

I am not too far away from living in Hope. It's only 3 miles away. But at least one can't die in Hope. Mainly as grave yard is in Caergwrle. Which is why around here we say:- "Live in hope die in Caergwrle." So I am crossing fingers and looking forward to some one who like me does it on the cheap or knows a web site which shows how to do it on the cheap.
 
Sponsored Links
Yes I have used CS4 to produce HDR. Not very good at making the 32 bit image and very slow. Picturenaut is in the main better. But once combined the tone mapping of CS4 works well on a 32 bit Tiff file. In the main using a S curve with local mapping.

However often loading all the images in layers and using masks and apply image works better. But not all the time. And this is the problem there does not seem to be any method that works with all.

Since each method can take 3 hours to complete what I want is to work out how the select best method before I start.

This example shows the problems with alignment
icMcl8z2gkVRw.jpg
note the eyes on white mask. Taken on a tripod using auto bracketing. The same images using layers and masks gave this
ieE0nyB7AXtZs.jpg
result which is to my view far better. But it does not work with all.

This picture taken from inside the dark banqueting room in Ruthin Castle
i3z51eIEtIZuq.jpg
shows the problems capturing the stained glass window, the view through the window and the inside of the room. Top right of the window is clearly over exposed and dark areas are showing grain.
 
Surely this is a metering issue. You can't have both the window and the interior correctly exposed at the same time. They require two different exposure settings.

This goes back to the heart of what was discussed here a month or two ago. Namely the reliance on software to try to fix problems that should be sorted in-camera. Software can't be a substitute for correct camera technique. If there is no information in the image because it is over exposed then no amount of fiddling with a photo package is going to sort it.

Isn't the answer to take several shots correctly exposed for each area and then composite them?

As for the images with the face mask, this looks like the gamma needs adjusting as part of the process.
 
Isn't the answer to take several shots correctly exposed for each area and then composite them?
Correct that's the whole idea of HDR. The picture shown was two images combined at two different exposures. Image IMGP7918.DNG was f4 at 1.5 seconds ISO 100 and IMGP7919 was f4 at 1/45 second ISO 400. Since 10 seconds between the images I will guess I did not originally plan combining them or the time between them would have been shorter.

Because it was at a Wedding I had set camera to store as DNG rather than PEF as I wanted a format which would be future proof. In hind sight that was a mistake as instead of a sidecar Photoshop includes corrections made in the Meta Data kept with the image so it is hard to revert to original. So maybe not the best example. By using RAW to Jpeg converter however I hope it has stripped out all the tweaks done to the original 16 bit images stored by the camera.
kvjTKQCKModry.jpg
k6YryzcXUasbb.jpg
Don't think it really needs to be full size for this discussion.
It is the method of combining and reducing to an 8 bit image I am talking about. These were done before I had looked at using apply image and I had just used layers and masks. But I had first opened up the RAW images (16 bit) and tweaked them at little in Photoshop RAW 5.7. I am sure I could re-do them now and improve on the results but this is the whole point.

I take a series of normally 3 or 5 images because I realise there is a likely problem with the dynamic range. With two EV stops between each image that's up to 8 EV stops more than with a single image so with RAW files one has around 12 EV stops from total black to white I have 20 EV stops from total black to white and I want to reduce this to around 8 EV stops which can be displayed with my printer or VDU.

Simple method is load all images into Picturenaut and let it do the whole job. This will likely produce a wishy washy image with very little punch but will capture whole range. The wishy washy result is due to the type of tone mapping and to give some real punch one needs to use local tone mapping as done with Photomatrix but this is an expensive program.

However there are manual methods of combining images which can work better than both Photomatrix and Picturenaut but this is time consuming so the people who have the money will not bother using layers and masks they will use Photomatrix so asking the pros will not help.

The example shown was combined using layers, masks, and brush tool and carefully selecting best of both. But one can using apply image instead of brush tool which instead of all or nothing will select a degree of transparency between the images. This can as I have found produce some really good results. However it can also produce rubbish.

I can with a lot of time and experiment produce some really good images. But repeat the same method with next group will produce rubbish and I have to start all over again.

I am sure there is a way of looking at a series images and saying for this type of series one needs to use XYZ. But as yet I can't work out this. So I hope there is someone who has worked it out and can pass on some tips so I don't need to re-invent the wheel.

One of the problems is loading RAW images into Photoshop layers auto turns them into 8 bit. So it is likely before loading into layers one needs to open in RAW 5.7 and adjust them to reduce the range at least with the darkest and lightest images of the group. Where loading direct into Picturenaut they are dealt with in 16 bit format.

So any ideas please. Even if it seems silly. I may jog something which will point me in the right direction. As I seem to have stalled.
 
On reflection maybe I did not use good images to show the problem.
This combo image shows the 6 pictures taken and the finished result.
It does work I am not saying it doesn't but there is no punch in the finished result.
What I wanted is the sky but still have details of the stonework of the Castle.
At the time of taking I knew it was not an easy shot so as you can see I took 6 pictures one because of the dynamic range and two because I could not get far enough back with my lens to capture all.
This shows the various stages used to combine the images. Sorry not in order. Bottom left shows how I selected the images in bridge. Centre second down how I aligned images, top left selecting a layer mask, and top right applying the image. This is the area I am struggling with, there are so many options. Bottom centre selecting the curve is another problem area. This is the tone mapping. Which must have been out as second down on right I had to adjust levels again.

As I have said yes I have combined all images and got the full range. Using RAW 5.7 I could improve this a little by tweaking the images to start with. I know the problem lies with tone mapping. But how do I redress this problem?
 

DIYnot Local

Staff member

If you need to find a tradesperson to get your job done, please try our local search below, or if you are doing it yourself you can find suppliers local to you.

Select the supplier or trade you require, enter your location to begin your search.


Are you a trade or supplier? You can create your listing free at DIYnot Local

 
Sponsored Links
Back
Top