Towel Radiator Tail Extension Piece Needed?

Joined
6 Jul 2018
Messages
54
Reaction score
3
Country
United Kingdom
Hello Folks,

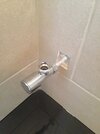
I am in the process of swapping out an old chrome curved towel rail for a new taller one. I will use the existing valves. There is absolutely no vertical play in the pipe (as the microbore pipework is buried in a solid wall) making it difficult to attach the chrome towel radiator to the valves.

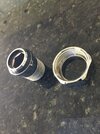
I'm pretty sure that the existing tails are 3/4" x 1/2" union radiator valve tails. I won't be able to get the new towel radiator to attach to the valves as once the radiator is hung, I won't be able lift the valves upward a few millimetres to screw on the union nut as there's no vertical pipe movement.

I noticed that the previous homeowner got round this problem (ingenious or foolish?) by slackening off the screws (just a little) where the four wall clamps attach to the wall. In doing so he was able to wobble all four clamps up and down a few millimeters so he could hang the radiator and drop it onto the valves and tighten up the 3/4" nut.

Is an extension piece the only way to solve the problem of bridging the gap that exists (when the rad is hung) between the valves and the 3/4" nut?

E.g.
https://www.bes.co.uk/adjustable-radiator-extension-piece-to-40mm-7511/
 

Attachments

  • Bathroom (1).JPG
    Bathroom (1).JPG
    390.7 KB · Views: 22
  • Bathroom (2).JPG
    Bathroom (2).JPG
    276 KB · Views: 18
Sponsored Links
Sorry, but I don't know what you mean by that.
 
The brackets that hold the radiator can often be lowered by approximately 5 or 6 millimetres,as they have an elongated slot , through which the screw that holds the bracket to the wall fits. This allows several millimetres of adjustment.
Also ,is the pipework copper or plastic microbore ?
 
Sponsored Links
Apologies for making this post overly wordy.

In a nutshell, that nut in first pic (that will be sticking out the bottom of the rad) has to not hit the valve when I offer the rad to the wall. So there's a gap of a few milli that I can't bridge as there's no play in the pipe. How to get the nut screwed onto the valve...?
 
The pipework is copper microbore 10mm.

The amount of play in the pipe isn't enough to attach the nuts to the valves. No wonder the previous homeowner ended up with all four wall clamps at a slight angle below the horizontal so he could drop the rad onto the valves and tighten the nuts.

I came up with an idea while trying to get to sleep last night - as you do. Normally, the rad is first attached to the wall with the tails and valves fitted before it's piped up.

My case is in reverse. Pipework is already installed with valves attached (admittedly with a tiny amount of vertical play in the pipe, but not nearly enough to attach the valves to the rad). All I need to do is:

1. Support the valves with a toolbox or whatever so that I can sit the rad on the valves and do up the nuts. I don't want the microbore pipework taking the weight of the rad even though the rad is empty of water at this point.
2. Mark the walls with circles around the four wall clamps that are already attached to the rad. At this point the rad is attached to the valves but not to the wall.
3. Unscrew the nuts and set rad aside. Drill and plug the screw holes.
4. Screw the four chrome/plastic cylinders to the wall and insert the four wall clamps (that attach with a grub screw) into the cylinders. Leave the screws loose so the chrome/plastic cylinders can move up and down due to the slotted hole.
5. Attach the radiator to the valves. Again, as in step 1, make sure the weight of the rad is supported.
6. Tighten the screws on the four chrome/plastic cylinders. Attache front part of the four wall clamps and fit decorative caps.

Sounds doable!
 
@terryplumb your comment of "The brackets that hold the radiator can often be lowered by approximately 5 or 6 millimetres" pushed me in the right direction. If I can't move the pipework upwards just a little to attach the nuts to the valves (I can't) then I have to lower the rad onto the valves. 3 choice as far as I can see:

1. Method I outlined in my previous post.
2. extension/telescopic tail pieces.
3. Leave the wall clamps slightly loose so they can wobble up and down as the previous homeowner did (my least favourite option).

If the mountain (pipes) will not come to (rad) Mohammed, Mohammed will go to the mountain! ;)
 
I can't see why you need tail extensions ,that would require you to put the mounting brackets ( I assume there are 4) in completely new ,higher, positions wouldn't it ?
If you assemble the brackets onto the rad and position the rad onto the valves, mark the wall with bracket positions,then remove them from rad and anchor them to the wall, I don't see what problem you envisage connecting the rad to the valves .
 
I find the reason for the initial post a bit obscure!
If there's a gap between the radiator tails and the valves when the towel rail is secured to the wall with its brackets, then obviously the answer is to lower the brackets - either by making use of their elongated screw holes or, if that is not sufficient, fixing the brackets to the wall a bit lower down.
In fact the OP is, in a subsequent post, suggesting just this.
So why was there a need for the initial post asking about tail extensions?
 
The initial post is overly wordy and confusing, hence my subsequent post (#5). It appears that lowering the brackets is doable after the rad is attached to the valves which is what I'll be doing. My #5 post explains the problem as I understand it. I'm not a plumber so I may have overlooked something. :-O

I've already linked to a BES extension piece. I was looking at other options as some folks have had problems with these extensions leaking - though perhaps due to alignment issues rather than the fitting itself!
 
I can't see why you need tail extensions ,that would require you to put the mounting brackets ( I assume there are 4) in completely new ,higher, positions wouldn't it ?
If you assemble the brackets onto the rad and position the rad onto the valves, mark the wall with bracket positions,then remove them from rad and anchor them to the wall, I don't see what problem you envisage connecting the rad to the valves .
I agree that there's no need for the extension tails. I'll be drilling new holes as I've re-tiled the bathroom. At the point after I've marked the bracket positions and undone the nuts to remove the rad, I will have to lift the rad up and away from the wall. After drilling and inserting plugs and fixing the brackets, offering up the rad to the wall will result in the top of the valve hitting the nuts. This is the only part of the job that's a thorn in my side. It's just bad luck for me as a DIYer that I've encountered a solid wall with barely a mm vertical movement in the pipe - otherwise this'd be a doddle.

I've done this job a couple of times previously (plasterboard walls with plenty of play in the pipes) and seen likely most of the YouTube videos that show how to fit a towel rad to a wall (Plumber Parts, Ultimate Handyman etc). There's always play in the pipes in those videos. I have to bring the rad down onto the valves as I can't push the pipes upwards to push the valves onto the rad. I refer back to my post #8.

I can believe it's a bit infuriating when experienced DIYer's and plumbers read these types of posts - a bit anal and paralysis by anal-ysis! I may be making a problem in my head that doesn't exist. And yet, I'm sure the last homeowner had this problem and used method 3. in post #8 to solve.
 
You do realise that the captive nut can be moved upwards,away from the valve ,so the mating surfaces of the valve and tail come into contact with each other before the nut is lowered onto the thread of the valve ?
 
Wow! And elegantly expressed too. I am extremely grateful to you for posting that. I may have made a mountain out of a molehill. I'll hold off buying extension tails for now. Thanks again terryplumb! Sounds like you are an actual or retired plumber. I feel your advice has been golden. I will report back next week when I have the radiator on the wall. (y)
 

DIYnot Local

Staff member

If you need to find a tradesperson to get your job done, please try our local search below, or if you are doing it yourself you can find suppliers local to you.

Select the supplier or trade you require, enter your location to begin your search.


Are you a trade or supplier? You can create your listing free at DIYnot Local

 
Sponsored Links
Back
Top