Unexpected support posts under winders

Joined
18 Jun 2016
Messages
10
Reaction score
0
Country
United Kingdom
Evening all,

I'm in the process of opening up the existing cupboard space underneath the stairs to unlock much needed storage space.

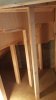
After removing the plasterboard I was faced with something I didn't expect - 3 posts underneath the winders (image attached).

I had expected the stairs to be supported by the stringers only. What are my options?

My current thinking is, if the winders need extra support I can frame it out with 2 studs for each winder (one either end) rather than the current set up with one in the middle. That would give me more usable space. But still curious why this was done in the first place?
 

Attachments

  • Winders support.jpg
    Winders support.jpg
    59 KB · Views: 134
Sponsored Links
heeelllooo and welcome boscho :D:D:D


normally the treads are grooved and wedged into the strings/newel post
i wonder if they are bodged and need extra support
i would affix a bit off 2x2" 1/4 tread away from the back edge wide end with a 4 or 5" long bit of wood glued and screw underneath to support at each end
 
Last edited:
Cheers big-all

Hmm yeah I'm thinking it's a bodge :rolleyes: Fixed and wedged at the stringer end but 2 of the 3 treads aren't resting on the newel post.
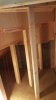
I was thinking of doing something like what the red lines show in the attached pic. Is that what you're describing?
 

Attachments

  • Winders support modified.jpg
    Winders support modified.jpg
    63 KB · Views: 150
yes that would work i was just trying to minimize the extra timber to within the string footprint as the string timbers will be horizontal that would allow you to re-board the under stairs with only the supporting timbers on the newel being vertical needing cut round and showing

actually the timber thats there looks like 3x2" so you could recycle that with some to spare
 
Last edited:
Sponsored Links
I think I'm with you. Brace across the length of the tread and affix additional supports to existing newel and stringer?
 
if that was me and the timber is around 60 to 76mm i would rip it down in half if its 60mm[2x28mm] or 1/3 on 76 [3x23mm]providing its decent quality as a 15mm bearing surface would be enough to support each end [20mm surface and a 5mm short timber ]
i would also angle the bottom cut to 45% for 2/3 depth to avoid a sharp edge
 
I think I'm with you. Brace across the length of the tread and affix additional supports to existing newel and stringer?
if the tread is wedge into the string then you only need to support the additional brace
so brace then 44-51mm below[timber thickness]a horizontal baton to support at the string end
And the same at newel? or drop new verticals to the floor?
 
heeelllooo and welcome boscho :D:D:D


normally the treads are grooved and wedged into the strings/newel post
i wonder if they are bodged and need extra support
Actually B-A in quite a few Victorian examples I've seen the winder at the bottom.is bodged with nails rather than housed so in those cases I'd think twice before removing anything. In this case, however, the stairs look to be modern and up against a modern block work wall. The "sticks" don't appear to be well fixed to the stairs (in fact I can't see any fixings) so I suspect that the chippie has simply left the temporary supports - required when assembling the winder in situ - and just forgotten to remove them. Providing the strings are adequately secured they should be removeable
 
obviously at the newel the support will be at an angle on the first and second step in so the brace would be angled at the newel end to match the supporting face
if the tread is half on one face and half on the other then you may be ok with a timber support on one face extended forward or back off the newel edge to support the brace or you may need a support off 2 faces
to be honest you have all the information to tackle the job in a workman like fashion
providing 90% off the brace width is supported across the width and at least 15mm at each end it will be fine
 
heeelllooo and welcome boscho :D:D:D


normally the treads are grooved and wedged into the strings/newel post
i wonder if they are bodged and need extra support
Actually B-A in quite a few Victorian examples I've seen the winder at the bottom.is bodged with nails rather than housed so in those cases I'd think twice before removing anything. In this case, however, the stairs look to be modern and up against a modern block work wall. The "sticks" don't appear to be well fixed to the stairs (in fact I can't see any fixings) so I suspect that the chippie has simply left the temporary supports - required when assembling the winder in situ - and just forgotten to remove them. Providing the strings are adequately secured they should be removeable

your more likely to be right than me :D as i dont do may [very few ] installed repairs lol
 
Cheers big-all. I like the approach of taking the loads back to the string and newel rather than more posts to the concrete.

heeelllooo and welcome boscho :D:D:D


normally the treads are grooved and wedged into the strings/newel post
i wonder if they are bodged and need extra support
Actually B-A in quite a few Victorian examples I've seen the winder at the bottom.is bodged with nails rather than housed so in those cases I'd think twice before removing anything. In this case, however, the stairs look to be modern and up against a modern block work wall. The "sticks" don't appear to be well fixed to the stairs (in fact I can't see any fixings) so I suspect that the chippie has simply left the temporary supports - required when assembling the winder in situ - and just forgotten to remove them. Providing the strings are adequately secured they should be removeable

Yup - c20 years old. I wondered if it might have been temporary and left behind. The baton is glued to the tread with a nail coming through the baton in to the "stick".
 
The winder section often comes either as a kit of parts or as a part-assembled structure with additional pieces to be installed. You generally assemble the winder then set-out its' position on the floor. The straight (upper) string is then notched-out and lifted into position hooked-over the trimmer at the top of the stair void. The bottom of this section is supported on a couple of temporary props whilst the winder section is mated to it, joints glues (and often pinned), as required. In order to carry the weight of the carpenter whilst he drills and fixes the wall-side strings to the masonry it is often necessary to use temporary props beneath the winder section as well. These temporary props are rarely fixed at all, and if they are it is using one or two screws or nails only. At the end of the installation, after the glue in the M&T joints has set and the hammer fixings have been put into the walls the temporary props should be removed. Maybe the chippy on this job forgot, or was called away to another job never to return. Who knows?
 
Thanks for that Job. I understood how it was supposed to work when finished but didn't have that knowledge on how it would be constructed originally. Very interesting. That makes a lot of sense for them to be temporary props. Having taken the first two out this afternoon I can confirm they are just held in with a couple of nails.

I've replaced the two I removed with a brace running from stringer to newel. TBH having had a good look (and from what you guys have said), the braces aren't really necessary but I had decided to fit them so cracked on. There was a bit of movement at the front of the treads but that appeared to be from the glue blocks coming loose. Added a few screws and problem solved :)
 

DIYnot Local

Staff member

If you need to find a tradesperson to get your job done, please try our local search below, or if you are doing it yourself you can find suppliers local to you.

Select the supplier or trade you require, enter your location to begin your search.


Are you a trade or supplier? You can create your listing free at DIYnot Local

 
Sponsored Links
Back
Top