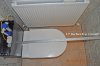
New toilet pan with a cistern-concealing 'cupboard' recently installed. Due to my careless mistake the 'cupboard' when it arrived was over a foot deep and in the restricted space available this only left a few inches between the front end of the seat and the wall. My bad. I put up with the installation for a few months, but with no leg-room it became clear that this was a no-no.
I decided to temporarily remove the 'cupboard' releasing <13 inches of space! That's 8 usable inches after allowing for the slim 5 inch cistern. Fine. I can cut down the 'cupboard' and re-install it, once the toilet pan has been shifted back <8 inches or so.
Just remove the pan securing screws and shove the whole thing along, then re-secure, yes?
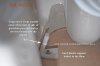
Problem is, the toilet pan is not screwed vertically down into the floor.
There is a hole each side thru the porcelain for a long self-tapper screw which locates in an angled hard plastic bracket, which has been pre-bolted to the floor.
I can remove the screws and shove the pan along a small distance, but soon the brackets prevent any further movement.
I'd have liked to lift away the pan, unbolt the brackets and reposition them, but the guy who did the installation had to use about three tubes of silicone in order to get a good seal between the corrugated waste tube and the vertical waste exit. And I am reluctant to disturb his good work.
The brackets being the problem, I'd thought I could easily tilt the pan on each side and just anglegrind the bolt fixings off. The pan would then slide into the new position - as long as the concertina waste pipe is happy to be squashed up that much.
But how to screw the pan to the floor. I've tried long 120mm screws inserted thru the side holes but they do not droop enough to get any purchase on the timber ply flooring; the angle of the holes in the porcelain is not enough, set as it is at around 90degrees.
If you will forgive this long post - I would be very grateful for another head to think this through.
I decided to temporarily remove the 'cupboard' releasing <13 inches of space! That's 8 usable inches after allowing for the slim 5 inch cistern. Fine. I can cut down the 'cupboard' and re-install it, once the toilet pan has been shifted back <8 inches or so.
Just remove the pan securing screws and shove the whole thing along, then re-secure, yes?
Problem is, the toilet pan is not screwed vertically down into the floor.
There is a hole each side thru the porcelain for a long self-tapper screw which locates in an angled hard plastic bracket, which has been pre-bolted to the floor.
I can remove the screws and shove the pan along a small distance, but soon the brackets prevent any further movement.
I'd have liked to lift away the pan, unbolt the brackets and reposition them, but the guy who did the installation had to use about three tubes of silicone in order to get a good seal between the corrugated waste tube and the vertical waste exit. And I am reluctant to disturb his good work.
The brackets being the problem, I'd thought I could easily tilt the pan on each side and just anglegrind the bolt fixings off. The pan would then slide into the new position - as long as the concertina waste pipe is happy to be squashed up that much.
But how to screw the pan to the floor. I've tried long 120mm screws inserted thru the side holes but they do not droop enough to get any purchase on the timber ply flooring; the angle of the holes in the porcelain is not enough, set as it is at around 90degrees.
If you will forgive this long post - I would be very grateful for another head to think this through.