Weird Hotpoint WD420 washer

Joined
30 Dec 2018
Messages
19,145
Reaction score
3,215
Location
Up North
Country
United Kingdom
Had this machine an awful long time. A few electronic issues in that time, but this is the first mechanical problem....

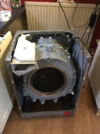
Filled it up with a pile of washing, it filled with water, then it attempted to rotate the drum but couldn't, so went to fault. Took the washing out, tried to spin the drum round and it was quite tight, but movable. Removed the drive belt, worked it back and forth a few times, there was a light tinkle noise, but eventually the drag on the drum- what ever it was cleared. Drum bearing seemed OK, no noise, no play, so I put it all back together and ran a fast spin, completely empty which worked fine.

Now to try it with another wash. [EDIT] No problem at all, it did that wash and a second one after it.

How do the manufacturers get away with leaving such razor sharp edges on these machine panels? Blood every where.
 
Last edited:
Sponsored Links
Sounds like you might have had some small metal object in one of your pockets that has got between inner & outer drum then freed off & possibly dropped into the sump. Might be worth checking drain pump/filter for a foreign object.
Can't help with sharp edges, suspect they presume there will not be diy repairers.

It didn't feel like something jamming it, rather it felt as if a brake was partially applied - but there is no brake.

I think, despite the bearings seeming to be quiet, that it might well be the bearings, so I've done a bit of research on fitting replacements. It's quite a job made more difficult by where it is and lack of workspace in the utility room. Pulling out from where it resides, will mean climbing over it to access the other side.

Looking at the design, it seems the bearings fail not through wear and tear, but due to water ingress past a failed bearing seal. The drum shaft rusts whether it is used a lot, or not - which then wrecks the seal, followed by the bearing.

This seems to be the idea -
Though not as obviously noisy as that one.
 
Only ever tried to replace drum bearings once many years ago, vowed never to try it again. You must be fitter than me Harry if you are willing to attempt it.
 
Sponsored Links
Only ever tried to replace drum bearings once many years ago, vowed never to try it again. You must be fitter than me Harry if you are willing to attempt it.

Maybe not fitter, definitely I am more stubborn/less willing to be beaten by a simple machine :)
 
After a bit of confusion over the model number suffix and trying to find a correct bearing seal kit, I found the suffix letter referred only to the case colour of the washer. There were two bearing options 30 and 35mm for the same machine range.

Ordered bearing was delivered this morning, so I made a start at stripping it down. I was stumped by the door to drum seal fastening method, for a good hour, struggling to work out how to release the steel band, but managed it eventually. Just the motor system to work out how to disconnect, then release the drum suspension and out the inner and outer drum should come as one, to be split.

I found a few items in pump filter - three unused tiewraps, a finger plaster and a bit of soggy cardboard. Whilst disconnecting the dryer duct, I found the spade connectors where they connected onto the heater had burnt out. I don't know how long it's been not heating up, but the dryer part is no longer used anyway - odd that no one bothered to tell me it wasn't in fact working.

Onwards and upwards..
 
I've now stopped for the day, having managed to get the drum, plus tub (they call the outer the tub) out and split the two halves of the tub apart and got the drum pulley off. Tomorrows first task is to find a way to support half of the tub with the drum still attached, so I can hammer the drum shaft out of the bearing.

There is more limescale collected around the outside of the drum and the heater than I would have expected, but it scrapes off quite easily. I'll scrape the worst off, then assuming I get this all back together successfully, I'll run it on a 'wash and hold', with some citric acid to dissolve away the limescale. Gunge, as in the TV ad, there was absolutely none anywhere to be found.

hope I can remember how to get it all back together :)

1664989657064.png
 

Attachments

  • 1664989615594.png
    1664989615594.png
    1.1 MB · Views: 42
Last edited:
" Tomorrows first task is to find a way to support half of the tub with the drum still attached, so I can hammer the drum shaft out of the bearing."

That was the hard part, then removing the bearings. As I remember I used several concrete blocks & some bits of 3 x 2. I would suggest you give everything (shaft & bearings ) a good soaking with wd40 or similar overnight before getting your hammer out. Good luck.
 
Years ago, we went through several Hotpoint washers. I always ended up replacing brushes and bearings. From memory, it didn’t need a strip down like the OP is doing. I do remember though that on some models, I had the option of replacing the 'spider' that contained the bearing. A three pronged affair that bolted onto the drum.
 
That was the hard part, then removing the bearings. As I remember I used several concrete blocks & some bits of 3 x 2. I would suggest you give everything (shaft & bearings ) a good soaking with wd40 or similar overnight before getting your hammer out. Good luck.

Thanks! I was thinking about it last night and remembered I have some short bits of railway sleepers tucked away in my garage which might work for supporting it. I don't think soaking it will help much, if at all - there is no way for a lubricant to get through to the inner bearing, past the outer bearing. From the drum side there is a water seal, a small drain hole to let water out that gets past that seal, then the inner bearing, then the outer one just before the pulley. The outer bearing is a sealed one, visually in as new condition and a tight fit on the shaft. It's the inner bearing which eventually suffers from water leaking past the seal, then through to the inner bearing.
 
I was thinking it might help getting the bearings out of the housing & let the shaft pass through them more easily .
 
New bearings in, and drum, plus tub all reassembled - just taking a break, before the next stage.

I struggled for an hour, trying to knock the drub shaft out of the half tub. It sat perfectly on 3 short bits of railway sleeper, I then managed to knock it through around 6mm, with a scrap bolt in the shaft end, but it would move no further. Drum was also stiff in bearings, so I rocked it back and forth to free it, after which the shaft knocked out quite easily - I would guess the bearing was locked up solid, and the shaft turned in the inner and freed itself.

Shaft was a bit rusty, around the seal and the first bearing and both were completely shot, as I hoped was the case - I would want to get this far for no purpose. The drum had a slight rumble, but I still wasn't certain. No rumble at all now and the difference is obvious. There was no weep hole, to allow drainage for any water that managed to get past the seal.

The outer bearing, nearest the pulley was like new. Seal and both bearings knocked out fairly easily. I cleaned the shaft up as best I could, along with the alloy outer sleeve for the bearings and seal, then blathered both with waterproof grease, British Railways points grease in fact.

Next stage is to try to reassemble it all, and struggle to remember where all the bits go :( I think it will turn into a three day job. I'm taking my time, looking for and fixing problems as I go, I don't want to be doing this job again too soon, despite quite enjoying it. In the process I found another repair I did on it, which I don't even remember having done - I obviously had to replace the mains power filter at some point.
 
Well done Harry, I would have thought there would be u-tube vids if you need a reminder of how to rebuild it.
 
Well done Harry, I would have thought there would be u-tube vids if you need a reminder of how to rebuild it.

There is, but they are just similar to my machine, not the same. I took a few photos and a few notes, I just hope that is enough.
 
This mornings brief action was to finish off the reassembly, and do a quick test. Finishing the reassembly went quick enough, but the test didn't go well. No leaks found, and most things seem to be working as you would expect, but it acts weird and is flashing up fault codes. No time for much investigation, I had other things needing my attention, but I have an idea that it might be the wash temperature sensor. Two thin wires, with an IDC plug on the end, from which the plug came adrift whilst manoeuvring the casing around. I did my best to botch the wires back onto the plug, but....

In the meantime, I have managed to download a full manufacturers repair manual for the washer, which will help a lot. The fault codes suggest 'heater relay stuck due to either of pressure switch; or heater and modules. I guess the later includes what may be the thermistor, which senses the water temperature, mounted on the heater.

I also managed with the help of the manual, to work out it was manufactured in April 2006, so we much have bought it a few weeks after that date. It is older than I thought, 16 years old and still doing battle.
 

DIYnot Local

Staff member

If you need to find a tradesperson to get your job done, please try our local search below, or if you are doing it yourself you can find suppliers local to you.

Select the supplier or trade you require, enter your location to begin your search.


Are you a trade or supplier? You can create your listing free at DIYnot Local

 
Sponsored Links
Back
Top