Where to start wallpapering

Joined
20 May 2018
Messages
52
Reaction score
0
Country
United Kingdom
hello people ive been spending ages stripping and filling and sanding spare bedroom..this weekend im gonna start hanging 1400 plain paper..
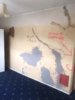
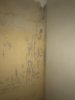
First time wallpapering,from the photo,where would i start with first piece,on the corner marked by the bedroom door and wrap around the corner 12”..
Im in birmingham uk ..im a total rookie ill admit it,i hope it dont turn into a laurel and hardy job..
 

Attachments

  • 0D68EF41-E732-40B5-91BB-B38E0116A465.jpeg
    0D68EF41-E732-40B5-91BB-B38E0116A465.jpeg
    191.5 KB · Views: 447
Sponsored Links
As pointed out, if you’re going to wallpaper over the lining paper, it’s traditional to hang the lining paper horizontally and then wallpaper vertically.

If you’re painting the lining paper, then hang vertically and butt joint the seams. I hung and painted lining paper recently and used 1400 grade. It’s a bit stiffer than paper but not as stiff as card. Make sure you get enough paste on and paste the edges adequately. I used ready mixed paste but needed two tubs (the label said one would be enough for my coverage). Cut at inside corners because unless the corner is at 90 degrees and perfectly plumb, the bit of paper that goes on to the next wall won’t be perfectly horizontal.

I used a decorating blade as well as a brush to help press the paper to the wall and squeeze out any bubbles.

It will be worth sizing the walls too. I used diluted wallpaper paste, brushed it on the night before (it is very sloppy) and it had dried by the time I came to paper the following morning.

Take your time. Make sure you adequately soak the paper (ie cut a length, apply glue, gently concertina fold and let it rest for 10 mins) before using it. Once I got the hang of things, I was soaking three drops at a time.

The only bit I was crap at was cutting the paper perfectly at the coving and skirting edges. I often resorted to using wallpaper scissors because a blade (even a fresh one) would snag and tear the paper.
 
I’ve never had much luck with a blade so I always use scissors too. When I do internal corners though, I cut the paper approximately 1/4” past the corner and then the next piece I ensure it is hung straight and cut exactly into the corner, overlapping the 1/4”. I also use overlap paste on that corner too. I always take my time and make sure the edges are perfect if it is being painted - it can sometimes shrink when it dries so don’t try to do too many strips at first. With all wallpapering I normally start opposite the door and work towards the door so all the last minute fiddly bits are out of sight around the door area. I find wallpapering very therapeutic- it’s just the stripping off and preparation I hate so I get the wife on that while I’m out at work!
 
Sponsored Links
Ok thanks people.iv sized the wall with pva and water and am planning on hanging the 1400 vertically and i got a roller and roll the seams..
See what happens i soppose,ill use scissors i think as no new blade..
Thanks
 
Quick question before i start..first piece from door,could i go round the corner first piece as in photo,just asking to avoid a fiasco thanks people.
 

Attachments

  • D8837F6C-1E24-47F2-81FA-62F0AF22E978.jpeg
    D8837F6C-1E24-47F2-81FA-62F0AF22E978.jpeg
    138.6 KB · Views: 283
You could do but measure up to make sure you don’t end up with a tapering half inch strip at the other end of the wall!
 
Personally I’d make sure the left edge of the paper is perfectly vertical (draw a line with a spirit level or plumb level and pencil if you need to) and make sure the drop is at least 2” longer than you need it to be so it allows for skewed corners. Start on the long wall and then wrap it around the corner towards the door.
 
Im not doing that bad thanks for the advice,im heading for an internal corner,oviousley square room,do i cut into the corner and re plumb line the next wall,or paper round the corner and just keep going ..
Thanks for the help..
 

Attachments

  • 5E510629-AC3A-43BB-BB99-46B6A8F453C2.jpeg
    5E510629-AC3A-43BB-BB99-46B6A8F453C2.jpeg
    122.5 KB · Views: 346
  • 7F22BF3C-B6C4-4B27-A14C-C88764F77F3A.jpeg
    7F22BF3C-B6C4-4B27-A14C-C88764F77F3A.jpeg
    153.6 KB · Views: 294
So ill have to start tomorrow by cutting this thin strip into the corner..and thanks for the advice peeps..
 

Attachments

  • FFEB605E-FB9A-40A9-A90A-1F5A3A6E0B0F.jpeg
    FFEB605E-FB9A-40A9-A90A-1F5A3A6E0B0F.jpeg
    97.4 KB · Views: 288
Ive navigated the corner,this corner is a bit rough could i use decorators caulk to round it off anyone..cos its not perfect..
 

Attachments

  • 5E9978BD-EE2A-4D57-9B49-D71BCE59DFD1.jpeg
    5E9978BD-EE2A-4D57-9B49-D71BCE59DFD1.jpeg
    65 KB · Views: 351
  • 41F3CB88-B58A-4C77-ACE0-AED879E8E4C5.jpeg
    41F3CB88-B58A-4C77-ACE0-AED879E8E4C5.jpeg
    114 KB · Views: 332
I told ya - you should have gone round the corner by a quarter of an inch, plumbed for the next strip and cut that into the corner. And use scissors if you can, not gardening shears! :LOL:
 
You sized the wall with PVA :eek: 
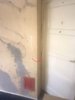
Anyway, you don't *have* to hang the lining paper horizontally, though that is the prescribed correct way. What you need to avoid is lining paper and wallpaper seams lining up. So you can start with a half width sheet on the wall adjacent to the window and paper away from the window. I do it in a clockwise manner, but I'm left handed, so you may want to go clockwise.
 

DIYnot Local

Staff member

If you need to find a tradesperson to get your job done, please try our local search below, or if you are doing it yourself you can find suppliers local to you.

Select the supplier or trade you require, enter your location to begin your search.


Are you a trade or supplier? You can create your listing free at DIYnot Local

 
Sponsored Links
Back
Top