Which screws

Oh.. I thought the batons were going to be inside the cabinets.

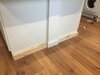
With regards to your second image. I am recommending that you pick up a new end panel and cut it so that it spans the width of your two brown lines (rad brackets). Lets call that part A. That end panel would be then screwed to the ends of the two units, however, because the wall juts out by 4 cm, your newly cut panel will be 4 cm away from the cabinets and require you to pack them out using off cuts from the rest of your newly purchased end panel. Two strips of end panel either side of the wall (parts B) plus 6mm packing pieces behind the cut to size part.

View attachment 218263

The advantage of the above is that you will then be able to screw the A/B combo from the inside of the cabinets (no visible screws when looking at A) and you will be able to screw through part A into the end of the wall (unfortunately two visible screws). You will now be distributing the weight/load of the rad throughout the cabinets and the wall.

When looked at from the side, yes you will see the A/B panel but it will be the same colour as the end of the units.

I hope that makes more sense.
Ah yes I get you now, that sounds like a plan indeed.

I did find these ugly things which might be easier https://m.ebay.co.uk/itm/Adjustable...e&pageci=452ba79b-df72-4588-870a-224d943416e9

I must admit i’m not too fussed for looks as heat is all I require the most
 
Links in this post may contain affiliate links for which DIYnot may be compensated.
Sponsored Links

They look like the path of least resistance. They will take the majority of the load and your timber batons will prevent it from tilting. The only thing that worries me is that the weakest part of the radiator (the convection fins) are taking the load rather than the strongest part of the rad. Someone in the plumbing section might be able to advise you further.

I did find these though.

https://www.wolseley.co.uk/product/stelrad-floor-standing-bracket-plus-hardware-pack-500mm/

They are floor brackets that use the mounting points on the back of the rad. If you are worried about someone yanking the rad forward, you could drill through them and into the cabinets or make some kind of straps.
 
Links in this post may contain affiliate links for which DIYnot may be compensated.
Well I went with somewhat my original plan but had a batten at the bottom too.

It sure was nervy but seems solid as a rock thus far, going to gloss the wood tomorrow then wait 15 years for the gloss to dry

Sort out the plumbing and slowly fill, go back to the flexi’s and turn the water isolation cables back off then give it some hard tugs and if still good, then job done hopefully
 

Attachments

  • 87800F7B-13D9-4982-B9DF-D4FBE9D9C72D.jpeg
    87800F7B-13D9-4982-B9DF-D4FBE9D9C72D.jpeg
    239.9 KB · Views: 49
  • 27EAD5CD-D54D-4706-A1BC-6DB17B24D6DC.jpeg
    27EAD5CD-D54D-4706-A1BC-6DB17B24D6DC.jpeg
    209.3 KB · Views: 49
  • F2C7EF85-1756-448A-A3A4-ED2A04316BA6.jpeg
    F2C7EF85-1756-448A-A3A4-ED2A04316BA6.jpeg
    257.7 KB · Views: 58
  • 55DC93D1-3ADB-4E54-9CCB-C816834889D2.jpeg
    55DC93D1-3ADB-4E54-9CCB-C816834889D2.jpeg
    248.8 KB · Views: 55
Incidentally, have you done anything to protect the worktop from heat?
 
Sponsored Links
Incidentally, have you done anything to protect the worktop from heat?
Not yet, when the radiator is off tomorrow for painting the wood, I was going to use radiator reflective foil, which will be behind the radiator and underside of the worktop which is quartz or granite (never been able to find out if it’s quartz or granite).

Hopefully that’ll be suitable as I can use what’s left for my downstairs toilet radiator as behind that is the garage and heat disappears fairly quickly in there
 

DIYnot Local

Staff member

If you need to find a tradesperson to get your job done, please try our local search below, or if you are doing it yourself you can find suppliers local to you.

Select the supplier or trade you require, enter your location to begin your search.


Are you a trade or supplier? You can create your listing free at DIYnot Local

 
Back
Top